By Lorna Rose
Lorna’s art explores mark-making and lines, made by pen and stitch. As part of the DrawAble series of resources for learning at home or school, this resource inspires children and teenagers to create drawings of indoor or outdoor environments, using straight lines.
Notes for Teachers
What is the aim of this exercise?
This resource allows children and teenagers to develop their observational drawing and mark-making skills.
As the children are encouraged to only use straight lines, it may promote a different way of looking and seeing objects and environments. The addition of mark-making, collage and/or stitching allows children to expand and personalise their drawings.
What age can this exercise be used with?
This resource is easily adaptable and can be used with children aged 6-13 and beyond.
How long does this exercise take?
This exercise will take between 30 minutes and 2 hours. The length of this activity will depend on the complexity of children’s chosen environment, the amount of detail in the drawings, and whether any additional materials are used.
How do I measure success?
Encourage children to look closely at their drawings, and talk about the challenges they encountered
How engaged were the children by the activity? Did they enjoy the restriction of making a drawing using only straight lines?
How did using a straight edge to build the drawing feel different from other drawings they have made?
What difference did adding the stitch marks make to their drawings – did they like the additional textures and colour the materials contributed to the drawing?
Were they able to identify the dark and light values from their environment and build up areas of tone in their drawings using a variety of shading techniques ? How confident did they feel about using these drawing methods?
More able children may want to experiment with different mark-making in their drawings (or use their previous knowledge of mark-making) and including more experimental hand stitching, increasing the complexity of their drawings.
Demonstrating different mark-making techniques (or practising them before starting this activity) may be beneficial for less confident students. If children are adding stitching to their drawings, they may want to punch holes in the paper before adding stitches.
Drawings could be made with other media to explore colour using coloured pencils, ink, watercolour or thinned acrylic paint (so that the surface is not too thick to sew through) and introducing coloured threads and papers.
To extend the activity, children could make drawings on a larger scale (A1 or rolls of paper) either on their own or collaboratively and experience the challenges of scaling up marks and materials (use tape, wool, or thicker threads and found collage papers or papers previously decorated with mark making)
Which artists might we look at?
Sue Stone creates stitched, figurative compositions.
Rosie James draws with stitch on the sewing machine.
Izziyana Suhaimi combines drawing on paper with hand stitching
Jason Kriegler explores paper, sumi ink and hand embroidery
You may also want to look at Lorna Rose’s website.
Introduction
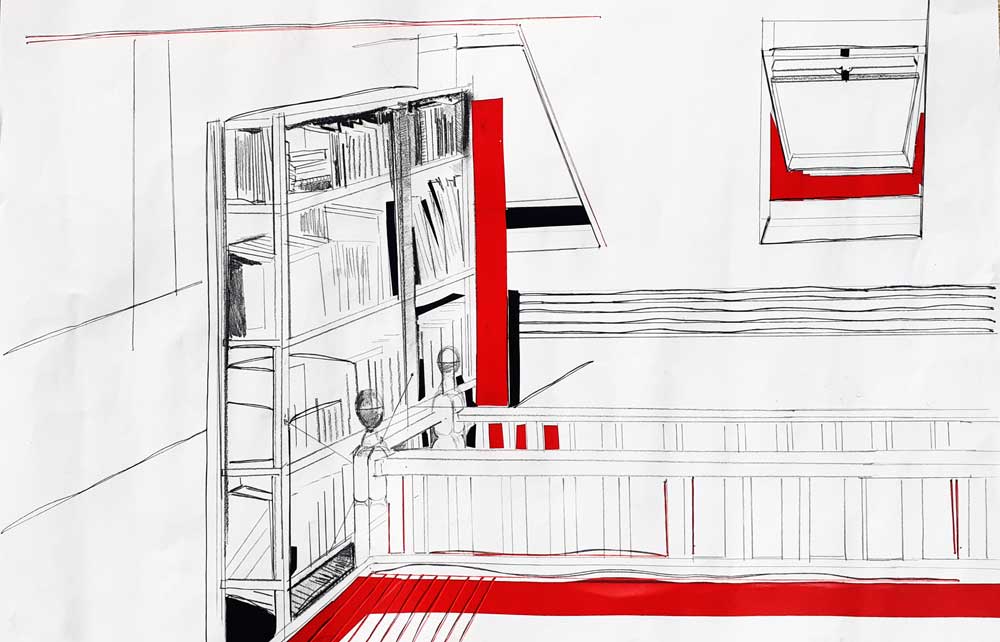
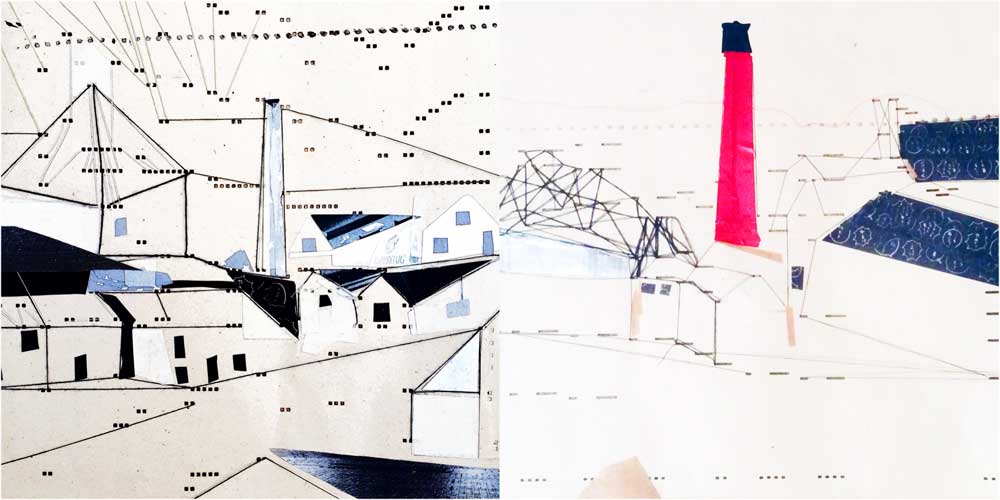
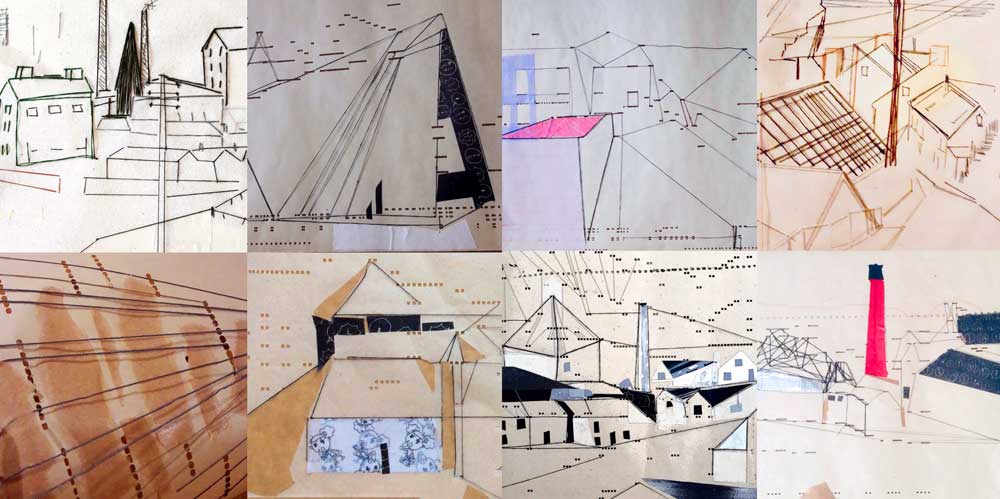
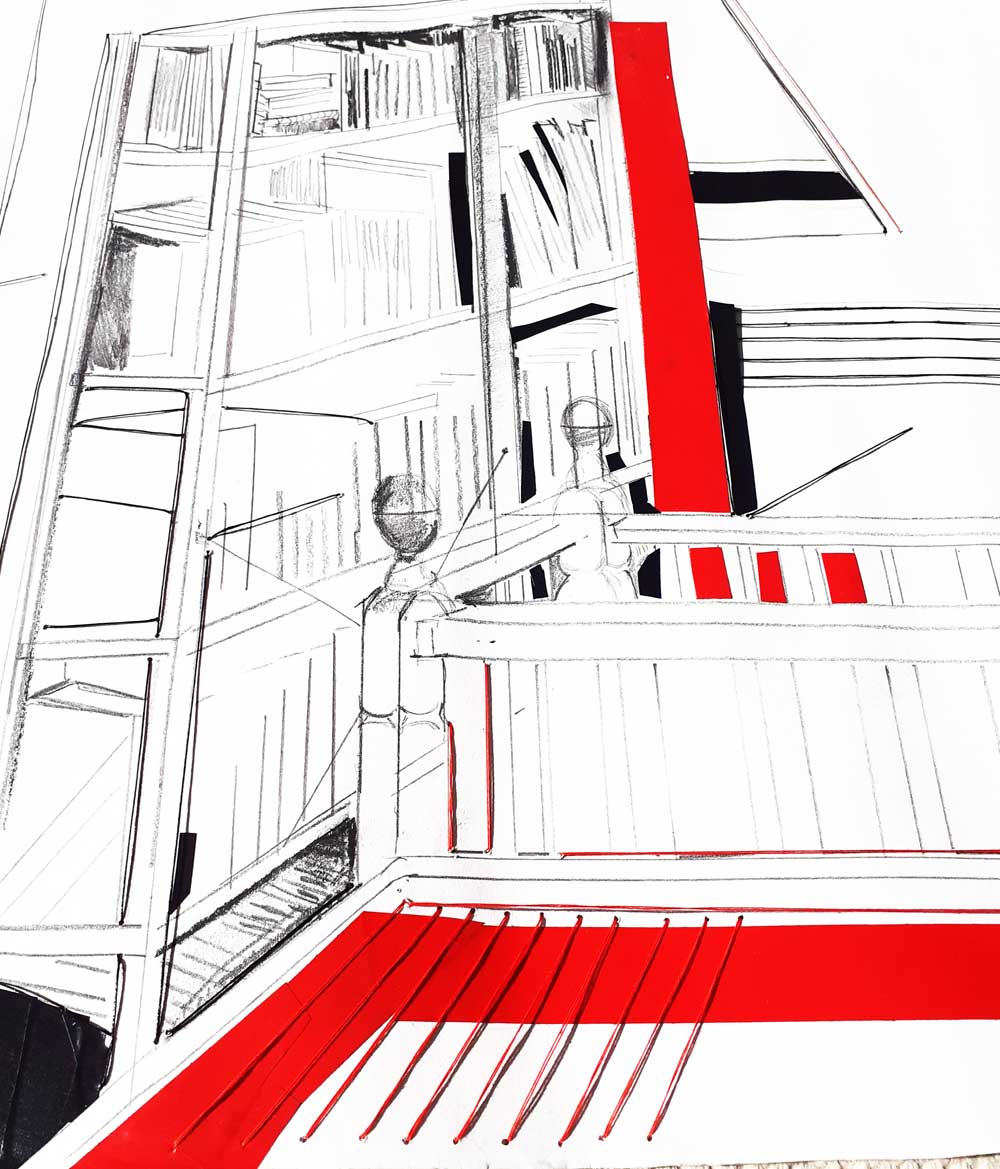
My name is Lorna Rose, and I’m an artist. I love drawing and I’m always spotting new things I’d like to draw, on holiday, in my garden, or even on the bus coming home from work, I make quick sketches to capture the moment. This is some of my work where I used stitch to make marks:
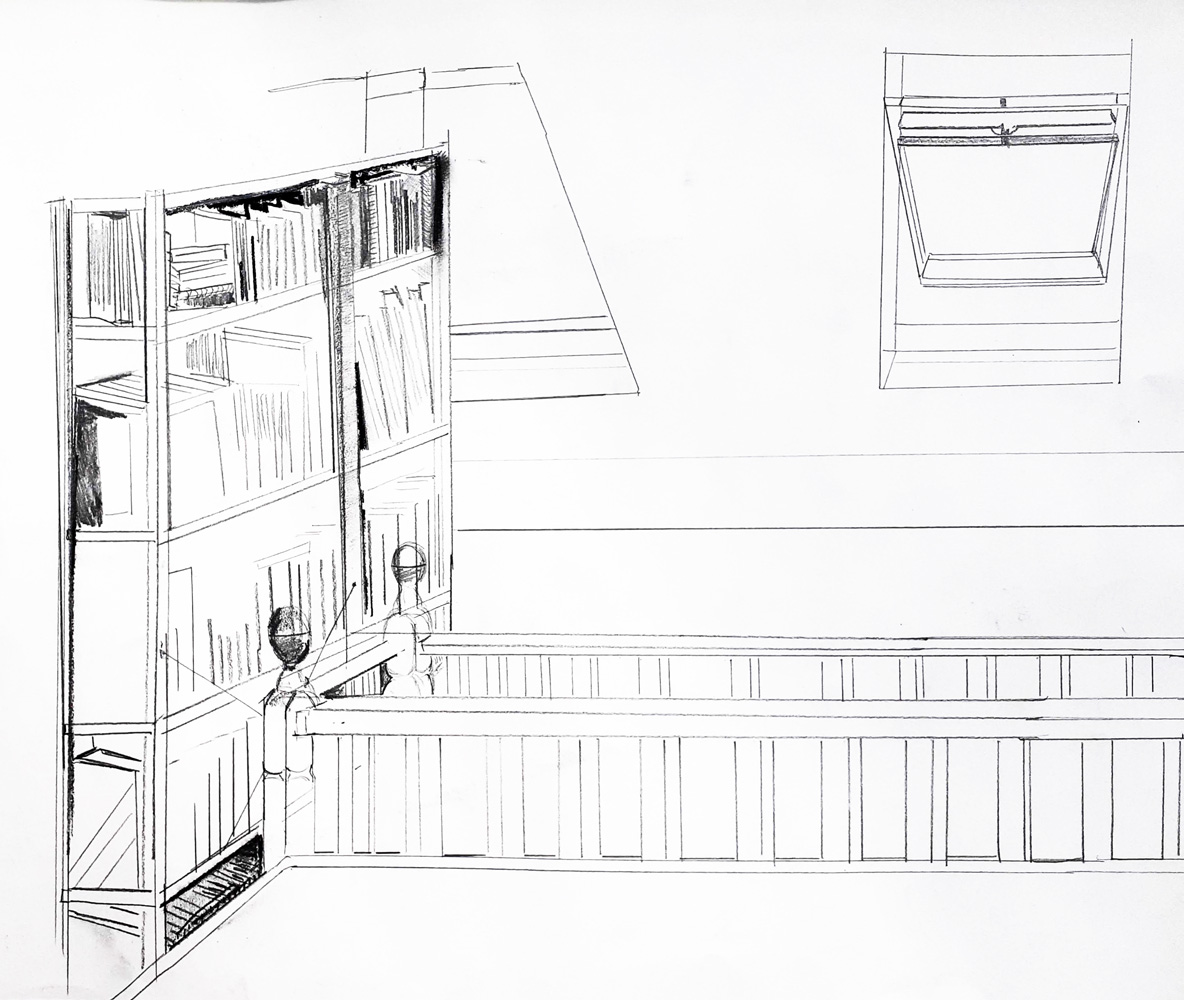
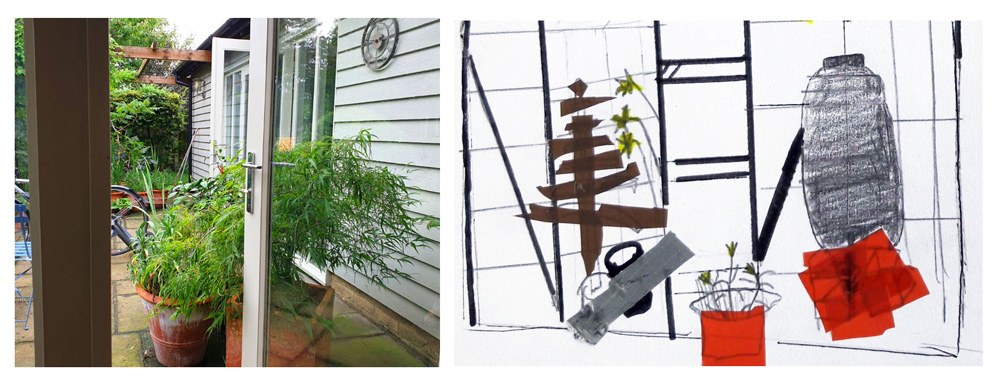
Today, we’re going to explore how to make a drawing in our houses or outdoors using just straight lines. These pieces of artwork are great by themselves, but you can also develop them using other art forms, such as collage or stitch.
How to create your drawing
To start off any drawing you need to look. I tell all of my students, look a hundred times and then look some more. Look around you – what can you see that is made up of straight lines?
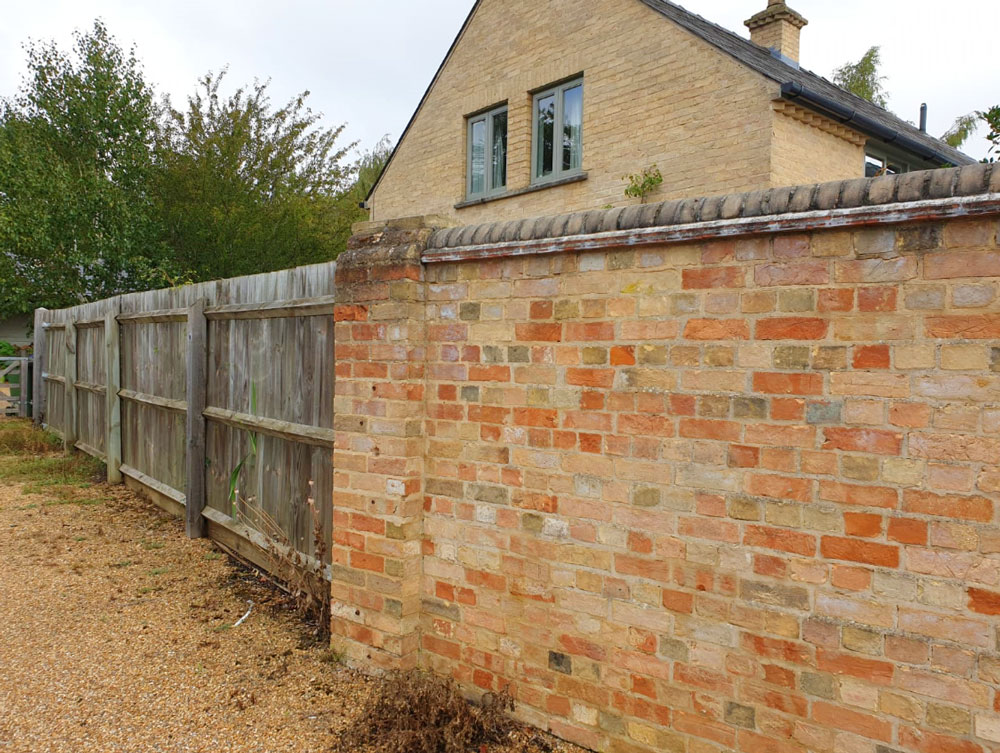
Don’t forget that you will only be using straight lines. This can be quite challenging, but there’s always a way to work around it. You can use a ruler to create the shapes in your picture with straight lines. If you don’t have a ruler, anything with a straight edge is good, like a lollipop stick or an edge of a book.
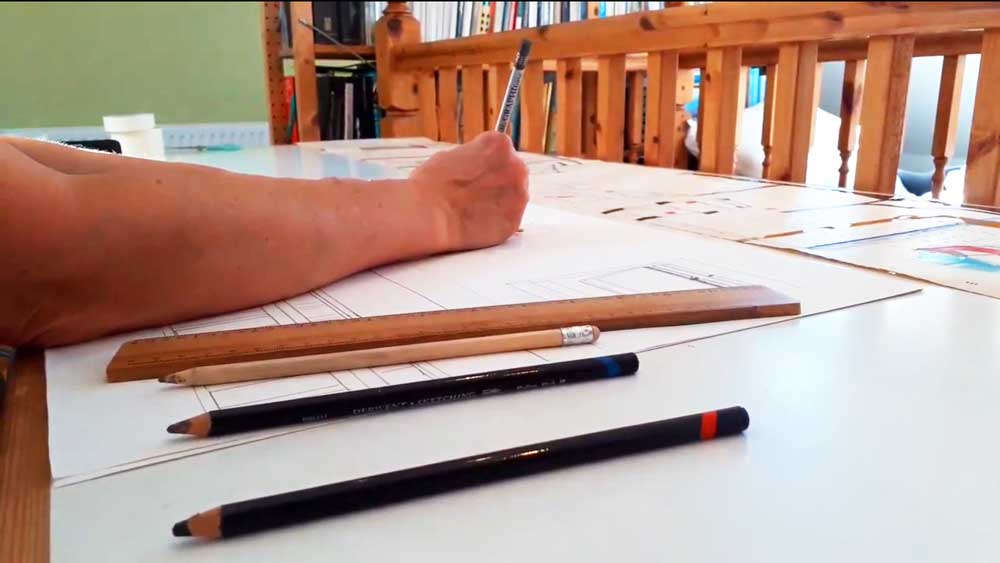
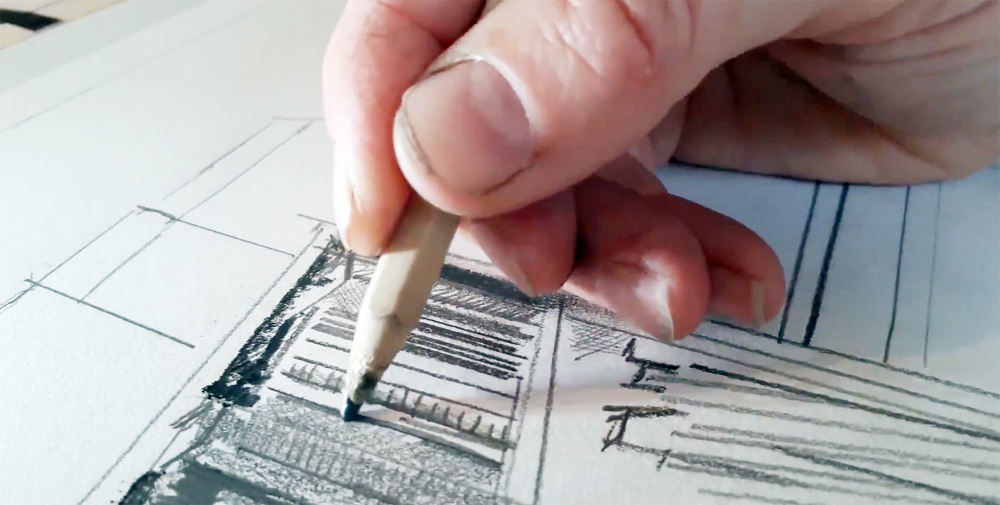
If you have different grade pencils, thick or thin ones, or even pens, these can build up dark and light areas of your picture. Or, you can use a variety of marks such as crosshatching, shading, rubbing, or blending. Sometimes it helps if you close your eyes a little bit, to see where the light and dark areas are. Start by capturing the lines that stand out the most, the dark ones. This will create the structure, and then you can go on to fill in all of the other lines around it.
Adding other media
Once you’ve made your drawing, you can add to it by using stitch like I do, or even different kinds of tape or papers.
Now, it’s your turn to have a go!
Find a subject or a scene and notice the major straight lines in it. Look at it as much as you can, before you start drawing. Keep re-looking at your drawing to assess how it’s coming on. Are you happy with it? Does it need anything adding to or tweaking in any way?
Good luck. Enjoy making your drawing and have fun!
This is a sample of a resource created by UK Charity AccessArt. We have over 1500 resources to help develop and inspire your creative thinking, practice and teaching.
AccessArt welcomes artists, educators, teachers and parents both in the UK and overseas.
We believe everyone has the right to be creative and by working together and sharing ideas we can enable everyone to reach their creative potential.
See This Resource Used in Schools…


You May Also Like…
Pathway: Music and art

Mark Making & Sound: Part Two

Mark Making & Sound: Part Three
")
Drawing to a Slow Rhythm

Inspired by Miro

Drawing to Music

See This Resource Used in Schools…


You Might Also Like…
Pathway: Gestural Drawing with Charcoal

Session Recording: exploring Charcoal

The ancient art of konan

Molly Hausland
 Museum of Contemporary Art, Roskilde, Denmark Photo by Matilde Haaning")
A collection of imagery and sources which you can use to prompt drawing in schools and community groups.
Please note that this page contains links to external websites and has videos from external websites embedded. At the time of creating, AccessArt checked all links to ensure content is appropriate for teachers to access. However external websites and videos are updated and that is beyond our control.
Please let us know if you find a 404 link, or if you feel content is no longer appropriate.
We strongly recommend as part of good teaching practice that teachers watch all videos and visit all websites before sharing with a class. On occasion there may be elements of a video you would prefer not to show to your class and it is the teacher’s responsibility to ensure content is appropriate. Many thanks.
Nests
Use the film below to enable children to explore drawing nests. Try to create a sense of momentum – for example you might pause the video 4 times and ask the pupils to make a 1 minute, 2 minute, 3 minute and 4 minute drawing at each pause.
Encourage close and slow looking by talking as they draw – use your voice to attract their attention to qualities of the nest.
Try the same exercise using different materials, ie handwriting pen, ink and nib, pastel, watercolour…

Canaan Valley National Wildlife Refuge, Davis, United States. Original public domain image from Wikimedia Commons

Bird nest hanging on a tree. Free public domain CC0 photo.

Birds nest in tree, nature photography. Free public domain CC0 image.

Birds nest in tree, nature photography. Free public domain CC0 image.


You May Also Like…
Pathway: Sculpture, Structure, Inventiveness & determination

using sketchbooks to make visual notes

Show me what you see

A collection of imagery and sources which you can use to prompt drawing in schools and community groups.
Please note that this page contains links to external websites and has videos from external websites embedded. At the time of creating, AccessArt checked all links to ensure content is appropriate for teachers to access. However external websites and videos are updated and that is beyond our control.
Please let us know if you find a 404 link, or if you feel content is no longer appropriate.
We strongly recommend as part of good teaching practice that teachers watch all videos and visit all websites before sharing with a class. On occasion there may be elements of a video you would prefer not to show to your class and it is the teacher’s responsibility to ensure content is appropriate. Many thanks.
This resource is free to access and is not a part of AccessArt membership.

Drone Footage Over Natural Landscape
Use the film below as source material to enable an exploration of drawing natural landscapes. You can also try to find drone footage of your own environment, or that of areas relating to projects you are covering in school.
Pause the footage at points which catch your eye and invite the children to make timed drawings – 15 minutes, 10 minutes, 5 minutes, 2 minutes or 1 minute.
Vary the drawing materials you use and work in sketchbooks or sheets of paper of different sizes and textures. You may also like to make multiple line drawings over one page – each with a different colour or line weight, to describe different pause points in the same film to capture a moving landscape.
Patagonia, South America
Howqua Hills, Australia
Reading, UK
The Netherlands
This Source Material Features in…
Pathway: Cloth, thread, paint

Pathway: Mixed Media Land and city scapes

using sketchbooks to make visual notes
Show me what you see
You May Also Like…
Pathway: Exploring the world though mono print

Drawing Large

Many thanks to accessArt Young Artist Rowan Briggs Smith


See This Resource Used In Schools…


You May Also Like…
Pathway: Exploring pattern

Talking points: Andy Gilmore

talking points: Louise Despont
