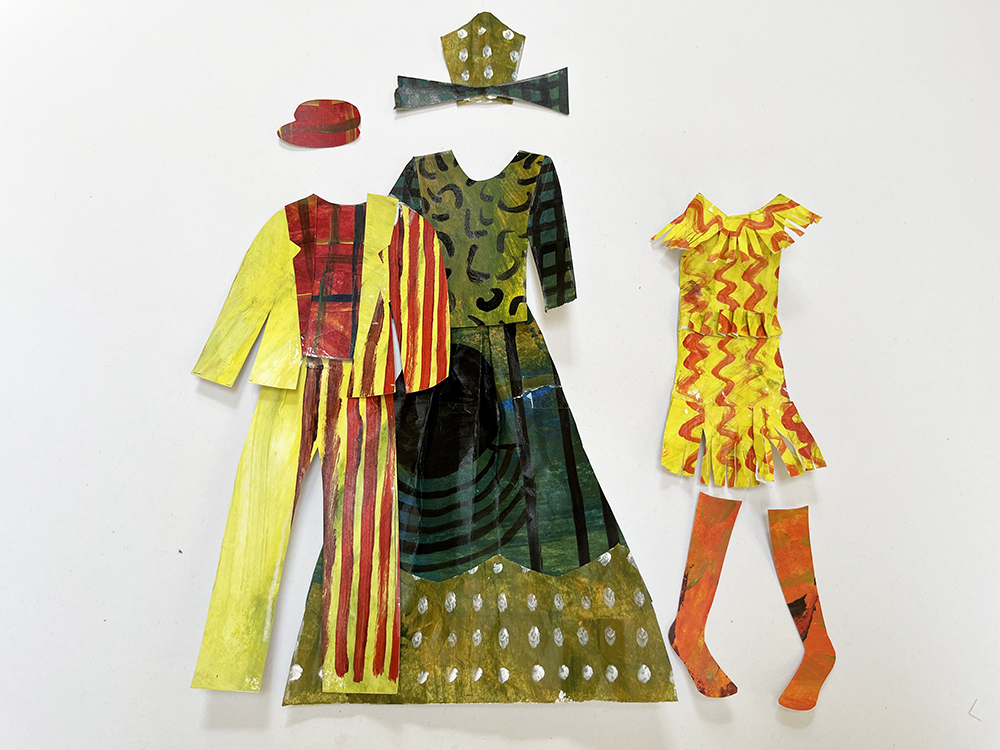
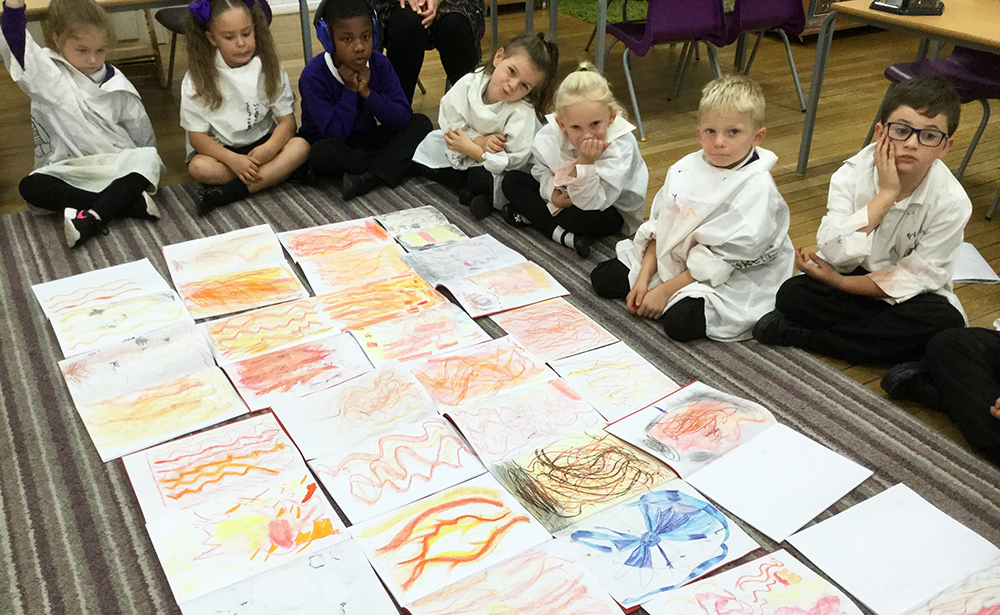
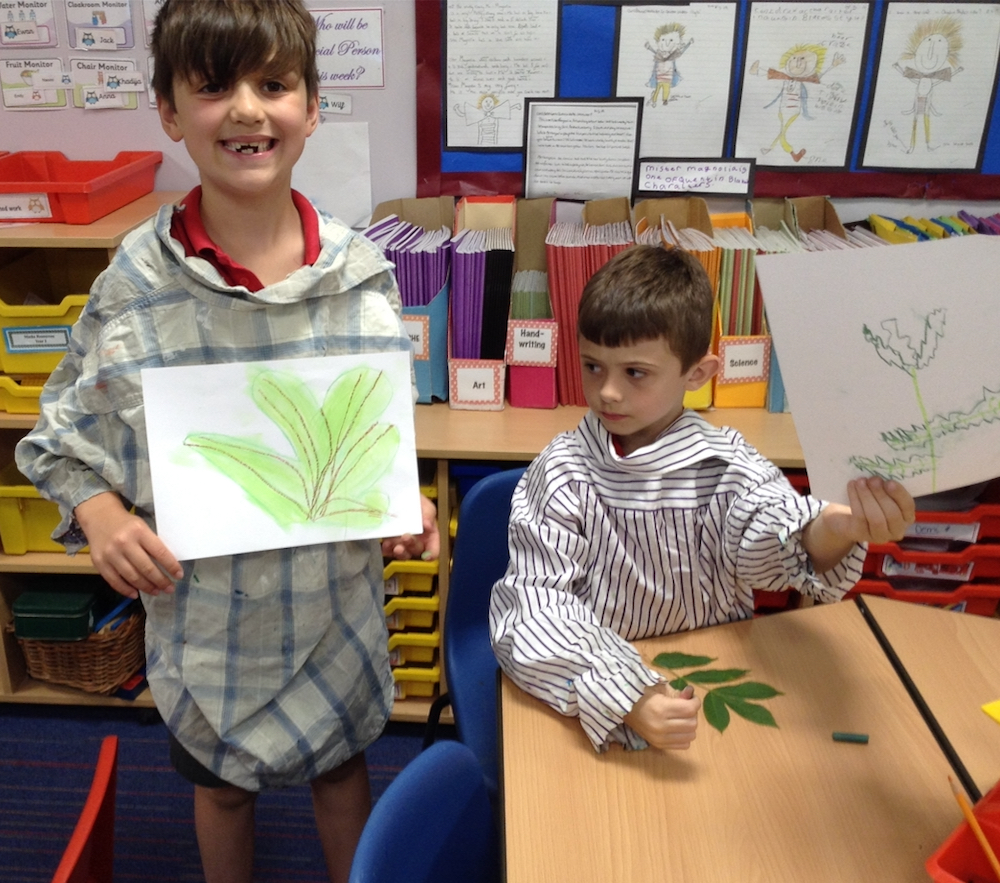
A Visual Poetry Zine with Monotype

This post shares the making of a visual poetry zine, using collage and monotype.

The activity provides lots of space for visual interpretation/personal creative response to poetry or even film. It also provides an opportunity for a more intuitive exploration of colour, line and shape, as well as space for an exploration of the relationship between text and image on the page.

Monoprinted pages folded into zine

Materials

You will need:

  • A1 sheets of cartridge paper (1 per pupil).
  • Smaller sheets of paper (any type such as cartridge or sugar paper, but not thin printer paper). These sheets are used to collage with.
  • Printer paper, to use to ink the monotype OR Carbon Copy paper.
  • Acrylic paints.
  • Printing ink (black or dark blue)*
  • Newsprint to protect table.*
  • Rollers.*
  • Recycled cardboard as paint palettes.
  • Brushes, water.
  • PVA or glue stick glue.
  • * not needed if you use Carbon Copy paper method

To Begin


Please log in here to access full content.

Username
Password


Remember me
Forgot Password


To access all content, I would like to join as…

An Individual

Creative practitioners, educators, teachers, parents, learners…


An Organisation…

Schools, Colleges, Arts Organisations: Single and Multi-Users


AccessArt is a UK Charity and we believe everyone has the right to be creative. AccessArt provides inspiration to help us all reach our creative potential.


See the Resource Used in Schools…

Littleport Community Primary School Year 5 Making Monotypes - these were inspired by Sea Fever the poem by John Masefield

You May Also Like…

Pathway: Making Monotypes

This is featured in the 'Making Monotypes' pathway

This is featured in the ‘Making Monotypes’ pathway

Talking points: What is a monotype?

Monotype Vimeo Screenshot

Talking Points: Kevork Mourad

Kevork Mourad: the making of Seeing Through Babel https://vimeo.com/347106795


Print Foam – Making Relief Prints: Incised & Additive

See This Resource Used In Schools…

Year 1, Combs Ford Primary School
Ruth at Carden Primary School, Brighton

You May Also Like….

Pathway: Simple Printmaking

Featured in the 'Simple Printmaking' pathway

Featured in the ‘Simple Printmaking’ pathway


Pathway: Exploring Pattern

Pathway for Years 3 & 4

Disciplines: Drawing, Collage, Design

Key Concepts:

  • That the act of making drawings can be mindful.

  • That we can use line, shape and colour to create patterns.

  • That we can use folding, cutting and collage to help us create pattern.

  • That we can create repeated patterns to apply to a range of products or outcomes.

In this pathway, children have the opportunity to explore pattern and develop a range of technical skills and knowledge through drawing and collage.

The pathway also introduces them to the idea that working with pattern can be a mindful activity, and that as humans we respond to patterns made by other people.

This pathway will take approximately half a term, based upon a weekly art lesson. 

Medium:
Paper, Pens, Paint

Artists: 
Rachel Parker, Shaheen Ahmed, Andy Gilmore, Louise Despont

If you use this resource in your setting, please tag us on social media: #InspiredBy @accessart (facebook, twitter) @accessart.org.uk (instagram) and share the url. Thank you!

Jellies Art Print by Rachel Parker
Collage Materials For The Pattern By Rachel Parker
ages 9-11

Teaching Notes

Find the MTP for this pathway here.

Curriculum Links

History: Focus on patterns from your chosen ancient civilisation.

Maths: Measuring, symmetry, tessellation/repeated patterns, orientation.

Science: Look at patterns in the structure of fruits or plants, reflections and shadows.

Music: Use music and sound when doing mindful drawing as part of this pathway.


I Can…

  • I can relax into making a sensory drawing using a pencil, making marks on the page without having a predefined outcome. 

  • I have explored the work of an artist who creates artwork inspired by pattern. I have thought about where we use pattern in our life to make our worlds brighter.

  • I can work in my sketchbooks to explore how I can make drawings inspired by “rules.” I can generate lots of different types of patterns.

  • I can make a tessellated design and think about colour and shape, exploring positive and negative shapes.

or

  • I can explore the work of a surface pattern designer and make my own repeating pattern, exploring colour, shape and composition. 

or

  • I can fold paper and use pattern to make an object which other people can respond to.

  • I can present and share my work. I can reflect and share my thoughts with others. I can listen to the reflections of my classmates and feedback on their work. 

  • I can take photographs of my work.


Time

This pathway takes 6 weeks, with an hour per week. Shorten or lengthen the suggested pathway according to time and experience. Follow the stages in green for a shorter pathway or less complex journey.


Materials

Soft B pencils, handwriting pen, A2 cartridge paper, rulers, tape, string, coloured paper & card.

Option 1: Making Tessellated Designs – Thin cardboard or stiff paper, pencils, handwriting pens, felt tip pens, scissors, masking tape.

Option 2: Creating Repeated Patterns – Collage papers, A3 cartridge paper, ruler, masking tape, PVA glue, scissors, scanner for digital rendering (optional).

Option 3: Puzzle Purse – 21X21cm squares of card, soft pencils, handwriting pens, felt tip pens, ruler.


Pathway: Exploring Pattern

A PDF of this pathway can be found here.

  • Aims of the Pathway

    This pathway aims to enable a mindful approach to working with pattern. Pupils explore how artists and designers use pattern in their own work, and then go on to explore ways in which they can create pattern in a playful way. 

  • Week 1: Slow Down & Tune In

    Making a Sensory Drawing

    8

    The aim of the first session is to enable children to quieten and slow down into the process.

    Use the “Making a Sensory Drawing” resource as a warm-up, enabling children to make sensory patterns without a theme or subject focus. The emphasis should be on the process not outcome. 

    The repetitive nature of the exercise will allow the children to not worry about outcome, but will encourage them to make decisions as they go along. Use needles and sharp pencils with a variation of width to create a rhythmic piece.

    Work on thicker paper (cartridge or sugar paper is ideal). Work on sheets small enough to be stuck into sketchbooks at a later point. 

    Spend half an hour on this.

  • Look and Talk…

    Shaheen Ahmed

    Persia by Shaheen Ahmed

    Explore the free to access “Talking Points: Shaheen Ahmed” resource to discover an artist who explores patterns, signs and motifs that hold significance to her identity. Use the questions at the bottom of the resource to help guide your class conversation.

  • Week 2: Inventing & Exploring

    Rules and Resolutions

    Breaking the rules of Sol Lewitt's Wall Drawing #118

    Use the “Rules and Resolutions” resource to enable children to explore the idea that they can devise their own process criteria to help them make drawings. 

    Work in sketchbooks and encourage children to collaborate and discuss aims and outcomes. 

  • Week 3, 4 & 5: Find your focus

    Explore Tessellations, Surface Pattern or Puzzle Purses

    For the next three weeks work on one of the projects below. Intersperse the projects by looking at the work of the artists below to help inspire your journey. 

  • Option One

    Making a Tessellated Design

    Libby's tessellation in pastel on paper

    Explore working in colour and making patterns which fit together over and over again by using the “Making Tessellated Designs” resource. 

    This activity links really well with maths. Begin by asking them to invent a shape. Push them further by asking them to look at an object and try to create a shape inspired by it.

    Use the project to explore colour. What happens when they make a tessellated design using complimentary colours? How many colours do they need? How does the design change if they use cold colours, or warm colours? 

    Use sketchbooks to test colours and refine tessellation design, and then make final outcomes on larger sheets of cartridge or sugar paper. 

  • Explore an Artist

    Explore Andy Gilmore

    Andy Gilmore

    Use the free to access “Talking Points: Andy Gilmore” resource to explore the work of an artist inspired by repeated shape and pattern. See where Andy finds inspiration. Remember, pupils are not aiming to reproduce Andy’s work – just introduce the artist to the children and build their creative thinking, visual literacy and oracy skills through conversation. 


  • Or…

  • Option Two

    Explore Surface Design with Rachel Parker

    Sketchbook and Samples by Rachel Parker

    Explore the work of surface pattern designer Rachel Parker.


  • Make A Repeat Pattern

    Finished Pattern Square By Rachel Parker

    Use the “Creating Repeated Patterns” resource to enable pupils to think about colours and shapes, and the relationship between these components to create an overall balanced pattern. Using collage allows them to make these creative decisions as they work.

    Get children to think about where they find patterns, what are they used for? Make it known that children can grow up to make patterns for a living if they enjoy the process.

    Have their sketchbook open and ask them to make notes about their decision making, with swatches and thoughts as they go along.

    For the second part of this session children will get the opportunity to scan their pattern into the computer and create a repeat pattern using a Word Document or an equivalent editing software.  


  • Or…

  • Option 3

    Making a Puzzle Purse

    Puzzle purse making process by Eilis Hanson

    Use the “Making a Puzzle Purse Part One” resource to show children how to make an origami puzzle purse.

  • Explore an Artist

    Louise Despont

    Louise Despont

    Explore the work of an artist who makes meditative drawings through pattern with the free to access “Talking Points: Louise Despont“. Use the conversation to highlight to children how the act and outcome of drawing can help with feeling calm and in the moment. 


  • Making a Puzzle Purse Part Two

    A folded origami puzzle purse by Eilis Hanson

    Adapt the “Making a Puzzle Purse Part Two” resource, focusing on pattern rather than narrative. Explore colour, line, and shape to create patterns within the puzzle purse. Use the folded geometric structure to help inspire pattern making. 

  • Week 6: Reflect & Discuss

    Present, Talk, Share and Celebrate

    tessellation

    End the pathway by taking time to appreciate the developmental stages and the final outcomes in a clear space.

    Invite children to display the work in a way that best suits the project, have open sketchbooks. Use the “Crit in the Classroom” resource to help you. 

    Have children use tablets or cameras to take photographs of the work. 

    Encourage children to reflect upon all stages of the journey, and reference the artists studied. 

See This Pathway Used in Schools…

Ruth at Carden Primary School, Brighton

If You Use AccessArt Resources…
You might like to…

Join our Facebook Group

Join the AccessArt Network group on Facebook and ask questions of others using our resources

Join the AccessArt Network group on Facebook and ask questions of others using our resources

Share and Tag

Share photos of work made by tagging us on social media

Share photos of work made by tagging us on social media

You May Also Like…

Making Ruler Drawings

Use a straight edge to explore how you can find freedom by applying simple rules to your drawing

Use a straight edge to explore how you can find freedom by applying simple rules to your drawing

Explore Paper weaving

Explore different methods for paper weaving

Explore different methods for paper weaving

Making Stronger Drawings

If children in your class struggle with making confident drawings try this warm-up/intervention exercise

If children in your class struggle with making confident drawings try this warm-up/intervention exercise

Pattern and Collage

More tips and ideas in this whole school project

More tips and ideas in this whole school project


Pathway: Exploring the World Through Mono Print

Pathway for Years 1 & 2

Disciplines:
Printmaking (Mono Print), Drawing, Collage

Key Concepts:

  • When we make mono prints we use mark making to create one off prints.

  • When we make mono prints we create an impression of a drawing.

  • That we can generate playful narratives and inventions through drawing.

  • That we understand that using a range of marks will generate different effects when creating mono prints.

  • That we can create creative responses to different stimuli and make the work our own.

Building on the exploration of drawing in Autumn term 1, this pathway starts with two explorations of drawing – one drawing from photographs or film, and two drawing from small, closely observed objects.

In both sessions pupils develop drawing and mark making skills.

Children are then introduced to mono print. They explore the work of an artist who uses mono print in his own work, and are introduced to a simple mono print technique.

Classes then have a choice of projects to develop mono printing and drawing skills, depending upon their preferred area of subject focus.

This pathways encourages children to take creative risks and use drawing as a way to playfully invent and create narratives.

Themes: Natural and Manmade Forms, Invention, Narrative

Medium: Graphite pencils, Oil Pastels, Carbon Paper 

Artists: Xgaoc’o X’are, Leonardo Di Vinci

This pathway will take approximately half a term, based upon a weekly art lesson.

If you use this resource in your setting, please tag us on social media: #InspiredBy @accessart (facebook, twitter) @accessart.org.uk (instagram) and share the url. Thank you!

peeling back the paper to reveal the print
Using carbon paper as a drawing tool
Carbon and oil pastel mono print
ages 5-8

Teaching Notes

Find the MTP for this pathway here.

See the recording of the hour long zoom CPD to introduce teachers to this pathway.


Curriculum Links

English: Link to English by asking children to draw upon their own experience for narratives.

Geography: Adapt to explore habitats, continents. 

Maths: Use language to develop understanding of symmetry (peeling back monoprints). 

Science: Animals, trees, materials. 

PSHE: Peer discussion. Collaboration.

Be aware that you leave the making open enough for the children to explore fully and freely (not constrained by working too closely to a theme).


I Can…

  • I can make drawings using photos from films as my source material.

  • I can look closely guided by my teachers voice, and work in my sketchbook or on paper to make drawings using soft pencil or handwriting pen. 

  • I can look closely at small objects close to me and make drawings with soft pencil or handwriting pen at the same scale or size. 

  • I can think carefully about which marks I will include in my drawing.

  • I can share my sketchbook work with the class and talk about what I like about my work. I can listen to others talking about their work, and sometimes I can add my thoughts. 

  • I have seen what a mono print is and have explored the work of an artist who uses mono print. I can share my thoughts on the artists work. 

  • I can use carbon paper to make mono prints.  I can experiment with the kinds of marks I make, and think about how they help make my drawings interesting.

  • I can base my drawings upon careful observational looking. I can slow down my looking and mark making and work for 5 to 15 minutes on a drawing. 

  • I can explore a theme and make mono prints using my imagination to make my drawings personal.

  • I can share my work and talk about what I like, and what I would like to try again.

  • I can enjoy looking at the work of my classmates and sometimes I can share my thoughts about their work. 

  • I have understood that through art, I can invent and discover.


Time

This pathway takes 6 weeks, with an hour per week. Shorten or lengthen the suggested pathway according to time and experience. Follow the stages in green for a shorter pathway or less complex journey.


Materials

Soft pencils, oil pastels/wax crayons, handwriting pens, carbon paper, A3 cartridge paper, tracing paper.


Pathway: Exploring the World through Mono Print

A PDF of this pathway can be found here.

  • Aims of the Pathway

    This pathway aims to encourage children to explore the world around them through monoprint. How can we use line, mark, shape and colour to make imagery informed by our own perception of the world?

  • Week 1: Explore

    Draw from Stills & Film

    natural world

    Children will spend the first week making drawings in their sketchbooks. Use the free to access “Drawing Source Material: Natural World” resource to inspire their drawings.

    Use the “Show Me What You See” resource to help guide the children’s drawing. 

  • Week 2: Drawing from Observation

    Drawing Small

    drawing small

    Use the “Drawing Small” resource to help children become aware of the relationship of drawing, looking and mark making. 

    Pupils will work in sketchbooks or on larger sheets of loose paper.

    If you want further challenges, invite children to draw with their non dominant hand, create a blind drawing, a backwards forwards drawing and also a continuous line drawing.

    By the end of week two sketchbooks should be full of a variety of images – from drawings of the natural world capturing movement and energy made in week one, to collections of small, still,  found objects made in week two. 

  • Recap

    Reflect and Discuss

    Year Two boy holding up his pastel drawing of a leaf in a year one and two classroom at Hauxton Primary school with teacher Pamela Stewart for Inspire

    End week two with a short class or small group discussion about the sketchbook work. Encourage children to remember what they did and discuss whether pupils prefer drawings from week one or week two. 

  • Week 3: Introducing Mono Prints

    What is a Mono Printing?

    Monotype Drawn Over Paper by Tobi Meuwissen
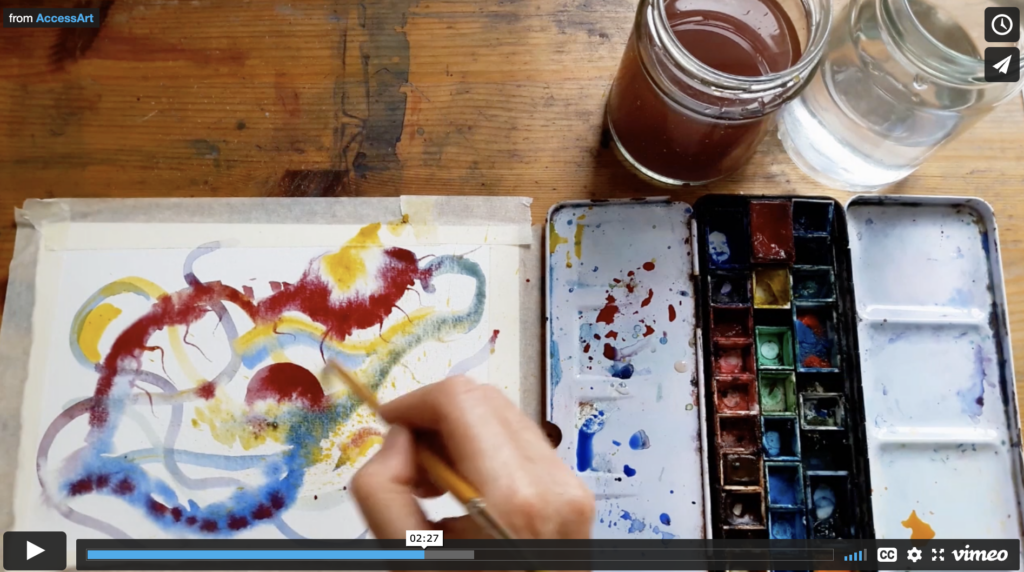
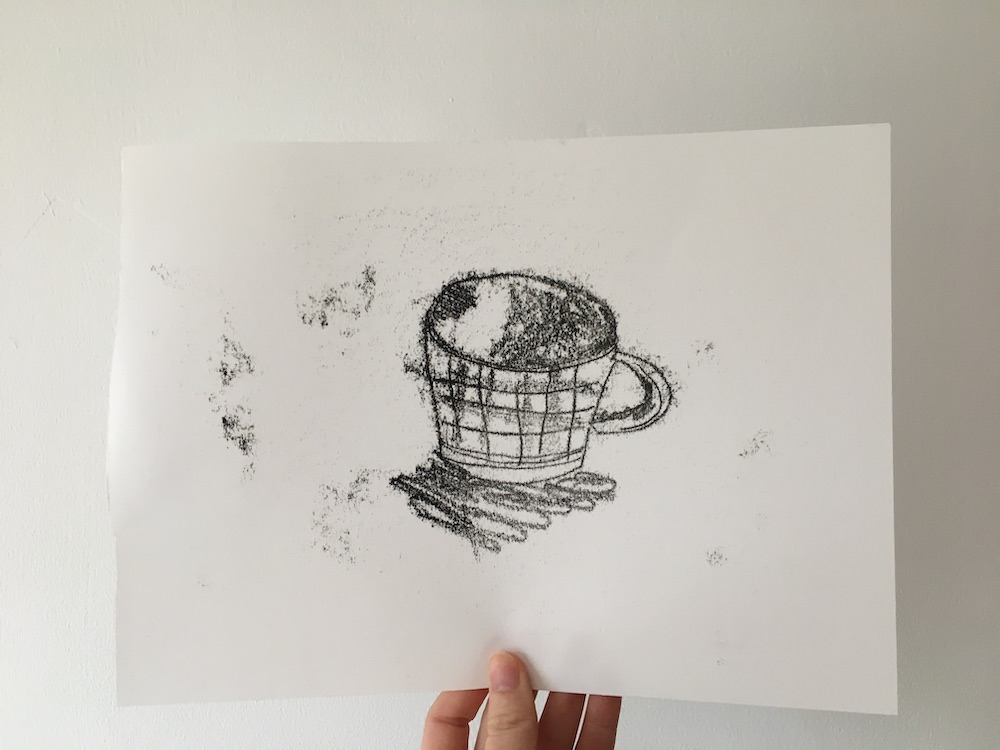
Introduce pupils to the technique of mono printing with ink. Watch this video on “trace monotype” and find out how you can facilitate a lesson on printmaking.

    NOTE: In this pathway you will be using a slightly different method which is cleaner and easier!

  • Introduce an Artist

    Explore the Work of Xgaoc’o X’are

    Two giraffe and two birds II 50x65sm by Qhaqhoo Xgaoc'o X'are

    Explore the work of Botswanan Printmaker Xgaoc’o X’are using the free to access “Talking Points: Xgaoc’o X’are” resource. Use the questions on that resource to discuss his work.

  • Experiment

    Mono Printing With Carbon Paper

    Carbon and oil pastel mono print

    Use the “Mono Printing with Carbon Copy Paper” resource to start the print making journey.

    This activity encourages children to look carefully at their subject matter and make thoughtful marks in response. The addition of oil pastel enables children to experiment with colour and shape as well as line.

    Children can either draw from the same objects that they drew in week two, or new objects. The aim of the session is for pupils to explore and see what they can do with this technique – the journey is more important than any final outcome. Pupils will work in sketchbooks or on sheets of paper. 

  • Week 4 & 5: Find Your Focus

    Choose a Theme

    Carbon and oil pastel detail

    Choose from one of the projects below, or adapt a similar approach to your own area of focus/curriculum theme. 

    All the resources below share the common aim of enabling children to explore printmaking with a focus on mono print. Whatever the focus or theme you attach make sure you give pupils plenty of freedom to play and invent.

    Give children plenty of time and space to explore, take creative risks, discover and share, without working towards a predefined outcome. Encourage and celebrate individuality.

    Have sketchbooks open on tables and encourage children to make notes (whatever form they take), and record and reflect.

  • Option 1

    Mono Printing Session with ‘Change, Grow, Live’

    peeling back the paper to reveal the print

    If you’d like to continue the theme of animals/natural habitat/natural world, then use the “Mono Printing Session with Change, Grow, Live” resource to make prints inspired by animals. (Pls note: the resource describes using carbon copy paper to print and also using ink and rollers to print. In this case use carbon copy paper). 

    Xgaoc’o X’are’s prints are inspired by the cave drawings made by his ancestors. It could be interesting to get children to think about a narrative involved in the animals that they choose to draw. For example an animal that they think represents them.

    Invite children to bring in animal toys or find images of animals with significance to them.

  • Option 2

    Inventions Inspired by Leonardo da Vinci

    The "drawn" side of the carbon - used as a drawing in its own right

    If you would like to continue working with small objects and link to curriculum areas such as materials, then you might like to use the “Drawings of Inventions Inspired by Leonardo Da Vinci” resource. 

  • Week 6: Display & Reflect

    Present, Talk, Share and Celebrate

    If children worked on separate sheets of paper throughout the project, consider if they would like to make a “Backwards Sketchbook” from the experimental loose prints and drawings made throughout the half term.

    Invite children to display the work in a clear space, and walk around the work as if they are in a gallery. Open out sketchbooks. Give the work the respect it deserves. Remind the children of their hardwork.

    If you have class cameras or tablets, invite the children to document their work, working in pairs or teams. 

    Use the resource here to help you run a class “crit” to finish the project. 

See the Pathway Used in Schools…

Art Stars Studio! in Delmar, NY
Brindishe Manor, Lewisham
Sutton Valence Preparatory School.

If You Use AccessArt Resources…
You might like to…

Join our Facebook Group

Join the AccessArt Network group on Facebook and ask questions of others using our resources

Join the AccessArt Network group on Facebook and ask questions of others using our resources

Share and Tag

Share photos of work made by tagging us on social media

Share photos of work made by tagging us on social media

You May Also Like…

Painting & printing the savannah

Give children the opportuntity to mono print, paint and collage

Give children the opportuntity to mono print, paint and collage


Drawing Source Material: Food

A collection of imagery and sources which you can use to prompt drawing in schools and community groups. 

Please note that this page contains links to external websites and has videos from external websites embedded. At the time of creating, AccessArt checked all links to ensure content is appropriate for teachers to access. However external websites and videos are updated and that is beyond our control. 

Please let us know if you find a 404 link, or if you feel content is no longer appropriate. 

We strongly recommend as part of good teaching practice that teachers watch all videos and visit all websites before sharing with a class. On occasion there may be elements of a video you would prefer not to show to your class and it is the teacher’s responsibility to ensure content is appropriate. Many thanks. 

Food

Use the film below to enable children to explore drawing food. Try to create a sense of momentum – for example you might pause the video 4 times and ask the pupils to make a 1 minute, 2 minute, 3 minute and 4 minute drawing at each pause. 

Encourage close and slow looking by talking as they draw – use your voice to attract their attention to qualities of the food.

Try the same exercise using different materials, ie handwriting pen, ink and nib, pastel, watercolour…

You May Also Like…

Pathway: Festival Feasts

This is featured in the 'Festival Feasts' pathway

This is featured in the ‘Festival Feasts’ pathway

using sketchbooks to make visual notes

Sketchbooks used for observations, research drawing and experimentation.

Show me what you see

Show Me What You See Method 250 Words by Tobi Meuwissen


Pathway: Working with Shape and Colour

Pathway for Years 3 & 4

Disciplines:
Printmaking (Stencil/Screen Print), Collage

Key Concepts:

  • That we can be inspired by key artworks and make our own work in creative response. 

  • That we can use shape and colour as a way to simplify elements of the world.

  • That shapes have both a positive and negative element.

  • That we can arrange shapes to create exciting compositions.

  • That we can build up imagery through layering shapes.

  • That we can use collage to inspire prints.

In this pathway children use close looking and the “Show Me What You See” technique to explore artwork from a particular artist, movement or era. Children then explore how they can use shape and colour to simplify elements, inspired by the Cut-outs of Henri Matisse. 

Using first collage, then simple printmaking methods, pupils play with positive and negative shapes and spaces to create meaningful compositions in response to the original artworks they looked at. 

Medium:
Paper, Printmaking Ink,  Stencils & Crayons

Artist: Henri Matisse, Claire Willberg

If you use this resource in your setting, please tag us on social media: #InspiredBy @accessart (facebook, twitter) @accessart.org.uk (instagram) and share the url. Thank you!

Drawing with Scissors
Inspired by Matisse
ages 5-8

Teaching Notes

Find the MTP for this pathway here.

Find the Zoom CPD session introducing this pathway here.

See the recording of the Zoom CPD session exploring Screen Printing in the classroom.


Curriculum Links

History: Choose a painting as inspiration which typifies a particular historical period, for example, a painting from  Ancient Egyptian. 

Maths: 2D/3D shapes, pattern. 

PSHE: Peer discussion.


I Can…

  • I can explore an artwork through looking, talking and drawing.

  • I can use the “Show Me What You See” technique to help me look closely, working in my sketchbook making drawings and notes using pencils and pens.

  • I can cut shapes directly into paper, using scissors, inspired by the artwork.

  • I can collage with my cut elements, choosing colour, shape and composition to make my own creative response to the artwork.

  • I can add to my collage, using line, colour and shape made by stencils. 

  • I can explore negative and positive shapes.

  • I can take photographs of my work.

  • I can share my work with my class. I can reflect and share what I like, and what I would like to try again. I can look at the work of my classmates and give useful feedback through class or small group discussion. 


Time

This pathway takes 6 weeks, with an hour per week. Follow the stages in green for a shorter pathway or less complex journey.


Materials

Soft B pencils, coloured pencils, oil/chalk pastels, A3 or A2 sugar or cartridge paper, collage papers, PVA glue, scissors.

Option 1: Monoprinting with Carbon Paper – Carbon paper, sharp pencil or pen, oil pastels.

Option 2: Explore Stencils – Card, oil pastels, scissors.

Option 3: Screenprinting mesh, water-based printing ink, tray, acrylic printing medium, scrap card for squeegee, embroidery hoop (optional), newsprint.

Pathway: Working with Shape & Colour

A PDF of this pathway can be found here.

  • Aims of the Pathway

    This pathway aims to enable pupils to respond to a painting from another culture or era, using visual literacy skills to come to their own understanding of the artwork. 

    Children then go on to make their own creative response to the original painting, using layering of shape, colour and line using printmaking and drawing. 

  • Week 1: What’s Your Focus?

    Choose an Artwork to Focus Your Exploration

    Choose a painting or artwork which you would like to explore. 

    This might be a painting in a local museum or gallery, a painting available online, or a painting from another era or culture which ties in with a curriculum area.

    Here are some free to access ideas:

    Portrait of a Woman in a Landscape (Portrait de femme dans un paysage) (ca. 1893–1896) by Henri Rousseau.
    Portrait of a Woman in a Landscape (Portrait de femme dans un paysage) (ca. 1893–1896) by Henri Rousseau.
  • Use Close Looking & Drawing to Explore

    Show Me What You See

    Working in sketchbooks, use the “Show Me What You See” technique to help pupil’s visually explore your chosen artwork.

    You can find a detailed explanation of the “Show Me What You See” resource here. 

    During the exercise, draw the children’s attention to the visual elements of the artwork, including talking about shape, colour and composition. As well as using line in sketchbooks to describe shapes, also use colour (pastel, crayon, pens etc).

    By the end of the session sketchbooks should be full of pupil’s interpretations of different elements (shapes, lines etc) from the paintings.

  • Week 2: Look and Talk

    Painting With Scissors

    Visit the free to access “Talking Points: Henry Matisse Cut Outs” resource to introduce pupils to the idea of “painting with scissors”.

    Use the free to access “Talking Points: Romare Bearden” resource to introduce pupils to the work of African American artist Romare Bearden who was influenced by patchwork quilts derived from African-American slave crafts and the work of Matisse. Bearden illustrated Homer’s Odyssey using collage.

    Jan Miller

    Refer to the “Drawing With Scissors” resource to see how to explore a historic (or contemporary) painting through printing. (Using just the part of the resource about collaging with cut elements).

  • “Paint with Scissors”

    Begin to Cut Shapes

    Drawing with Scissors

    With the original artwork on the white board and sketchbook work from Show Me What You See, provide pupils with coloured paper (sugar or coloured paper, or even old paintings which can be cut up) and invite them to start cutting out shapes made in response to the original artwork. You may want to refer back to “Drawing With Scissors“ resource. 

    You might like to split the class into groups – each taking a section of the original artwork, or you might like to give pupils more space to choose elements they particularly like. 

    Don’t waste any paper – at the end of the session encourage pupils to keep the paper which has been cut away (you can sort it into sizes) as well as the positive “shapes”. 

    “Envelopes” can be made/stuck in sketchbooks to keep paper elements safe until next week. 

    You might like to see the “Positive and Negative Shapes” resource (to be done). 

    Continue this work into week three.

  • Week 3: Continue “Painting with Scissors”

    Collaging with Cut Elements

    Continue the process described in the “Drawing with Scissors” resource. Invite pupils to begin to lay down their cut elements to make collaged compositions, working on A3 or larger paper.

    Encourage children to explore playfully before they decide where to stick shapes down on the page. Think about composition and meaning. Remember they are not trying to recreate the original artwork, instead they are making a creative response (which is personal) to the artwork.

    Remind pupils they can use the pieces of paper which have had shapes cut out of them, and so introduce negative shapes into their work.

    Continue into week four.

  • Continue with Collage

    Finalise Collages

    collaged artwork

    Continue the process described in the “Drawing with Scissors” resource.

    Finalise first stage of collages ready for second part of the project. By this point all cut elements should be stuck down onto each pupil’s piece of paper.

  • Week 4 & 5: Add Further Detail

    Stencils, Masks or Line

    Making a newsprint stencil

    Continue the process described in the “Drawing with Scissors” resource.

    The final stage of the project is to add further detail to the artwork by working over the collaged elements. 

    You can choose which method you want children to use from the 3 options below. Choose the option you think will best help pupils respond to the original artwork.

    The aim of this final stage is to add further definition or clarity to the collaged composition, using a different medium to make the artwork feel more dimensional (collage can be quite a “flat” medium).

  • Option 1

    Printed Line

    Revisit the original artwork and get pupils to look closely at the qualities of line the artists used.

    Use the “Mono Printing with Carbon Paper” resource and use carbon paper to add line drawings over the top of the collaged sheets.

    Remember the drawings do not have to line up with the exiting imagery. Layering imagery of different types will give exciting results.


  • Or…

  • Option 2

    Explore Stencils

    Use the “Explore Stencils, Composition and Expressive Mark Making with Oil Pastels” resource and invite children to create masks and stencils out of card, thinking about negative and positive shapes. Use the masks and stencils over the original collaged artwork, using oil pastel as a medium.

    Encourage the children to use a range of mark making and experiment with colour blending so that they get an understanding of the qualities of oil pastels.


  • Or…

  • Option 3

    Simple Screen Printing Hack

    Pushing Ink Through a Silk Screen by Paula Briggs

    If you are feeling more confident, you may want to give pupils the opportunity to explore simple screen printing as an alternative way to explore masks and stencils. See our “Talking Points: Screenprint

    Give children the opportunity to try out screen printing with this “Simple Screen Print Hack“. Watch all 3 videos before starting.

    Ask children to prepare their stencils and masks prior to printing. Remember that they will need stencils and masks of every element including clothing, face detail or any big shapes within the background. 

    As with Option 1 and 2, be inventive about the shapes which are overlaid over the collaged elements – remember the shapes do not have to line up with the collaged composition – exciting and surprising outcomes can be achieved by creating new shapes and lines over the first collage. 

  • Week 6: Reflect & Discuss

    Share, Reflect, Discuss

    Time to see the work which has been made, talk about intention and outcome.

    Peer Assessing work

    Invite pupils to display the work in a clear space, and walk around the work as if they are in a gallery. Give the work the respect it deserves. Remind the children of their handwork.

    If you have class cameras or tablets, invite the children to document their work, working in pairs or teams.

    Use the resource here to help you run a class “crit” to finish the project. 

  • Extension

    Extension: Animating With Used Masks, Stencils, Or Left Over Shapes

    Claire Willberg

    Claire Willberg repurposes the paper that she uses in her printing process to create visually exciting animations. See her animations in “Talking Points: Claire Willberg“.

    Get your children to keep their stencils and masks once they’ve been used and make a stop motion.

    See the “Animation Software” resource for support. 

See the Pathway Used in Schools…

By @QuintaElsinor Screen Printing Hack, Year 4
@QuintaElsinor Screen Printing Hack, Year 4
Year 3, Glenfrome Primary
Year 3 Oxley Primary School
Year 3 Ruth at Carden Primary School, Brighton
Ruth at Carden Primary School, Brighton

If You Use AccessArt Resources
You May Want To…

Join our Facebook Group

Join the AccessArt Network group on Facebook and ask questions of others using our resources

Join the AccessArt Network group on Facebook and ask questions of others using our resources

Share and Tag

Share photos of work made by tagging us on social media

Share photos of work made by tagging us on social media

You May Also Like…

Using Sketchbooks, Drawing and Reflective Tools in the 20th Century Gallery at the Fitzwilliam Museum, Cambridge

Explore 20th Century paintings and sculpture, using sketchbooks & drawing as tools for looking

Explore 20th Century paintings and sculpture, using sketchbooks & drawing as tools for looking

Using Drawing to Get Closer to 18th Century Portraits at the Fitzwilliam Museum, Cambridge

Explore different drawing exercises for capturing 18th Century portraiture

Explore different drawing exercises for capturing 18th Century portraiture


Expressive Painting & Colour Mixing

See the Resource Used in Schools…

year 2 @littletownschool sketchbooks

year 2 @littletownschool sketchbooks
Year 2
Year 2
Year 2
2023-01-30 (15)
Year 2
Year 2 Whitchurch Primary School
Home-Education Mixed Age Group, 6 - adult

You May Also Like…

Pathway: Expressive Painting

This is featured in the 'Expressive Painting' pathway

This is featured in the ‘Expressive Painting’ pathway

Talking Points: Brush Work of Van Gogh & Cezanne

Wheat Field with Cypresses (1889) by Vincent Van Gogh. Original from the MET Museum.

Talking Points: Marela Zacarías

Marela Zacarías

talking points: Charlie French

Charlie French

Session Recording: Expressive Painting

expressive painting on green


Osakana


Talking Points: Making Drawings With Your Whole Body – Molly Haslund

A collection of imagery and sources designed to introduce children to the work of Danish artist Molly Haslund.

Please note that this page contains links to external websites and has videos from external websites embedded. At the time of creating, AccessArt checked all links to ensure content is appropriate for teachers to access. However external websites and videos are updated and that is beyond our control. 

Please let us know if you find a 404 link, or if you feel content is no longer appropriate. 

We strongly recommend as part of good teaching practice that teachers watch all videos and visit all websites before sharing with a class. On occasion there may be elements of a video you would prefer not to show to your class and it is the teacher’s responsibility to ensure content is appropriate. Many thanks. 

*If you are having issues viewing videos it may be due to your schools firewall or your cookie selection. Please check with your IT department.*

This resource is free to access and is not a part of AccessArt membership.

ages 5-8
ages 9-11
free to access

The Circle Project by Molly Haslund

Teacher’s Notes

“Molly Haslund ventures out into the city wearing grey: a grey suit, grey socks and grey shoes so that she blends in with the tarmac and the pavement. She carries a huge pair of compasses much taller than herself. She stops somewhere and starts drawing a white circle on the ground. She completes the first circle and then moves the pair of compasses and starts drawing a new circle that overlaps the first one. She draws a third circle and stands in her grey shoes in the middle of the circle for a moment before snapping the pair of compasses together and moving on.” https://www.mollyhaslund.com/circles-2013-2

“… The focus is on the physical action, on the movement of the circles, and the patterns emerging and disappearing again – and of course the effect grows with the number of participants. on the other hand, if you want to draw alone, you can just withdraw a little from the rest. A bit like on the dance floor.”  Molly Haslund 

Watch the video with the pupils, and look at the images below. Find questions to prompt discussion at the end of this resource. 

Molly Haslund Circles, 2015 New York, Peekskill Project #6, Hudson Valley MOCA

Circles, Molly Haslund, 2015, New York, Peekskill Project #6, Hudson Valley MOCA, Photo by Joe Orangias

Molly Haslund Circles (2013) Museum of Contemporary Art, Roskilde, Denmark Photo by Matilde Haaning

Circles (2013), Molly Haslund, Museum of Contemporary Art, Roskilde, Denmark, Photo by Matilde Haaning

Molly Haslund Circles, 2014 Art Week, Superkilen, Copenhagen, Denmark Photo by Matilde Haaning

Circles, Molly Haslund, 2014, Art Week, Superkilen, Copenhagen, Denmark, Photo by Matilde Haaning

Molly Haslund Circles, 2014 Art Week Superkilen, Copenhagen, Denmark Photo by Matilde Haaning

Circles, Molly Haslund, 2014, Art Week, Superkilen, Copenhagen, Denmark, Photo by Matilde Haaning

Questions to Ask Children

How would you feel if you came across these circles in your street or playground, without knowing who had made them or why? What would you do? Would they change the way you move?

How do you think Molly, the artist, chooses where to make her circles?

How could you make similar circles in your playground, using chalk tied to sticks? 

How would the circles you make join up with the circles your friends make?

What would other pupils in your school think if they discovered your circles? What do you think they would do?

What other shapes could you make with your body in the playground? Would you need tools? 

If music played would you make different shapes? How would the shapes be different? 

This Talking Points Is Used In…

Pathway: Spirals

This is featured in the 'Spirals' pathway

This is featured in the ‘Spirals’ pathway

using sketchbooks to make visual notes

An open page spread of a child's sketchbook

Show me what you see

Show Me What You See Method 250 Words by Tobi Meuwissen

See This Resource Used In Schools…

Year 1, Goose Green Primary School


Talking Points: Brush Work of Van Gogh & Cezanne

A collection of imagery and sources designed to stimulate an exploration of the brushwork of Van Gogh and Cezanne.

Please note that this page contains links to external websites and has videos from external websites embedded. At the time of creating, AccessArt checked all links to ensure content is appropriate for teachers to access. However external websites and videos are updated and that is beyond our control. 

Please let us know if you find a 404 link, or if you feel content is no longer appropriate. 

We strongly recommend as part of good teaching practice that teachers watch all videos and visit all websites before sharing with a class. On occasion there may be elements of a video you would prefer not to show to your class and it is the teacher’s responsibility to ensure content is appropriate. Many thanks. 

*If you are having issues viewing videos it may be due to your schools firewall or your cookie selection. Please check with your IT department.*

This resource is free to access and is not a part of AccessArt membership.

ages 5-8
ages 9-11
ages 11-14
ages 14-16
free to access

Exploring the Brushwork of Van Gogh and Cezanne

If we zoom in and look closely at the brushwork of both Cezanne and Van Gogh you’ll see how they applied paint using fluid loose marks with complex colours, and yet when you stand back, the brush marks and the colours find their place to help tell the story of the painting.

In this resource we have zoomed in on sections of paintings to help pupils see the kinds of marks made by the painters. 

Use the questions at the end to help guide an exploration. 

deatil: Wheat Field with Cypresses (1889) by Vincent Van Gogh. Original from the MET Museum.
Wheat Field with Cypresses (1889) by Vincent Van Gogh. Original from the MET Museum.

Top: Detail: Wheat Field with Cypresses (1889) by Vincent Van Gogh. Original from the MET Museum.

Detail: Three Apples (Deux pommes et demie) (ca. 1878–1879) by Paul Cézanne. Original from Original from Barnes Foundation.
Three Apples (Deux pommes et demie) (ca. 1878–1879) by Paul Cézanne. Original from Original from Barnes Foundation.

Top: Detail: Three Apples (Deux pommes et demie) (ca. 1878–1879) by Paul Cézanne. Original from Original from Barnes Foundation.

Detail: Houses and Figure (1890) by Vincent Van Gogh. Original from the Barnes Foundation.
Houses and Figure (1890) by Vincent Van Gogh. Original from the Barnes Foundation.

Top: Detail: Houses and Figure (1890) by Vincent Van Gogh. Original from the Barnes Foundation. 

Deatil: Houses in Provence: The Riaux Valley near L'Estaque (ca. 1883) by Paul Cézanne.
Houses in Provence: The Riaux Valley near L'Estaque (ca. 1883) by Paul Cézanne.

Top: Detail: Houses in Provence: The Riaux Valley near LEstaque (ca. 1883) by Paul Cézanne.

Detail: The Bedroom (1889) by Vincent Van Gogh.
The Bedroom (1889) by Vincent Van Gogh.

Top: Detail: The Bedroom (1889) by Vincent Van Gogh.

Questions to Ask Children

“Impasto” describes paint when it is applied so thickly onto the canvas that it remains raised. Can you see areas of impasto in the paintings above?

Can you find an area of a painting where the artist has let the colour of the canvas show through?

Can you find examples of where the artist hasn’t mixed the colour on a palette – instead he has applied wet paint of one colour over wet paint of another colour and you can see where it mixes on the canvas?

Think about direction of brush strokes – can you find an area of canvas where the brush strokes go a particular direction? How do the artists’ change the direction of the brush strokes according to the subject matter of what they are painting? 

How would you describe some of the brush strokes? Restful? Busy? Rhythmical? Chaotic? 

Can you see areas of the paintings where the artist uses outlines? Doesn’t use outlines?

How many different colours can you spot in a particular area of canvas? Do you think the artist gives those colours names?

What kinds of tools or brushes do you think the artist might have used? 

This Talking Points Is Used In…

Pathway: Expressive Painting

This is featured in the 'Expressive Painting' pathway

This is featured in the ‘Expressive Painting’ pathway

using sketchbooks to make visual notes

Sketchbooks used for observations, research drawing and experimentation.

Show me what you see

Show Me What You See Method 250 Words by Tobi Meuwissen

See This Resource Used In Schools

Stourfield Infant School, Year 2


Talking Points: Charlie French

A collection of imagery and sources designed to stimulate conversation around the work of Charlie French.

Please note that this page contains links to external websites and has videos from external websites embedded. At the time of creating, AccessArt checked all links to ensure content is appropriate for teachers to access. However external websites and videos are updated and that is beyond our control. 

Please let us know if you find a 404 link, or if you feel content is no longer appropriate. 

We strongly recommend as part of good teaching practice that teachers watch all videos and visit all websites before sharing with a class. On occasion there may be elements of a video you would prefer not to show to your class and it is the teacher’s responsibility to ensure content is appropriate. Many thanks. 

*If you are having issues viewing videos it may be due to your schools firewall or your cookie selection. Please check with your IT department.*

This resource is free to access and is not a part of AccessArt membership.

SEND badge by Tobi Meuwissen
ages 5-8
ages 9-11
ages 11-14
ages 14-16
free to access

Charlie French

“I embrace a blank canvas with a sense of wonder and adventure.”

Charlie French is an abstract painter, living in London. 

Website

Instagram

Charlie French

In the Fathoms Below, copyright Charlie French

Charlie French

“What inspires you?”

“I am asked that question a lot. And I think there are obvious ones you see in my series: Disney movies, music, the ocean, the beautiful world I see, my happy memories and an imagination that cracks me up.

And lots of times I am inspired simply by my love of COLORS and SHAPES. I pick my colour palette and just paint.

The truth is that every day is different. But I am most happy when I can walk up to a canvas and let go. I am free. Freedom in life is very important. Don’t you think, Friends???”

Copyright Charlie French

Charlie French

Copyright Charlie French

Questions to Ask Children

How would you describe Charlie’s work?

How does it make you feel?

How would you describe the colours?

Charlie thinks it’s important to feel free and have the space to explore in your artwork. Would you agree? Have you ever felt like that? How do you think he lets himself feel like that?

When Charlie puts the paint on the canvas, what kinds of movements does he make with his body? Can you do “air painting” and move your arm as you think he did to apply the paint? Stand up! 

This Talking Points Is Used In…

Pathway: Expressive Painting

This is featured in the 'Expressive Painting' pathway

This is featured in the ‘Expressive Painting’ pathway

using sketchbooks to make visual notes

Sketchbooks used for observations, research drawing and experimentation.

Show me what you see

Show Me What You See Method 250 Words by Tobi Meuwissen


Talking Points: Marela Zacarías

A collection of imagery and sources designed to stimulate conversation around the work of Marela Zacarías.

Please note that this page contains links to external websites and has videos from external websites embedded. At the time of creating, AccessArt checked all links to ensure content is appropriate for teachers to access. However external websites and videos are updated and that is beyond our control. 

Please let us know if you find a 404 link, or if you feel content is no longer appropriate. 

We strongly recommend as part of good teaching practice that teachers watch all videos and visit all websites before sharing with a class. On occasion there may be elements of a video you would prefer not to show to your class and it is the teacher’s responsibility to ensure content is appropriate. Many thanks. 

*If you are having issues viewing videos it may be due to your schools firewall or your cookie selection. Please check with your IT department.*

This resource is free to access and is not a part of AccessArt membership.

ages 5-8
ages 9-11
ages 11-14
ages 14-16
free to access

Marela Zacarías

“My pieces are sculptural paintings. I make the piece take your eye into spaces you wouldn’t think to look.”

Marela is a painter/sculptor who creates undulating painted forms which explore movement and colour. The majority of Marela’s pieces are site specific (created for a particular location). 

Marela lives between Brooklyn and Mexico City

Website

Questions to Ask Children

How would you describe Marela’s artwork to someone who couldn’t see it?

How does it make you feel? How would you react if you were in the same space?

What does it remind you of?

Does your eye stay still when you look at it?

Can you imagine how Marela works out how the pieces join together? 

Is it like anything you have seen before?

What kinds of colours does she use?

This Talking Points Is Used In…

Pathway: Expressive Painting

This is featured in the 'Expressive Painting' pathway

This is featured in the ‘Expressive Painting’ pathway

using sketchbooks to make visual notes

Sketchbooks used for observations, research drawing and experimentation.

Show me what you see

Show Me What You See Method 250 Words by Tobi Meuwissen


Talking Points: Grayson Perry A Map of Days

A collection of imagery and sources designed to introduce pupils to “A Map of Days” by Grayson Perry.

Please note that this page contains links to external websites and has videos from external websites embedded. At the time of creating, AccessArt checked all links to ensure content is appropriate for teachers to access. However external websites and videos are updated and that is beyond our control. 

Please let us know if you find a 404 link, or if you feel content is no longer appropriate. 

We strongly recommend as part of good teaching practice that teachers watch all videos and visit all websites before sharing with a class. On occasion there may be elements of a video you would prefer not to show to your class and it is the teacher’s responsibility to ensure content is appropriate. Many thanks. 

*If you are having issues viewing videos it may be due to your schools firewall or your cookie selection. Please check with your IT department.*


This resource is free to access and is not a part of AccessArt membership.


ages 9-11
ages 11-14
ages 14-16
free to access

A Map of Days by Grayson Perry

“Grayson Perry RA created this map of a walled city as a self-portrait for an exhibition at the National Portrait Gallery. He said ‘I thought the walled city was a good metaphor – the wall, I suppose, can roughly be interpreted as your skin. But like any city, it’s dependent on the landscape it sits in as well.’ “ RA

See the Map on Google Arts & Culture.

Interview about the making of the map. 

Note for teachers on adult content: Please be advised that from 0.24 to 0.39 and 1.34 until 1.57 of this video, there is inappropriate language shown on the map. You may wish to show up to this point or to skip past the shot of the language in question.

Questions to Ask Children:

How does Grayson Perry use text in the map?

Can you find text on buildings as well as street names? How do you think he decides which text to make small, and which to make larger?

How much does Grayson Perry reveal about himself through the map?

Can you spot any symbols or visual metaphors? 

This Talking Points Is Used In…

Pathway: Typography and Maps

This is featured in the 'Typography and Maps' pathway

This is featured in the ‘Typography and Maps’ pathway

using sketchbooks to make visual notes

Sketchbooks used for observations, research drawing and experimentation.

Show me what you see

Show Me What You See Method 250 Words by Tobi Meuwissen


Talking Points: Hogwarts Maps

A collection of imagery and sources to explore the Hogwarts Maps.

Please note that this page contains links to external websites and has videos from external websites embedded. At the time of creating, AccessArt checked all links to ensure content is appropriate for teachers to access. However external websites and videos are updated and that is beyond our control. 

Please let us know if you find a 404 link, or if you feel content is no longer appropriate. 

We strongly recommend as part of good teaching practice that teachers watch all videos and visit all websites before sharing with a class. On occasion there may be elements of a video you would prefer not to show to your class and it is the teacher’s responsibility to ensure content is appropriate. Many thanks. 

*If you are having issues viewing videos it may be due to your schools firewall or your cookie selection. Please check with your IT department.*


This resource is free to access and is not a part of AccessArt membership.


ages 5-8
ages 9-11
ages 11-14
ages 14-16
free to access

Hogwarts Maps

There are many maps inspired by Hogwarts, the most famous of course is the Marauders map.

Use the sources below to focus a conversation with children about the typography and design of the highly visual maps. 

Questions to Ask Children:

Why do you think the designers chose the typography they did for the diary and map?

What kind of feeling are they trying to create?

How do you feel when you look at the map?

This Talking Points Is Used In…

Pathway: Typography and Maps

This is featured in the 'Typography and Maps' pathway

This is featured in the ‘Typography and Maps’ pathway

using sketchbooks to make visual notes

Sketchbooks used for observations, research drawing and experimentation.

Show me what you see

Show Me What You See Method 250 Words by Tobi Meuwissen


Talking Points: Paula Scher

A collection of imagery and sources designed to introduce pupils to the work of graphic designer Paula Scher.

Please note that this page contains links to external websites and has videos from external websites embedded. At the time of creating, AccessArt checked all links to ensure content is appropriate for teachers to access. However external websites and videos are updated and that is beyond our control. 

Please let us know if you find a 404 link, or if you feel content is no longer appropriate. 

We strongly recommend as part of good teaching practice that teachers watch all videos and visit all websites before sharing with a class. On occasion there may be elements of a video you would prefer not to show to your class and it is the teacher’s responsibility to ensure content is appropriate. Many thanks. 

*If you are having issues viewing videos it may be due to your schools firewall or your cookie selection. Please check with your IT department.*


This resource is free to access and is not a part of AccessArt membership.


ages 9-11
ages 11-14
ages 14-16
free to access

Paula Scher

Paula Scher is an American graphic designer, painter and art educator in design. 

Paula creates branding, but she also created a series of “maps” which contain “errors and mistakes”. Explore in the video and link below. 

“Paula Scher painted two 9-by-12-foot maps that resembled patchwork quilts from afar, but contain much textual detail. She created lines that represented the separation of political allies or borders dividing enemies. Scher created the maps into layers that reference what we think when we think of Japan, Kenya, or the Upper East Side.

For instance, The United States (1999) was painted in blocky white print and full with a list of facts that we comprehend when we think about cities. Africa (2003) is represented in a stark black and white palette, hinting at a tortured colonial past. The land of the red rising sun is represented when we think of Japan (2004).

Scher decided to produce silk-screened prints of The World that contained large-scale images of cities, states, and continents blanketed with place names and other information. It is full of mistakes, misspellings, and visual allusions to stereotypes of places such as South America, painted with hot colours and has two ovaries on the sides. It was not created to be a reliable map but convey a sense of the places that are mediated and mangled.” Wiki

www.pentagram.com/news/paula-scher-maps

Abstract: Art of the Design/ Paula Scher 

Please Note: At timecode 8.00 Paula Scher talks about her maps. 

Questions to Ask Children:

How would you describe one of Paula’s maps to someone who couldn’t see them?

In what ways do Paula’s maps differ from regular maps?

How would these maps change if you held them in your hand?

This Talking Points Is Used In…

Pathway: Typography and Maps

This is featured in the 'Typography and Maps' pathway

This is featured in the ‘Typography and Maps’ pathway

using sketchbooks to make visual notes

Sketchbooks used for observations, research drawing and experimentation.

Show me what you see

Show Me What You See Method 250 Words by Tobi Meuwissen


Talking Points: Louise Fili

A collection of imagery and sources designed to introduce pupils to the work of Typographer Louise Fili.

Please note that this page contains links to external websites and has videos from external websites embedded. At the time of creating, AccessArt checked all links to ensure content is appropriate for teachers to access. However external websites and videos are updated and that is beyond our control. 

Please let us know if you find a 404 link, or if you feel content is no longer appropriate. 

We strongly recommend as part of good teaching practice that teachers watch all videos and visit all websites before sharing with a class. On occasion there may be elements of a video you would prefer not to show to your class and it is the teacher’s responsibility to ensure content is appropriate. Many thanks. 

*If you are having issues viewing videos it may be due to your schools firewall or your cookie selection. Please check with your IT department.*


This resource is free to access and is not a part of AccessArt membership.


ages 9-11
ages 11-14
ages 14-16
free to access

Louise Fili

Founded in 1989, Louise Fili Ltd is an award-winning New York-based graphic and digital design firm specialising in strategic brand development and packaging for speciality food products.

Enjoy the video below where Louise shares how she made a poster for the New York Subway. 

Louise Fili Website

Subway Series: Louise Fili

Watch this video in Vimeo here.

This Talking Points Is Used In…

Pathway: Typography and Maps

This is featured in the 'Typography and Maps' pathway

This is featured in the ‘Typography and Maps’ pathway

using sketchbooks to make visual notes

Sketchbooks used for observations, research drawing and experimentation.

Show me what you see

Show Me What You See Method 250 Words by Tobi Meuwissen


Making Sculptural Birds

See This Resource Used In Schools…

Birds made by Year 3 Selbourne Primary School
Year 4
Year 1
Year 2 Trumpington Park Primary School
Year 2, Aboyne Lodge Primary School
Year 1 at Sydenham High Prep School
Year 2, Ruth at Carden Primary School

You May Also Like…

Pathway: Making Birds

Featured in the 'Making Birds' pathway

Featured in the ‘Making Birds’ pathway

Talking Points: Inspired by Birds

Fulmar Petrel from Birds of America (1827) by John James Audubon


Talking Points: Bridge Design

A collection of imagery and sources designed to explore bridge design.

Please note that this page contains links to external websites and has videos from external websites embedded. At the time of creating, AccessArt checked all links to ensure content is appropriate for teachers to access. However external websites and videos are updated and that is beyond our control. 

Please let us know if you find a 404 link, or if you feel content is no longer appropriate. 

We strongly recommend as part of good teaching practice that teachers watch all videos and visit all websites before sharing with a class. On occasion there may be elements of a video you would prefer not to show to your class and it is the teacher’s responsibility to ensure content is appropriate. Many thanks.

*If you are having issues viewing videos it may be due to your schools firewall or your cookie selection. Please check with your IT department.*

This resource is free to access and is not a part of AccessArt membership.

ages 5-8
ages 9-11
ages 11-14
ages 14-16
free to access

Bridge Design

Architects often use bridge design as a way to showcase their innovation. Many bridge designs entered for competitions never get built – but the ideas behind them move forward ideas about contemporary architecture. 

Explore the videos below to focus a discussion about what is possible. 

The Garden Bridge by Heatherwick Studios

The worlds first 3D printed bridge with robots by Joris Laarman

The Bouncing Bridge by AZC

Zaha Hadid Architects, Conceptual Bridge Project

Questions to Ask Children

What do bridges do?

How can bridges represent the communities they connect?

Are bridges just about destinations? Or are they about journeys?

Is there a limit to what a bridge can be?

Is there a limit to the materials you can use?

This Talking Points Is Used In…

Pathway: Be an architect

This is featured in the 'Be an Architect' pathway

This is featured in the ‘Be an Architect’ pathway

using sketchbooks to make visual notes

Sketchbooks used for observations, research drawing and experimentation.

Show me what you see

Show Me What You See Method 250 Words by Tobi Meuwissen


Talking Points: Hundertwasser the Architect

A collection of imagery and sources designed to explore the work of architect Hundertwasser.

Please note that this page contains links to external websites and has videos from external websites embedded. At the time of creating, AccessArt checked all links to ensure content is appropriate for teachers to access. However external websites and videos are updated and that is beyond our control. 

Please let us know if you find a 404 link, or if you feel content is no longer appropriate. 

We strongly recommend as part of good teaching practice that teachers watch all videos and visit all websites before sharing with a class. On occasion there may be elements of a video you would prefer not to show to your class and it is the teacher’s responsibility to ensure content is appropriate. Many thanks. 

*If you are having issues viewing videos it may be due to your schools firewall or your cookie selection. Please check with your IT department.*

This resource is free to access and is not a part of AccessArt membership.

ages 5-8
ages 9-11
ages 11-14
ages 14-16
free to access

Hundertwasser the Architect

Use the following images and videos to introduce children to the work of Austrian artist Friedrich Stowasser, better known by his pseudonym Friedensreich Regentag Dunkelbunt Hundertwasser (1928 – 2000).

Hundertwasser was a visual artist and architect and he also worked in the field of environmental protection.

“Hundertwasser stood out as an opponent of “a straight line” and any standardization, expressing this concept in the field of building design. ” Wiki

Explore The Inventive Architecture of Friedensreich Hundertwasser – Google Arts & Culture

www.kunsthauswien.com/en/

https://hundertwasser.com/en

Hundertwasser House by Studio Sarah Lou

Hundertwasser House
by Studio Sarah Lou

Hundertwasser's Beer Tower by AlexDROP

Hundertwasser’s Beer Tower by AlexDROP

Hundertwasser Tower in Abensberg

hundertwasser by twicepix

Hundertwasser by twicepix

Usine d'incinération décorée par F. Hundertwasser (Vienne)

Usine d’incinération décorée par F. Hundertwasser (Vienne) by dalbera

Hundertwasser in Altenrhein. This video is not in English – you may wish to watch it silently and use the opportunity to talk as teacher. 

Questions to Ask Children

What words would you use to describe Hundertwasser’s architecture to those who can’t see it?

How does it make you feel?

What would it be like to be inside the buildings?

What kinds of materials does he use? 

How does he use colour in his buildings?

How important is the relationship of detail to big structures?

Can you see any straight lines?

This Talking Points Is Used In…

Pathway: Be an architect

This is featured in the 'Be an Architect' pathway

This is featured in the ‘Be an Architect’ pathway

using sketchbooks to make visual notes

Sketchbooks used for observations, research drawing and experimentation.

Show me what you see

Show Me What You See Method 250 Words by Tobi Meuwissen


Talking Points: Thinking About Architecture

A collection of imagery and sources designed to introduce the idea of architecture to primary aged children.

Please note that this page contains links to external websites and has videos from external websites embedded. At the time of creating, AccessArt checked all links to ensure content is appropriate for teachers to access. However external websites and videos are updated and that is beyond our control. 

Please let us know if you find a 404 link, or if you feel content is no longer appropriate. 

We strongly recommend as part of good teaching practice that teachers watch all videos and visit all websites before sharing with a class. On occasion there may be elements of a video you would prefer not to show to your class and it is the teacher’s responsibility to ensure content is appropriate. Many thanks. 

*If you are having issues viewing videos it may be due to your schools firewall or your cookie selection. Please check with your IT department.*

This resource is free to access and is not a part of AccessArt membership.

ages 5-8
ages 9-11
free to access

Thinking About Architecture

Use the following videos to introduce the idea of architecture to young children. 

Architecture According to Pigeons, Illustrated by Natsko Seki. 

Imagine A World Without Architecture

Questions to Ask Children

What would birds see as they flew over the place you live in? 

Which buildings would stand out? 

Would they see patterns and shapes?

Can you imagine architecture from other perspectives? How would a dog see your local environment? How do YOU see your local environment?

This Talking Points Is Used In…

Pathway: Be an architect

This is featured in the 'Be an Architect' pathway

This is featured in the ‘Be an Architect’ pathway

using sketchbooks to make visual notes

Sketchbooks used for observations, research drawing and experimentation.

Show me what you see

Show Me What You See Method 250 Words by Tobi Meuwissen