Dark-field Monotype

By Tobi Meuwissen

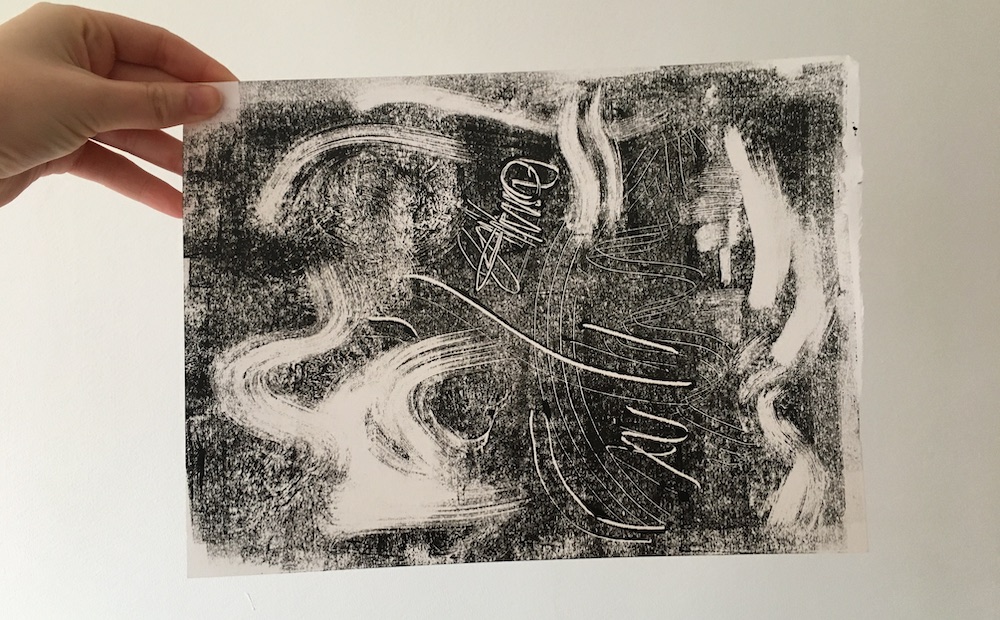
In this resource you will find out how to create a dark-field monotype. A dark-field monotype consists of covering a printing plate with ink and then drawing into the ink using mark making tools. This activity is a great exploration of mark making and also using light and dark to create form. Try it with children 8 and up!

Monotype Mark Making by Tobi Meuwissen


Please log in here to access full content.

Username
Password


Remember me
Forgot Password


To access all content, I would like to join as…

An Individual

Creative practitioners, educators, teachers, parents, learners…


An Organisation…

Schools, Colleges, Arts Organisations: Single and Multi-Users


AccessArt is a UK Charity and we believe everyone has the right to be creative. AccessArt provides inspiration to help us all reach our creative potential.


Talking Points: Shaheen Ahmed

A collection of imagery and sources designed to stimulate conversation around the work of Shaheen Ahmed.

Please note that this page contains links to external websites and has videos from external websites embedded. At the time of creating, AccessArt checked all links to ensure content is appropriate for teachers to access. However external websites and videos are updated and that is beyond our control. 

Please let us know if you find a 404 link, or if you feel content is no longer appropriate. 

We strongly recommend as part of good teaching practice that teachers watch all videos and visit all websites before sharing with a class. On occasion there may be elements of a video you would prefer not to show to your class and it is the teacher’s responsibility to ensure content is appropriate. Many thanks. 

*If you are having issues viewing videos it may be due to your schools firewall or your cookie selection. Please check with your IT department.*


This resource is free to access and is not a part of AccessArt membership.


ages 9-11
ages 11-14
ages 14-16
free to access

Shaheen Ahmed

Persia by Shaheen Ahmed

Primordial Sanctuary by Shaheen Ahmed

“When countries are at war, when people are suffering, that is the time to reach out. The very least we should do is empathise.”

“Craftivist” Shaheen Ahmed lives and works in the West Midlands where she manipulates maps and paper using Kirigami to connect her passion for Islamic art, and exploration of social justice.

The concept of empathy is central to Shaheen’s work. Her manipulation of maps, over-writing with pattern and marks, is Shaheen’s way of commenting upon and mending the destruction and fear caused by boundaries and borders. The meditative actions she performs become Shaheen’s blessings outwards for a better world. 

Linktree

www.shaheenahmed.com/

Mapping Empathy by Shaheen Ahmed

Craft Council Exhibition

Instagram

Primordial Sanctuary by Shaheen Ahmed

Primordial Sanctuary by Shaheen Ahmed

Primordial Sanctuary Series by Shaheen Ahmed

Persia by Shaheen Ahmed

Questions to Ask Children

Look carefully at Shaheen’s artwork. How would you describe it to someone who couldn’t see it?

Do you think the processes Shaheen uses and the final outcome contribute to Shaheen’s wellbeing?

How do you feel when you look at the artwork? Are you thinking about the painstaking processes Shaheen uses, or the final outcome? Or are you thinking about the people in the places she makes art about? Or something else? 

Shaheen describes herself as a “Craftivist”. What do you think that means?

This Talking Points Is Used In…

Pathway: Exploring pattern

This is featured in the 'Exploring Pattern' pathway

This is featured in the ‘Exploring Pattern’ pathway

using sketchbooks to make visual notes

Sketchbooks used for observations, research drawing and experimentation.

Show me what you see

Show Me What You See Method 250 Words by Tobi Meuwissen


Talking Points: Andy Gilmore

A collection of imagery and sources designed to stimulate conversation around the work of Andy Gilmore.

Please note that this page contains links to external websites and has videos from external websites embedded. At the time of creating, AccessArt checked all links to ensure content is appropriate for teachers to access. However external websites and videos are updated and that is beyond our control. 

Please let us know if you find a 404 link, or if you feel content is no longer appropriate. 

We strongly recommend as part of good teaching practice that teachers watch all videos and visit all websites before sharing with a class. On occasion there may be elements of a video you would prefer not to show to your class and it is the teacher’s responsibility to ensure content is appropriate. Many thanks. 

*If you are having issues viewing videos it may be due to your schools firewall or your cookie selection. Please check with your IT department.*


This resource is free to access and is not a part of AccessArt membership.


ages 9-11
ages 11-14
ages 14-16
free to access

Andy Gilmore

“A master of colour and geometric composition, Andy Gilmore’s work is often characterised as kaleidoscopic and hypnotic, though it could just as well be described as visually acoustic, his often complex arrangements referencing the scales and melodies in music.”

http://agilmore.com/

Instagram

Questions to Ask Children

Choose one of Andy’s pieces of art. Can you describe what you see?

How do you feel when you look at Andy’s work? 

Andy’s work appears in newspapers and magazines, record covers and in advertising. Why do you think Andy’s work is used this way? 

This Talking Points Is Used In…

Pathway: Exploring pattern

This is featured in the 'Exploring Pattern' pathway

This is featured in the ‘Exploring Pattern’ pathway

using sketchbooks to make visual notes

Sketchbooks used for observations, research drawing and experimentation.

Show me what you see

Show Me What You See Method 250 Words by Tobi Meuwissen


Talking Points: Louise Despont

Do we need to know the outcome of the work we make before we start? 

Louise Despont works intuitively, allowing her drawings to develop as she creates them. Using pencils, rulers, stencils, and compasses, she produces dense, colourful, large-scale, meditative works that aim to capture energy or feeling rather than something we can see or touch.

Use the below videos and questions to build up an understanding of Louise Despont’s drawings and see how you can bring her methods into making your own work.

Please Note:

This page includes links and videos from external sites, verified at publication but subject to change.

Teachers should review all content for classroom suitability.

Report any issues, and check school firewall settings if videos don’t play.

ages 9-11
ages 11-14
ages 14-16
free to access

Louise Despont

“[In drawing] the downshift in speed is what opened the door for information and inspiration to step through”

Louise Despont is an artist whose practice focuses on drawing. Her works comprise of detailed geometric drawings which evolve organically. The making of the artwork, and the outcomes, are powerful, meditative and mindful. 

She lives in USA and Bali. 

www.louisedespont.com/

Nicelle Beauchene Gallery

In the TedTalk below, Louise Despont shares why she thinks drawing is so important both to herself and to us all as human beings. 

TedTalk

How and where Louise finds inspiration…

Questions to Ask Children

Do you think Louise has a clear idea of the outcome before she starts each piece? 

How long do you imagine she works on each piece? How does she know when a piece is finished? Is a piece ever finished?

How do the drawings make you feel?

How would it feel to make drawings like that?

Louise gives advice:

  • Look at your work upside down for a new perspective.

  • Reorganise your pages to see if there isn’t an entirely different story inside the one you had.

What do you think she means by this advice, and can you apply it to your own work?

Look around you. Could you begin to collect images or objects, using your instinct, that you are attracted to. Could you use them as a starting point to draw? What tools could you use to help you draw? 

This Talking Points Is Used In…

Pathway: Exploring pattern

This is featured in the 'Exploring Pattern' pathway

This is featured in the ‘Exploring Pattern’ pathway

using sketchbooks to make visual notes

Sketchbooks used for observations, research drawing and experimentation.

Show me what you see

Show Me What You See Method 250 Words by Tobi Meuwissen


Drawing Source Material: The Natural World

A collection of imagery and sources which you can use to prompt drawing in schools and community groups. 

Please note that this page contains links to external websites and has videos from external websites embedded. At the time of creating, AccessArt checked all links to ensure content is appropriate for teachers to access. However external websites and videos are updated and that is beyond our control. 

Please let us know if you find a 404 link, or if you feel content is no longer appropriate. 

We strongly recommend as part of good teaching practice that teachers watch all videos and visit all websites before sharing with a class. On occasion there may be elements of a video you would prefer not to show to your class and it is the teacher’s responsibility to ensure content is appropriate. Many thanks.

These resources are free to access and are not a part of AccessArt Membership.

free to access

The Natural World

Use the film below as source material to enable the children to draw the natural world.

You can either choose to stop the video, and draw from a collection of paused images, or you can also choose to ask the children to work from the moving image. 

Find drawing exercises below to help your drawing exploration.

Drawing Exercises

  1. Have the children draw in a quiet room, with the video on the whiteboard.

  2. Stop the video at a chosen frame and use your voice to direct their drawing. Choose words which relate to the imagery, for example you might decide to focus their attention on vertical lines, so you might choose words like: line, growth, upward, downward, fall… or you might choose to attract their attention to the energy of a wave or the curve of an animals back. Think carefully about the words you use – they don’t have to be used in sentences – you can speak lists. 

  3. Each sketchbook response might take just 3 to 5 minutes, then move on to another still. Create a sense of momentum. 

  4. Direct pupils to use a chosen medium. You might like to start with soft pencil or handwriting pen. 

You May Also Like…

Pathway:Exploring the world though mono print

This is featured in the 'Exploring The World Through Mono print' pathway

This is featured in the ‘Exploring The World Through Mono print’ pathway

using sketchbooks to make visual notes

Sketchbooks used for observations, research drawing and experimentation.

Pathway: Making Animated Drawings

This is featured in the 'Making Animated Drawings' pathway

This is featured in the ‘Making Animated Drawings’ pathway

Show me what you see

Show Me What You See Method 250 Words by Tobi Meuwissen


Talking Points: What is Typography?

Videos and activities to help you explore Typography.

Please note that this page contains links to external websites and has videos from external websites embedded. At the time of creating, AccessArt checked all links to ensure content is appropriate for teachers to access. However external websites and videos are updated and that is beyond our control. 

Please let us know if you find a 404 link, or if you feel content is no longer appropriate. 

We strongly recommend as part of good teaching practice that teachers watch all videos and visit all websites before sharing with a class. On occasion there may be elements of a video you would prefer not to show to your class and it is the teacher’s responsibility to ensure content is appropriate. Many thanks. 

*If you are having issues viewing videos it may be due to your schools firewall or your cookie selection. Please check with your IT department.*


This resource is free to access and is not a part of accessArt membership.


ages 5-8
ages 9-11
ages 11-14
ages 14-16
free to access

What is Typography?

Typography is the art of creating and arranging letters in a way which is visually appealing and which makes the letters legible.

The videos below explore different aspects of typography. 

A Introduction to Typography…

Questions to Ask Children

Did you expect to see the artwork at the end? Was it a surprise?

How much practise do you think this took?

Do you think Pramod made lots of mistakes along the way? How much would he have learnt from his mistakes?

Questions to Ask Children

How do you feel when you watch the videos? 

What could you make letters out of?

Can you ever guess how the next letters might be made? 

What is Kinetic Typography?

Kinetic Typography is the technical name for “moving text”. 

Questions to Ask Children

What do you think the designers are trying to say through the font they use?

Questions to Ask Children

How do you feel when you watch the videos? 

Can you think of other examples you have seen of kinetic typography?

Logos

Logos can tell you a lot about what a brand is about and what it does. Next time you see a Logo, consider the message behind it.

Questions to Ask Children

What is Disney trying to convey through the Disney font/logo?

In the animation what do you think the designers are trying to convey with the typography?

Resources which Explore Typography

Cut out Typography

Cut Out Typography By Tobi Meuwissen

Typography for Children

Typography for children

Making an illustrated Alphabet

Isobel Grant

Making a Monogram

Making an Artist's Monogram

This Talking Points Is Used In…

Pathway: Typography and Maps

This is featured in the 'Typography and Maps' pathway

This is featured in the ‘Typography and Maps’ pathway

using sketchbooks to make visual notes

Sketchbooks used for observations, research drawing and experimentation.

Show me what you see

Show Me What You See Method 250 Words by Tobi Meuwissen


Cut Out Typography

See This Resource Used In Schools…

Year 5
Year 5
Oxley Primary School Typography @oxley_primary
Year 5, Bramber Primary School, Worthing
Year 5, Selborne Primary School
St Hilary School, Year 5

You May Also Like…

Pathway: Typography and Maps

This is featured in the 'Typography and Maps' pathway

This is featured in the ‘Typography and Maps’ pathway

Talking Points: What is typography?

What is typography

Talking Points: Louise Fili

Louise Fili video


Talking Points: Romare Bearden

How can artists use their work to show shared or personal experiences?

Romare Bearden was an influential artist in the 20th Century. He used collage as a way to tell stories about his personal experience, as well as celebrate the African-American cultural experience, by cutting up old artworks, magazines and photos, and building a composition with them.

Explore his collages using the sources below, then discuss the questions provided.

Please Note:

This page includes links and videos from external sites, verified at publication but subject to change.

Teachers should review all content for classroom suitability.

Report any issues, and check school firewall settings if videos don’t play.

ages 9-11
ages 11-14
ages 14-16
free to access

Romare Bearden

Romare Bearden’s artwork includes poetic memories from his childhood, powerful and thought-provoking statements about African American culture, and reinterpretations of biblical stories from an African American perspective.

In the work below, we see Bearden’s collages of Homers Odyssey, influenced by the quilting craft from African-American slaves and by post modern artists such as of Henri Matisse. 

Download the PDF at this link to see some high quality images of the work produced. 

You can find a Google Arts & Culture Story about Romare’s work here.

Questions to Ask Children

What can you see in Beardens’s collages?

Do you like his artwork Why?

Can you see any other artistic influences in his work?

What do you think the benefits of collage are?

“You sing on the canvas. You improvise, you find the rhythm, and catch it good, and structure it as you go along, then the song is you.” – Romare Bearden.

Knowing that music was a big influence in Bearden’s artwork, what do you think he meant by the quote above? 

This Talking Points Is Used In…

Pathway: working with shape and colour

This is featured in the 'Working with Shape and Colour' pathway

This is featured in the ‘Working with Shape and Colour’ pathway

using sketchbooks to make visual notes

Sketchbooks used for observations, research drawing and experimentation.

Show me what you see

Show Me What You See Method 250 Words by Tobi Meuwissen


Talking Points: Claire Willberg

Videos and sources to help you explore the work of Printmaker Claire Willberg.

Please note that this page contains links to external websites and has videos from external websites embedded. At the time of creating, AccessArt checked all links to ensure content is appropriate for teachers to access. However external websites and videos are updated and that is beyond our control. 

Please let us know if you find a 404 link, or if you feel content is no longer appropriate. 

We strongly recommend as part of good teaching practice that teachers watch all videos and visit all websites before sharing with a class. On occasion there may be elements of a video you would prefer not to show to your class and it is the teacher’s responsibility to ensure content is appropriate. Many thanks. 

*If you are having issues viewing videos it may be due to your schools firewall or your cookie selection. Please check with your IT department.*


This resource is free to access and is not a part of AccessArt membership.


ages 5-8
ages 9-11
ages 11-14
ages 14-16
free to access

Claire Willberg

Claire Willberg graduated as a sculptor at the Royal College of Art in 1989. Subsequently she completed an MA in Printmaking at Camberwell College of Art. Since 2010 she has been based at the Slaughterhaus Print Studio in South London.

Her current practice combines traditional intaglio and relief printmaking techniques. She takes inspiration from discarded objects found on the streets of London and gives them a new existence through her work.

In the videos above Claire uses the shapes inspired by the objects she finds to make animations. 

www.instagram.com/clairewillbergartist/

Questions to Ask Children

When you watch Claire’s animations, what do you think? 

What kind of a world is Claire creating for us? 

Look around you and find items which have been discarded. Look at packaging too – open out cartons and boxes and look at the shapes. What kind of shapes would they inspire you to make out of paper, and what could they become in an animation?

Do you have particular colours you are drawn to using?

Do you think you have to know “what you are doing” or can you “play” with shapes and see what happens? Do the shapes give you ideas for stories? 

This Talking Points Is Used In…

Pathway: working with shape and colour

This is featured in the 'Working with Shape and Colour' pathway

This is featured in the ‘Working with Shape and Colour’ pathway

using sketchbooks to make visual notes

Sketchbooks used for observations, research drawing and experimentation.

Show me what you see

Show Me What You See Method 250 Words by Tobi Meuwissen


Talking Points: Matisse Cut Outs

How do the colours and shapes in an artwork change the way you feel about it?

Henri Matisse was a highly influential figure in modern art, celebrated for his bold and playful use of colour and form. A painter and sculptor, he later created paper cut-outs, transforming the practice of collage.

Explore his cut outs using the sources below, then discuss the questions provided.

Please Note:

This page includes links and videos from external sites, verified at publication but subject to change.

Teachers should review all content for classroom suitability.

Report any issues, and check school firewall settings if videos don’t play.

ages 5-8
ages 9-11
ages 11-14
ages 14-16
free to access

Painting with Scissors: Cut Outs by Matisse

Enjoy the videos below to understand what we Matisse meant by “Painting with Scissors” and to understand how revolutionary his cut outs were at the time. 

See a Visual History Of Matisse’s work at Google Arts & Culture here

The video below is an animation made using cut outs by Matisse, animated by Beatriz Rosa. 

Questions to Ask Children

How do you think the size of the scissors matisse used affected the artwork he created?

Do you think Matisse drew on the paper first before he cut the shapes out?

Do you think Matisse had a “plan” in his head when he picked up coloured paper and scissors?

Matisse was old and ill when he made the cut outs. Can you tell that from the energy of the work? 

How big would you like to work? 

What do you think Matisse would have thought about the animation made by Beatriz Rosa? 

This Talking Points Is Used In…

Pathway: working with shape and colour

This is featured in the 'Working with Shape and Colour' pathway

This is featured in the ‘Working with Shape and Colour’ pathway

using sketchbooks to make visual notes

Sketchbooks used for observations, research drawing and experimentation.

Show me what you see

Show Me What You See Method 250 Words by Tobi Meuwissen


Talking Points: The Bayeux Tapestry

How can art that captures past events spark our imagination and creativity?


Historical artworks and artefacts offer rich inspiration for creative exploration while supporting cross-curricular learning. Activities such as drawing, collage, and hands-on making provide engaging ways to analyse a painting, helping to develop visual literacy and critical thinking skills.

Explore the Bayeux Tapestry using the sources below, then discuss the questions provided.

Please Note:

This page includes links and videos from external sites, verified at publication but subject to change.

Teachers should review all content for classroom suitability.

Report any issues, and check school firewall settings if videos don’t play.

ages 5-8
ages 9-11
ages 11-14
free to access

The Bayeux Tapestry

Bayeaux Tapestry

Discover the entire Bayeux Tapestry scene by scene and follow online the 70 meter-long embroidered canvas which tells the story of the conquest of England in 1066 via the official Bayeux Tapestry site.

Use the above images to inspire “Show Me What You See” looking and drawing exercise. 

The Animated Bayeux Tapestry was created as a student project while at Goldsmiths College. Just as the historic original embroidery does, the animation depicts the lead up to the Norman Invasion of Britain in 1066. 

Animation by David Newton, Music and sound design by Marc Sylvan.

“Close Looking” Questions to Ask Children

Tell me about the clothes the people wear. What purposes do the outfits serve? What patterns can you see repeated? 

What shapes and forms do you see repeated? Why do you think the artists repeated similar forms? 

Tell me about the colours you see. How do they make you feel? Would we use similar colours today? 

How do the artists depict ideas about strength and power?

This Talking Points Is Used In…

Pathway: working with shape and colour

This is featured in the 'Working with Shape and Colour' pathway

This is featured in the ‘Working with Shape and Colour’ pathway

using sketchbooks to make visual notes

Sketchbooks used for observations, research drawing and experimentation.

Show me what you see

Show Me What You See Method 250 Words by Tobi Meuwissen


Talking Points: Enfant Précoce – Painter

Introducing you to the work of Enfant Précoce

ages 9-11
ages 11-14
ages 14-16

Enfant Précoce / Francis Essoua Kalu

Teacher Advisory: Please watch the video before showing it to children to ensure you are happy. You may prefer to pause the video at several key points and present them as a series of stills. 

Enfant Précoce / Francis Essoua Kalu. Enfant Précoce is a painter, born in Cameroon in 1989

Instagram

Interview at Metal Magazine

Interview at Artsper

Website

Questions to Ask Children

What do you think the artist is trying to do with his “Exposez-Moi” project? (translated as “Expose Me”)


Talking Points: Thandiwe Muriu

Introducing you to the work of Kenyan Photographer Thandiwe Muriu.

Please note that this page contains links to external websites and has videos from external websites embedded. At the time of creating, AccessArt checked all links to ensure content is appropriate for teachers to access. However external websites and videos are updated and that is beyond our control. 

Please let us know if you find a 404 link, or if you feel content is no longer appropriate. 

We strongly recommend as part of good teaching practice that teachers watch all videos and visit all websites before sharing with a class. On occasion there may be elements of a video you would prefer not to show to your class and it is the teacher’s responsibility to ensure content is appropriate. Many thanks. 

*If you are having issues viewing videos it may be due to your schools firewall or your cookie selection. Please check with your IT department.*

This resource is free to access and is not a part of AccessArt membership.

ages 9-11
ages 11-14
ages 14-16
free to access

Thandiwe Muriu

Camo 05 © Thandiwe Muriu

Camo 05 © Thandiwe Muriu

Thandiwe Muriu is a photographer from Kenya. Thandiwe’s work celebrates her own African heritage and tackles issues around perception of identity. 

See more at Thandiwe’s website and Instagram feed

Questions to Ask Children

When you hear Thandiwe speak and listen to her words how does it make you feel?

When you look at her photographs what do you see? What do you feel?

This Talking Points Is Used In…

Pathway: Exploring Identity

This is featured in the 'Exploring Identity' pathway

This is featured in the ‘Exploring Identity’ pathway

using sketchbooks to make visual notes

Sketchbooks used for observations, research drawing and experimentation.

Show me what you see

Show Me What You See Method 250 Words by Tobi Meuwissen


Pathway: Explore & Draw

Pathway for Years 1 & 2

Disciplines:
Drawing, Sketchbooks, Collage

Key Concepts:

  • That artists explore the world, seeing things around them in new ways, and bring things back to their studios to help them make art.

  • That we can go into our own environments, even when they are very familiar to us, and learn to see with fresh eyes and curiosity.

  • That we can use the things we find to draw from, using close observational looking.

  • That we can explore and use art materials, be inventive with how we use them, taking creative risks and enjoying accidents as well as planned successes. 

  • We can use the shape of the page, and the way we arrange elements on the page, to create compositions which we like. 

In this pathway children are introduced to the idea that artists can be collectors: they go out into the world, look at things in new ways, and bring things back to the studio to inspire their art.

Children explore observational drawing and experimental mark making, and think about how they can use composition to create their artwork. 

The exercises and projects in this pathway encourage children to begin to develop hand-eye coordination through slow and paced looking. This is balanced by encouraging children to nurture a playful exploration of media, a curiosity towards the world around them, and to begin to take creative risks/trust instinct. 

Themes:
Natural Forms, Seasonal Changes, Patterns, Symmetry

Medium:
Graphite, Handwriting Pen, Watercolour / Brusho, Wax Resist

Artists: 

Rosie James, Alice Fox

This pathway will take approximately half a term, based upon a weekly art lesson. 

If you use this resource in your setting, please tag us on social media: #InspiredBy @accessart (facebook, twitter) @accessart.org.uk (instagram) and share the url. Thank you!

Wax resist leaves by pupils at Dent School, facilitated by Rosie James
Leaf Created with Wax Crayons and Brush Ink with Rosie James
Drawing 1:1 ratio
ages 5-8

Teaching Notes

Find the MTP for this pathway here.


Curriculum Links

Geography: Adapt to explore habitats. 

Maths: Use language to develop understanding of patterns, sequence, symmetry, pictorial representation, repetition. 

Science: Identifying common and wild plants, trees, structures of plants, exploring local environments and habitats, seasons, planting and growing. 

PSHE: Peer discussion, Collaboration. 


I Can…

  • I have seen how some artists explore the world around them to help them find inspiration.

  • I can explore my local environment (school, home, etc) and collect things which catch my eye.

  • I can explore composition by arranging the things that I have collected.

  • I can talk about what I collected, and how and why I arranged the things I collected.

  • I can take photographs of my artwork and I can think about focus and light.

  • I can use careful looking to practice observational drawing, and I can focus for 5 or 10 minutes.

  • I can hold an object and I can make a drawing thinking about the way the object feels. 

  • I can combine different drawing media such as wax resist and watercolour, graphite and water, wax crayon and pencil in my observational drawings.

  • I can work small in my sketchbook and on large sheets of paper, exploring how I can use line, shape and colour in my work.

  • I can cut out and collage to explore composition.

  • I can talk about the work I have made with my classmates, sharing the things I thought were successful and thinking about things I would like to try again.


Time

This pathway takes 6 weeks, with an hour per week. Shorten or lengthen the suggested pathway according to time and experience. Follow the stages in green for a shorter pathway or less complex journey.


Materials

Soft pencils, handwriting pens.

Project 1: Wax Resist Autumn Leaves – A3 cartridge paper, metallic wax crayons, brusho ink.

Project 2: Autumn Floor Drawings – Water colour, graphite, charcoal, soft B pencils, inks, A2 paper.

Pathway: Explore & Draw

A PDF of this pathway can be found here.

  • Aims of the Pathway

    In this pathway pupils are introduced to the idea that artists are inspired by the world around them. Children are empowered to go out into the world, re-see, collect and re-present through drawing. 

  • Week 1: Introduction

    Artists Are Collectors & Explorers

    Introduce children to the idea that artists are often collectors and explorers. 

    artists as collectors

    Visit the “Talking Points: Artists As Collectors & Explorers” resource and choose from one or more artists. Enable children to understand that by exploring our environments with “fresh eyes” and curiosity we can find inspiration for our artwork. 

    Use sketchbooks to make visual lists of places and things you could explore and collect in your school, home and area. 

  • Week 2: Explore and Collect

    Explore and Collect

    selecting the first twigs

    Get active and invite children to go outside into the playground or school area to collect and create “Patterns With Nature”.

    Play with the objects to create new shapes and patterns on the ground, around branches, and on logs. Be curious. Think about how even ordinary things like twigs and pebbles might be interesting when you really look at them.

    Gather the objects back to the classroom and explore composition and arrangements on paper and table tops. Don’t fasten anything down. Just play with the compositions you can make. Can you sort by colour, size, material, type?


  • Photograph Your Work

    Take photographs of the compositions. Ask the children to adapt and change how the objects are arranged or to photograph them from different angles or orientations.

    Remember to reflect on the different elements of the session: active gathering and careful documentation. Discuss how the children found these approaches.

    Create “Digital Collages” using this resource.

    A collage of different photographs.

    Print out the photographs and save them. They can be used later in the project.

  • Week 3: Sketchbook Work

    Two Drawing Exercises

    Working in a sketchbook and using a variety of media (handwriting pen, pencil), try the exercises below, drawing the things you collected the week before as individual items (i.e. not part of a bigger composition). 

  • Exercise One:

    Continuous Line Drawing Exercise

    Continuous line drawing

    Continuous Line Drawings are a great way to get participants to loosen up, get them to look closely, and make new and interesting marks on the paper. With younger children (6 to 10) we sometimes call them “squiggle drawings”.

    For full instructions visit the “Continuous Line Drawing” resource. 

  • Exercise Two:

    Feely Drawings

    Sketching as you feel

    Make drawings inspired by sense of touch. This is a fun way to encourage children to be really curious about what they are drawing. How do they use the sense of touch to find the  information they need to make a drawing? Can you forget what you know by sight? And how does this make your drawings look?

    For full instructions visit the “Feely Drawings” resource. 

  • Week 4 and 5: Projects

    Choose a Project

    Choose one of the two projects below to explore how pupils can bring all their skills together into a finished drawing. 

  • Project One:

    Wax Resist Autumn Leaves

    Wax resist autumn leaves by year 3-6 pupils at Dent C of E Primary School in the Yorkshire Dales, Cumbria

    In the “Wax Resist Autumn Leaves” resource, children are introduced to wax resist techniques, inspired by the rich colours and shapes of autumn leaves.

    Begin with observational drawing techniques, using the objects you collected from your environment as subject matter, followed by an immersive exploration of colour and scale using wax crayons and Brusho Crystal Colours. If your pupils collected other objects rather than leaves, simply adapt the resource to suit. 

    You might also like to visit the “What is Composition?” resource to help pupils think about how they might build an awareness of composition in their artwork. 


  • Or…

  • Project Two

    Autumn Floor Drawings

    Squiggle Drawing & Autumn Floor Drawing - Free to Access

    Use the “Autumn Floor Drawing” resource which you can find as the second part of the resource. to give pupils the opportunity to continue practicing their observation and mark-making skills, this time bringing in two added elements:

    1) Thinking about composition. These drawings have no top or bottom as they are inspired by the fallen leaves and twigs on the ground. You might like to talk to pupils about composition using the “What is Composition?” resource. 

    2) Great experimentation with different media. Explore graphite, water soluble graphite, wax resist and watercolour or ink, or a combination of all those media. 


  • Reflect, Share, Talk

    Reflect, Share, Talk

    Time to see the work which has been made, talk about intention and outcome.

    Give the work the respect it deserves and clear a space to see all the work made, including the sketchbook work made earlier. Remind the children of their hard work and enable them to connect all the elements of their learning. 

    If you have class cameras or tablets, invite the children to document their work, working in pairs or teams. 

    You might like to assemble the drawings made in Week 2 and 3 into a “class” Backwards Sketchbook

    Use the resource here to help you run a class “crit” to finish the project. 

See the Pathway Used in Schools…

Penny Kemp, Teacher of Lower School of Inskip St Peters C of E Primary School, Lancashire
Larkfield Primary School
Emma Seaman @mysliceofschoollife and New Silkworth Academy
Ruth at Carden Primary School, Brighton

If You Use AccessArt Resources…
You might like to…

Join our Facebook Group

Join the AccessArt Network group on Facebook and ask questions of others using our resources

Join the AccessArt Network group on Facebook and ask questions of others using our resources

Share and Tag

Share photos of work made by tagging us on social media

Share photos of work made by tagging us on social media

Scroll drawings

Making a scroll drawing, Drawing Projects for Children

Encourage children to experiment with size and ratio

Larger than life Scroll drawings

Close up knot

Explore drawing objects life sized, using a selection of media

Help children to draw larger

Helping Children to Draw Larger

Explore a more gestural approach


Talking Points: Artists as Collectors & Explorers

A collection of imagery and sources designed to explore the idea that artists can be collectors and explorers.

Please note that this page contains links to external websites and has videos from external websites embedded. At the time of creating, AccessArt checked all links to ensure content is appropriate for teachers to access. However external websites and videos are updated and that is beyond our control. 

Please let us know if you find a 404 link, or if you feel content is no longer appropriate. 

We strongly recommend as part of good teaching practice that teachers watch all videos and visit all websites before sharing with a class. On occasion there may be elements of a video you would prefer not to show to your class and it is the teacher’s responsibility to ensure content is appropriate. Many thanks. 

*If you are having issues viewing videos it may be due to your schools firewall or your cookie selection. Please check with your IT department.*

This resource is free to access and is not a part of AccessArt membership.

ages 5-8
ages 9-11
ages 11-14
free to access

Introduction

The following videos and weblinks explore the idea that artists can be collectors and explorers. 

By approaching the world with curiosity and openness, we can re-see the things around us and use them to inform and inspire our creative processes.

The following artists all venture out into the world, exploring familiar and new places and finding inspiration in the things around them. These artists then bring the things they “collect” back to their studios to make work. 

Andy Goldsworthy

Andy Goldsworthy is a British Sculptor who has become know for making art from things he finds in the landscape. Sometimes he creates the artwork in the landscape itself (he calls this “land art”), but in this video he shares how he takes ice and rocks from the landscape and lets it make a “drawing” as it thaws in his studio.

The video is suitable for children, however depending upon the abilities/experience of the children in your class you may wish to watch the video yourself, then turn the sound down as you play it to the children, using your own voice to help share what the artist is doing. 

TateShots: Andy Goldsworthy, Studio Visit

Questions to Ask Children

Andy Goldsworthy says: “Art has this amazing ability to show you what’s there.” 

What do you think he means by that? 

Do you like the artwork in the video more because you can see how it has been made?

How much control does Andy have over the artwork he makes? Does he want more control? 

Joseph Cornell

Joseph Cornell was an American visual artist and film-maker, one of the pioneers and most celebrated exponents of assemblage. He was a great collector.

His images are copyright protected but the Royal Academy has created some excellent videos about his work, and there are images on the site too. 

Take a look at the videos here. 

RA

Hassan Hajjaj

Hassan Hajjaj was born in 1961 in Larache, Morocco, and now lives and works in London, UK. He is inspired by Moroccan culture and artefacts and his work crosses many disciplines including photography and design. 

www.instagram.com/hassanhajjaj_larache/

Avantarte

Questions to Ask Children

What kinds of things catch Hassan’s eye when he is looking around his environment?

Do you think there is a clear distinction between “art” and “life” in Hassan’s mind? 

Lorna Crane the Brush Maker

Lorna Crane is an abstract painter whose work is inspired by the Australian landscape. She makes her own artist’s brushes using diverse natural and man-made materials, many of them found at Pambula river mouth on the NSW far south coast.

Questions to Ask Children

How do you think Lorna decides which things to pick up and turn into brushes?

Do you think two brushes are ever the same?

Which part do you think Lorna likes best: the collecting, the making brushes, or the painting with her brushes?

What could you make brushes out of? What marks would they make? What challenges might you face?

Alice Fox

Alice Fox took on an old allotment and on the allotment were a number of sheds. Alice spends time discovering the past through the things she finds and creates small, carefully crafted artworks, inspired by what she finds and natural materials.

You can see more of Alice’s work here. 

A film about artist Alice Fox who works with found, gathered and grown materials all within the boundaries of her allotment.

Questions to Ask Children

Can you think of some words to describe the small pieces of art that Alice makes? What do they make you think of?

When she is making her work, how do you think Alice feels? 

Where do you think she gets her ideas about how to transform materials from?

Do you think she works quickly or slowly?

Nicole White

Nicola is a “Mudlarker” and artist, who uses the glass she finds on the beach to make her artworks.

Nicola White, Mudlarker and Artist

Trash Art Project

Trash Art Project collected from Brokenstraw Creek, USA

Questions to Ask Children

Do you think these students knew what they would make before they found the materials?

How do you think they decided what to make?

Do you think the project went right from the start, or can you imagine they had to keep rethinking challenges along the way?

What challenges do you think they faced?

This Talking Points Is Used In…

Pathway: Explore and Draw

This is featured in the 'Explore and Draw' pathway

This is featured in the ‘Explore and Draw’ pathway

Pathway: using natural materials to make images

This is featured in the 'Using Natural Materials to Make Images' pathway

This is featured in the ‘Using Natural Materials to Make Images’ pathway

using sketchbooks to make visual notes

Sketchbooks used for observations, research drawing and experimentation.

Show me what you see

Show Me What You See Method 250 Words by Tobi Meuwissen


Drawing Source Material: Birds

A collection of imagery and sources which you can use to prompt drawing in schools and community groups. 

Please note that this page contains links to external websites and has videos from external websites embedded. At the time of creating, AccessArt checked all links to ensure content is appropriate for teachers to access. However external websites and videos are updated and that is beyond our control. 

Please let us know if you find a 404 link, or if you feel content is no longer appropriate. 

We strongly recommend as part of good teaching practice that teachers watch all videos and visit all websites before sharing with a class. On occasion there may be elements of a video you would prefer not to show to your class and it is the teacher’s responsibility to ensure content is appropriate. Many thanks. 

These resources are free to access and are not a part of AccessArt Membership.

free to access

Birds

Use this collection of films as source material for pupils exploring birds. In the first instance you might want to pause the videos as suitable points to enable the children to carefully look at the main forms and details. Try to create a sense of momentum – for example you might pause the video 4 times and ask the pupils to make a 1 minute, 2 minute, 3 minute and 4 minute drawing at each pause. 

Encourage close and slow looking by talking as they draw – use your voice to attract their attention to features of the bird. 

When pupils are more experienced, you can also try getting them to make their drawings as the videos play – making quick gestural sketches. 

You May Also Like…

Pathway: Making Birds

Making birds from card, paper and wire

This is featured in the ‘Making Birds’ pathway

using sketchbooks to make visual notes

Sketchbooks used for observations, research drawing and experimentation.

Show me what you see

Show Me What You See Method 250 Words by Tobi Meuwissen


Screen Printing In The Classroom

See the Pathway Used in Schools…

By @QuintaElsinor Screen Printing Hack, Year 4
@QuintaElsinor Screen Printing Hack, Year 4

You May Also Like…

Pathway: working with shape and colour

This is featured in the 'Working with Shape and Colour' pathway

This is featured in the ‘Working with Shape and Colour’ pathway

Pathway: Print & Activism

This is featured in the 'Print & Activism' pathway

This is featured in the ‘Print & Activism’ pathway

Talking Points: What is a Screenprint?

Screenprinting Screen Work in Progress by Theresa Easton


Talking Points: Paul Klee

How can abstract artwork help us use our imagination?

Paul Klee was one of the most influential artists of the 20th century, celebrated for his distinctive abstract and childlike style. His work was deeply influenced by poetry, colour theory, and music, as well as by major artistic movements such as Surrealism, Cubism, and Expressionism.

Explore his paintings using the sources below, then discuss the questions provided.

Please Note:

This page includes links and videos from external sites, verified at publication but subject to change.

Teachers should review all content for classroom suitability.

Report any issues, and check school firewall settings if videos don’t play.

ages 5-8
ages 9-11
free to access

Watercolour Paintings by Paul Klee

Klee was born in 1879 in  Switzerland. When he was 35 he visited Tunisia in Africa, where his experience of the light and colours of the landscapes and architecture helped awaken his interest in colour. 

He became less interested in painting exactly what he saw and in fact from 1915 onwards he never again worked from a model. Instead, he became interested in painting the colours around him, letting them detach themselves from the objects the colours were on. In this way his worked moved towards Abstraction. 

He became interested in creating fantastical worlds, full of symbols, shapes, colour and line.  

He took his inspiration from the world around him, and his imaginative response to the world, and also from poetry, music and literature. 

Sometimes his work was serious and meditative, other times it was full of humour. He also loved the sounds of words and phrases and the titles of works were often very important to Klee. 

Battle scene from the funny and fantastic opera "The Seafarers" (1923) painting in high resolution by Paul Klee. Original from the Kunstmuseum Basel Museum

Battle scene from the funny and fantastic opera “The Seafarers” (1923). Painting by Paul Klee. Original from the Kunstmuseum Basel Museum

Questions to Ask Children

Describe what you see.

What do you think is happening?

How does the title change the painting?

Why do you think Klee painted in blocks of colour?

How does the painting make you feel?


The Firmament Above the Temple (1922) by Paul Klee. Original from The MET Museum

The Firmament Above the Temple (1922) by Paul Klee. Original from The MET Museum

Questions to Ask Children

Describe what you see.

Can you see the landscape and the sky? How has Klee painted them?

How does the painting make you feel?

Temple Gardens (1920) by Paul Klee. Original from The MET Museum

Temple Gardens (1920) by Paul Klee. Original from The MET Museum

Questions to Ask Children

Describe what you see.

How does this landscape make you feel?

If you were there, in the painting, how would you feel?

Tell me about the colours. Why do you think Klee choose these colours?

Persische Nachtigallen (Persian Nightingales) (1917) by Paul Klee. Original portrait painting from The Art Institute of Chicago.

Persian Nightingales (1917) by Paul Klee. Original portrait painting from The Art Institute of Chicago.

Questions to Ask Children

Describe what you see.

What materials do you think Klee used?

Can you see two letters?

The R and the N stand for Rose and Nightingale. Can you spot the rose and the Nightingales in the painting? 

How does this painting make you feel? 

How do you think the painter felt when he painted it? 

Watch this animation of one of Klee’s paintings.

Questions to Ask Children

How do you feel watching the animation?

What kind of world has Klee/the animator created?

If you could animate one of the paintings above, how would you bring it to life? What would you make it do? 

In this video, Klee’s paintings are shown alongside music. 

Questions to Ask Children

How does the music change the way you look at the paintings?

Do you think Klee would have liked this video (remember Klee made his paintings at a time when there were very few films).

This Talking Points Is Used In…

Pathway: Exploring Watercolour

Featured in the 'Exploring Watercolour' pathway

Featured in the ‘Exploring Watercolour’ pathway

using sketchbooks to make visual notes

An open page spread of a child's sketchbook

Show me what you see

Show Me What You See Method 250 Words by Tobi Meuwissen


How Do Non-Specialist Teachers Teach Art?


Talking Points: What Is A Plinth?

A collection of imagery and sources designed to encourage children to consider what role a plinth may play in creating or displaying artwork. 

Please note that this page contains links to external websites and has videos from external websites embedded. At the time of creating, AccessArt checked all links to ensure content is appropriate for teachers to access. However external websites and videos are updated and that is beyond our control. 

Please let us know if you find a 404 link, or if you feel content is no longer appropriate. 

We strongly recommend as part of good teaching practice that teachers watch all videos and visit all websites before sharing with a class. On occasion there may be elements of a video you would prefer not to show to your class and it is the teacher’s responsibility to ensure content is appropriate. Many thanks. 

*If you are having issues viewing videos it may be due to your schools firewall or your cookie selection. Please check with your IT department.*


This resource is free to access and is not a part of AccessArt membership.


ages 9-11
ages 11-14
free to access

What Is A Plinth?

Silver-gilt mouthpiece late 6th–5th century B.C

“Limestone plinth with the feet of a male statuette” Licensed under CC0 1.0

In the traditional sculptural sense, plinths are usually heavy boxes or bases made from stone, wood or metal, which raise a sculpture above the ground.

Plinths sometimes protect the sculpture from the elements, such as a sculpture raised out of the way of puddles of rain in the street. 

More often, the role of a plinth is to give the sculpture some kind of status. By raising the sculpture to a certain level, the sculptor can decide how the viewer interacts with the artwork. 

Plinths also help create a separation between the ordinary everyday world around us and the art “object”. 

Seeing an object on a plinth might encourage us to view that object as an artwork – as something special. 

Questions to Ask Children

Have you seen any sculpture on a plinth in and around the place where you live?

Why do you think those sculptures are on plinths? How does the way the sculpture is displayed affect how you think about the sculpture?

Imagine two peas. One is on the kitchen floor, but an identical pea is on a plinth in a gallery. How does it change how you think about the pea? 

The Fourth Plinth

Photo of Fourth Plinth, Trafalgar Square, London by Andy Hay

Photo of “Nelson’s Ship in a Bottle,” by Yinka Shonibare, Fourth Plinth, Trafalgar Square, London by Andy Hay

What is The Fourth Plinth?

The Fourth Plinth is considered to be one of the world’s largest ongoing public art commissions. Its main aim is to bring contemporary art to the public and to encourage debate about what art is.

The Fourth Plinth

The “fourth plinth” was originally intended to hold a sculpture of a horse belonging to William IV, but the sculpture was never displayed due to lack of money. For over 150 years the plinth remained empty, until in 1998, the Royal Society for the Encouragement of Arts, Manufactures and Commerce (RSA) commissioned three contemporary sculptures to be displayed temporarily on the plinth. The legacy of those three sculptures was a rolling programme called the Fourth Plinth.

Take a look at the Fourth Plinth website to explore some recent commissions and explore the work of one Fourth Plinth artist, Antony Gormley below. 

Antony Gormley, The Fourth Plinth

"One and Other" by Anthony Gormley, Image by Feggy Art

“One and Other” by Antony Gormley, Image by Feggy Art

Whilst Antony Gormley usually makes sculpture out of more traditional materials like steel, he was commissioned as part of the Fourth Plinth to produce a rather different kind of art. 

Instead of working in traditional materials, Gormley used the plinth as a focus for creating an artwork which “became a portrait of the UK, now”. For 100 days in 2009, 24 hours a day, Gormley and the team coordinated members of the public to take stage on the plinth for an hour at a time. They could do whatever they liked, using the plinth to give their expression a literal and metaphorical platform. 

Through “One & Other”, Gormley hoped that by giving the public free will to express their hopes and fears for what might be,  a “portrait of the nation” would be revealed.

Questions to Ask Children

How would you use your time if you were given an hour on the plinth?

The Fourth Plinth Challenge

Can you find a “plinth” at school and coordinate a similar project?

How would children and teachers “apply” for a slot on your plinth?

Who would decide who gets a slot and what would your criteria be?

How long would each slot last?

How would you encourage an audience?  

How would you document the event?

This Talking Points Is Used In…

Pathway: The Art of Display

This is featured in the 'The Art of Display' pathway

This is featured in the ‘The Art of Display’ pathway

using sketchbooks to make visual notes

Sketchbooks used for observations, research drawing and experimentation.

Show me what you see

Show Me What You See Method 250 Words by Tobi Meuwissen