Drawing Source Material: Orchestras and Instruments
A collection of imagery and sources which you can use to prompt drawing in schools and community groups.
Please note that this page contains links to external websites and has videos from external websites embedded. At the time of creating, AccessArt checked all links to ensure content is appropriate for teachers to access. However external websites and videos are updated and that is beyond our control.
Please let us know if you find a 404 link, or if you feel content is no longer appropriate.
We strongly recommend as part of good teaching practice that teachers watch all videos and visit all websites before sharing with a class. On occasion there may be elements of a video you would prefer not to show to your class and it is the teacher’s responsibility to ensure content is appropriate. Many thanks.
Orchestras and Instruments
Use the film below to enable children to explore orchestras and instruments. Try to create a sense of momentum – for example you might pause the video 4 times and ask the pupils to make a 1 minute, 2 minute, 3 minute and 4 minute drawing at each pause.
Encourage close and slow looking by talking as they draw – use your voice to attract their attention to different qualities.
Try the same exercise using different materials, ie handwriting pen, ink and nib, pastel, watercolour…
How might you invent your own instrument? What instruments might you combine? Is it self playing?
Which Artists Should We Look At in Primary School?
Talking Points: The Ancient Art of Drawing Kolam
A collection of sources and imagery to explore the ancient tradition of drawing Kolam.
Please note that this page contains links to external websites and has videos from external websites embedded. At the time of creating, AccessArt checked all links to ensure content is appropriate for teachers to access. However external websites and videos are updated and that is beyond our control.
Please let us know if you find a 404 link, or if you feel content is no longer appropriate.
We strongly recommend as part of good teaching practice that teachers watch all videos and visit all websites before sharing with a class. On occasion there may be elements of a video you would prefer not to show to your class and it is the teacher’s responsibility to ensure content is appropriate. Many thanks.
*If you are having issues viewing videos it may be due to your schools firewall or your cookie selection. Please check with your IT department.*
This resource is free to access and is not a part of AccessArt membership.
‘Every morning at sunrise all across Southern India women practice the ancient art of drawing kolam on the thresholds of their properties. A physical form of prayer and symbol of protection, a daily exercise, and a moment of intense concentration and meditation, drawing kolam is an important household ritual that has a lot more to it than may first meet the eye.
Two very different women living in Chennai explain their shared passion for kolam, and their involvement in the local kolam competition.’ – BBC
Questions to Ask Children
What do you like/dislike about kolam drawings?
Do they remind you of anything?
What are some of the rituals do you take part in every morning?
A collection of sources and imagery to explore the question ‘what is composition?’
Please note that this page contains links to external websites and has videos from external websites embedded. At the time of creating, AccessArt checked all links to ensure content is appropriate for teachers to access. However external websites and videos are updated and that is beyond our control.
Please let us know if you find a 404 link, or if you feel content is no longer appropriate.
We strongly recommend as part of good teaching practice that teachers watch all videos and visit all websites before sharing with a class. On occasion there may be elements of a video you would prefer not to show to your class and it is the teacher’s responsibility to ensure content is appropriate. Many thanks.
*If you are having issues viewing videos it may be due to your schools firewall or your cookie selection. Please check with your IT department.*
This resource is free to access and is not a part of AccessArt membership.
Composition is the arrangement of different elements in a piece of artwork.
As well as positioning, elements like shapes, lines and colours can have an impact on composition.
Composition addresses the relationship between these different elements. Some artists aim to create a balanced composition in their artwork whilst others may choose to bring things to the viewers attention by creating imbalance.
Why is Composition Important?
Whether it is a painting, drawing, photograph, print or even a piece of sculpture, the way the elements are arranged impact upon how we respond to the piece of art. The artist might be trying to convey an emotion, or communicate a message, and artists use tools they have through composition to help sell those “messages”.
Throughout history, composition can be seen as an indication of the period or artistic movements that a piece of art has been created in.
Focal Point
The focal point is the area of the artwork which your eye is drawn to. The artist might use placement to draw your eye to an object (i.e. where the object is on the page), or they might use colour or value to draw your eye in.
How goes the artist draw your eye to a focal point in the illustration below?
Interior of the Temple of Aboo Simbel Nubia illustration by David Roberts (1796–1864)
What is the focal point for you in the paintings below? You might have a different focal point to your friends, or you might even have more than one? Where are your eyes drawn?
Little Girl in a Blue Armchair (1878) by Mary Cassatt.
Johannes Vermeer’s The Lacemaker (ca.1669–1671)
Balance / Imbalance
Sometimes the elements of an artwork lend to a sense of calm. This is usually because the artist has intentionally balanced colours, shapes and values.
In other artwork the artist deliberately makes us feel uneasy by throwing us off balance, by creating a sense of chaos…
Improvisation 35 (1914) Wassily Kandinsky
Rule of Thirds
Sometimes artists divide rectangles into a grid of 9 – 3 rows and 3 columns.
When working with landscape for example, artists might choose to place the horizon along one of the grid lines.
Jalais Hill, Pontoise (1867) by Camille Pissarro.
Golden Ratio
The Golden Ratio is a spiral and it can be found in nature and art.
Can you spot how the Golden Ratio is used in the “Katsushika Hokusai’s The Great Wave” above?
Classical Composition
Within the classic tradition, artists would create a sense of balance by arranging elements in geometric shapes such as triangular compositions.
Foxhound (1760) painting in high resolution by George Stubbs. Original from The Yale University Art Gallery.
Questions to Ask Children
What can you see in the foreground/background of the painting?
How do the colours vary from the foreground to the background? Why do you think these choices were made by the artist?
Where is your eye drawn to in this painting? What do you see next?
Can you see any triangles in the composition?
Symmetry
Can you see how symmetry has been used in the still life below by by Camille Pissarro?
How does this image make you feel?
Think about the colours AND the shapes, and where they are placed.
A collection of sources and imagery to explore the sculptures of Thomas J Price.
Please note that this page contains links to external websites and has videos from external websites embedded. At the time of creating, AccessArt checked all links to ensure content is appropriate for teachers to access. However external websites and videos are updated and that is beyond our control.
Please let us know if you find a 404 link, or if you feel content is no longer appropriate.
We strongly recommend as part of good teaching practice that teachers watch all videos and visit all websites before sharing with a class. On occasion there may be elements of a video you would prefer not to show to your class and it is the teacher’s responsibility to ensure content is appropriate. Many thanks.
*If you are having issues viewing videos it may be due to your schools firewall or your cookie selection. Please check with your IT department.*
This resource is free to access and is not a part of AccessArt membership.
Thomas J Price
Thomas J Price is a sculptor who questions the types of people that have traditionally been made into a sculpture and displayed on a plinth. Price is interested in making sculptures of anonymous people – people who are no one and everyone at the same time. By doing this he asks us as viewers to question: What is the purpose of sculpture? How do my figures speak to you?
Reaching Out
The Space In-Between
Ordinary Men
Questions to Ask Children
What do you think that the artist is trying to say with the sculptures?
Do you like the sculptures?
How do you think the artist makes the sculptures?
Describe the different types of plinths that the artist uses.
Why do you think the artist has chosen different plinths for different sculptures?
That there is a relationship between drawing & making – we can transform 2d to 3d.
That we can use observational drawing and experimental mark-making together to make art.
That we can work from similar stimulus or starting point but end up with very different individual results.
That the individual results can then be brought together to make a whole artwork.
In this pathway children continue to develop their understanding of sculpture and build their making skills.
The exploration starts with careful looking and drawing, and from this “grounded” basis children are encouraged to take creative risks by using experimental mark-making with a variety of media.
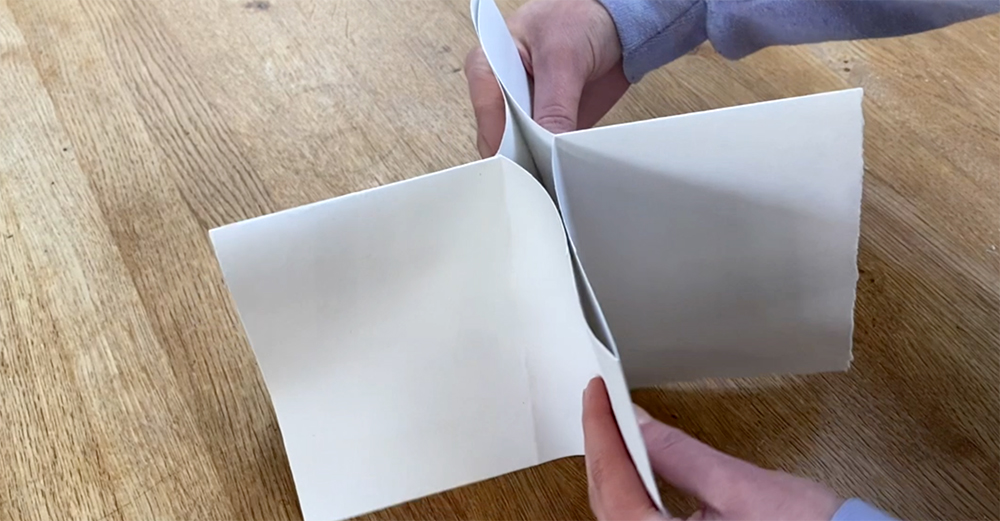
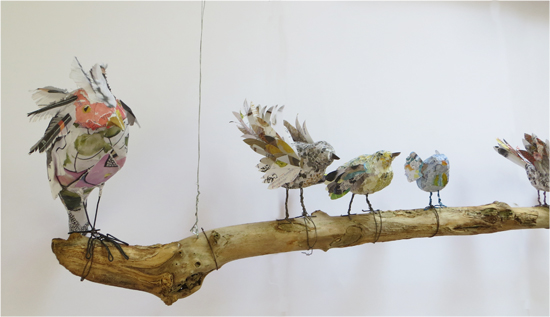
Children are then invited to explore how they can manipulate their drawings in an intuitive way to make 3d forms. Paper is twisted, folded, crumpled to become 3d and added to a simple structure. Children explore balance to finally created an individual bird.
The class birds can then be brought together to make a “flock” – with each child’s artwork valued as part of the whole.
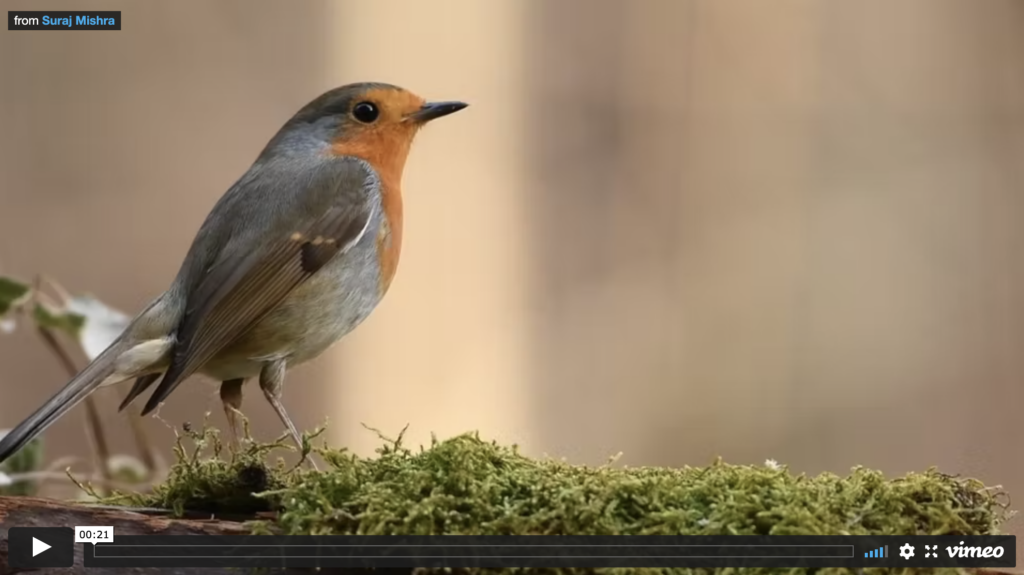
Themes: Birds, Wildlife, Local habitat
Medium: Paper (sugar and cartridge), Soft pencils, wax crayons, watercolours, pastels, graphite, scissors, glue sticks, cardboard or foamboard, paper clips or wire.
Artists: A variety (see resource)
If you use this resource in your setting, please tag us on social media: #InspiredBy @accessart (facebook, twitter) @accessart.org.uk (instagram) and share the url. Thank you!
PSHE: Supports Peer Discussion, Collaboration, Responsibility to the planet.
I Can…
I can look carefully at photos and films of birds, take in the details and overall shapes, and then made drawings of what I have noticed.
I can drawn from life looking closely.
I can experiment with a variety of drawing materials and test ways to make marks that describe what I see.
I can use colour in my drawings and mix two or more different media together.
I have looked at the work of other artists who have been inspired by birds and I can share my response to their work.
I can fold, tear, crumple and collage paper to transform it from 2d to 3d.
I can use a variety of materials to make my own sculpture, and I have taken on the challenge of making my sculpture balance and stand.
I have seen how my sculpture can be part of a class artwork. I can see how all our sculptures are individual.
I can share my work with my classmates and teachers, and consider what was successful for me.
Time
This pathway takes 6 weeks, with an hour per week. Shorten or lengthen the suggested pathway according to time and experience. Follow the stages in green for a shorter pathway or less complex journey.
This pathway aims to help children begin to understand the relationship between drawing and making, 2d and 3d. Pupils explore how to transform materials into sculpture, moving from mark making to balance and structure.
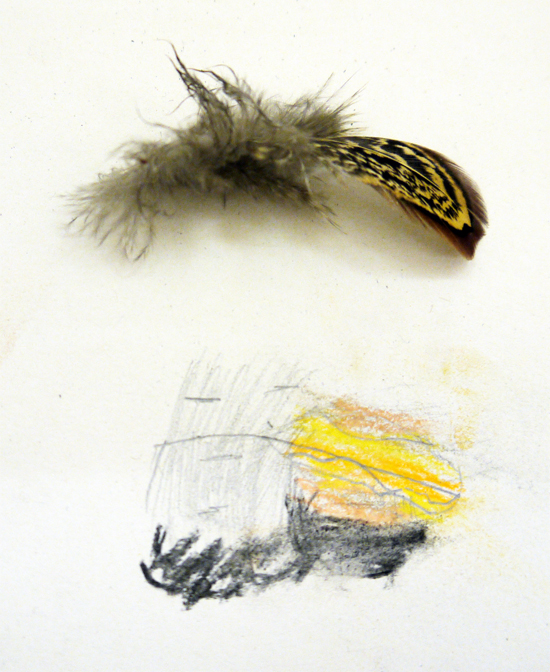
This time working from real feathers rather than photographic imagery, encourage the children to take creative risks and explore how they can draw feathers using a variety of mediums.
Work in sketchbooks or on larger pieces of paper (A3) and experiment with how the paper size changes the nature of the mark-making (for example use sugar paper and cartridge paper).
You might like to show pupils this work by artist Andrea Butler, in which Andrea shares how she uses the textures and colours within birds to inspire her artwork.
Week 3: Working Slowly Towards 3d
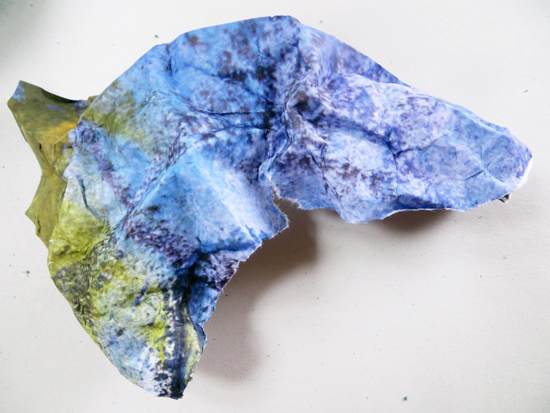
Manipulating Paper from 2D to 3D
Still working on paper, but this time on sheets of newsprint, sugar and cartridge paper, pupils will explore what happens when you fold, tear, crumple paper and start to manipulate it towards 3d forms.
Explore these three resources and decide which elements you would like to explore with your children:
Make sure you encourage playful exploration and celebrate invention. Pupils are not working towards a fixed outcome, instead they are developing making and creativity skills.
Week 4, 5: Watch & Make
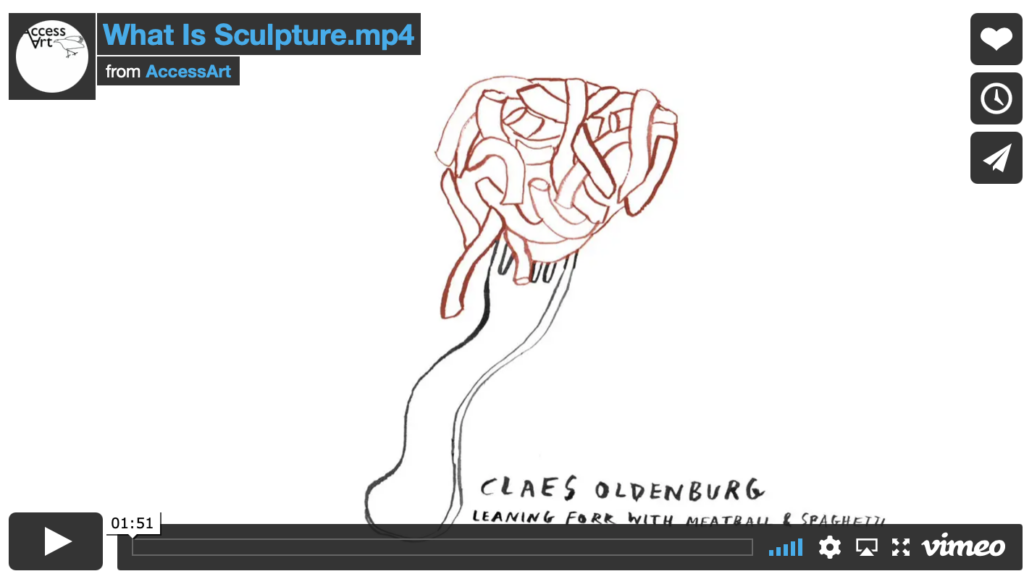
Explore Sculpture
Pupils are now going to start making their sculptures.
Watch the “What Is Sculpture” animation if you didn’t watch it with the class earlier in the year.
Take a look at the free to access “Talking Points: Inspired by Birds” resource if you’d like to talk about how other artists have been inspired by birds. Work in sketchbooks guided by the “Show Me What You See” resource.
Use the “Making Birds” resource to enable children to pull all their learning together and make small sculptures.
Week 6: Celebrate
Reflect & Share
Finally make time to display the birds as a “flock”. Here is an opportunity to talk about many pieces made by separate people can be exhibited as a single artwork.
Use the “Crit” resource to help you explore how to talk about the work.
See the Pathway Used in Schools…
If You Use AccessArt Resources… You might like to…
That when we make art in 3 dimensions it is often called Sculpture.
That we can generate ideas through playful exploration.
That we can build understanding of the properties of materials through manipulation.
That making sculpture is a partnership between materials, ideas, hands and tools.
That we can reflect upon our intention when we see our ideas made physical.
In this pathway children are introduced to what sculpture can be, and invited to explore the work of other sculptors whilst taking a playful and inventive approach to making their own sculptures.
The pathway encourages children to start voicing their response to sculptural artworks, including their own, and to give them time and space to explore properties of materials, and what happens when you join one or more materials together to construct new forms.
Theme: Transformation & Invention
Medium: Construction Materials (card, paper, wood, wire, string, fabric including recycled and found objects)
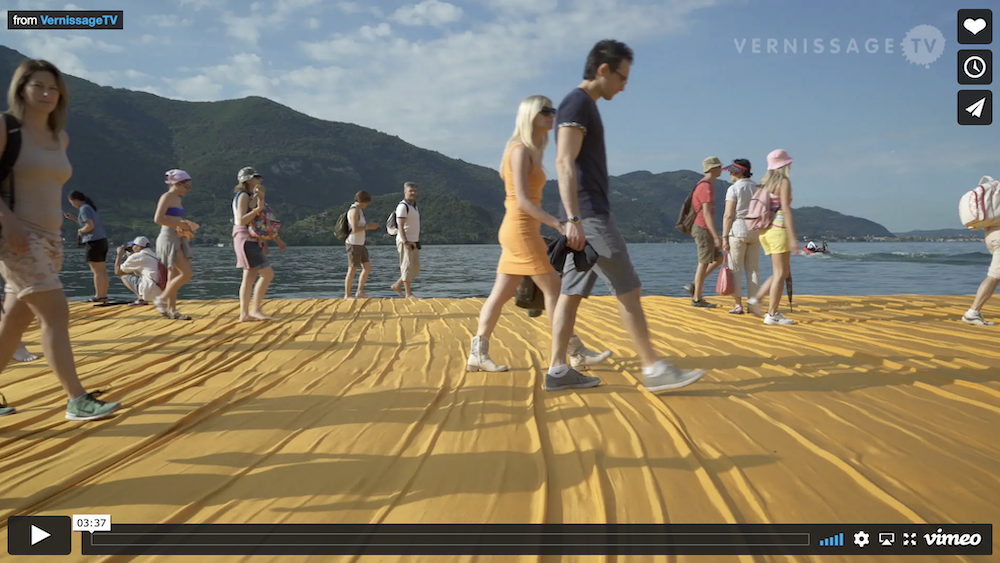
Artists: Christo & Jeanne-Claude, Faith Bebbington, Caitlind r.c. Brown & Wayne Garrett
This pathway will take approximately half a term, based upon a weekly art lesson.
If you use this resource in your setting, please tag us on social media: #InspiredBy @accessart (facebook, twitter) @accessart.org.uk (instagram) and share the url. Thank you!
Geography: Adapt the playful making approach to make sculptures of ports and harbours, towns, cities, villages, The Great Wall of China etc.
Maths: Uses language to support understanding of 2D/3D shapes, sequence, measuring, position & direction.
Science: Uses language to support understanding of properties and manipulation of materials.
PSHE: Collaboration, responsibility to the planet.
I Can…
I have explored what we mean by “sculpture” and I thought about what I like about different pieces of sculpture.
I can use my sketchbook to make drawings inspired by sculptures I have seen, to help me think about what I like, and to remember what I have seen.
I can use my hands to make small sculptures out of lots of different materials. I can bend, twist, fold, cut and fasten.
I can use my hands to make sculptures without designing first. I can just see what happens if…
I can discover that sometimes working with materials is hard work – things break or my fingers hurt – but that is all ok!
I can share my work and listen to what other people like about it.
I can look at other people’s work and sometimes share what I like about it with them.
Time
This pathway takes 6 weeks, with an hour per week. Shorten or lengthen the suggested pathway according to time and experience. Follow the stages in green for a shorter pathway or less complex journey.
Remember that children are using drawing as a way of collecting information and adding their own thoughts. They can also add words etc (no need for sentences).
Remember there is no need/requirement to add learning objectives to sketchbooks or to mark the pages in any way.
Week 2. Start Making
The AccessArt Making Prompt Cards
Time to let the children explore materials and tools and connect hand, heart and head. Before you introduce children to this activity, watch “Design through Making“.
In this warm up session, introduce children to “The AccessArt Making Prompt Cards” a wide range of materials and invite them to make in a playful way without a predefined outcome in mind.
Openly invite the children to explore the materials without “knowing” what they will make (“We are going to be explorers and inventors…”). This comes easy to young children and we tend to grow out of it as we get older – but it’s an important skill to acknowledge and retain.
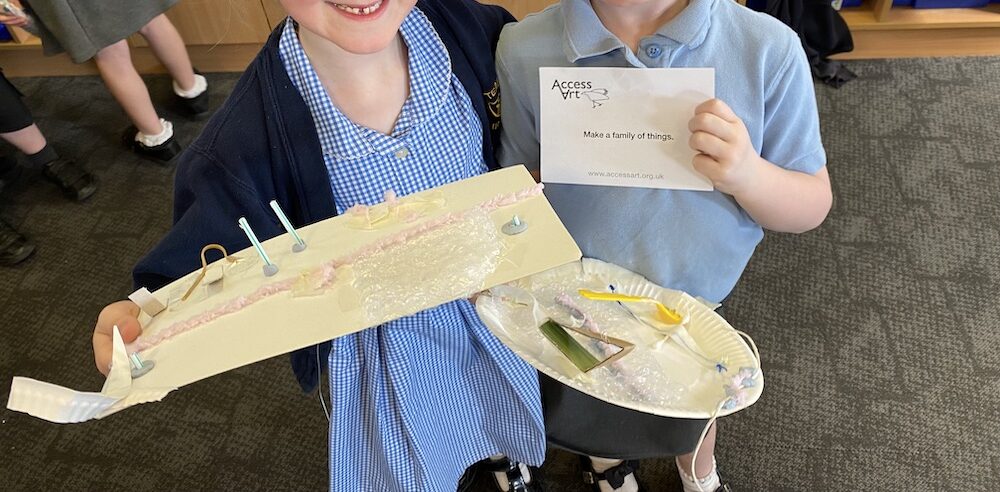
Collect together materials on the materials list in the Teacher notes column, and choose one or more of the prompts.
At the end of the session, tidy the room and clear a space to show the “sculptures” made. Remember these are just “doodles” of materials – and are the first stage in exploring the properties of materials, and how we can connect and combine to make new objects.
Ask the children to try to guess the prompt card used, and to talk about the sculptures as a class.
Week 3 & 4. Find Your Focus
Make Your Sculpture
Choose from one of the projects below, or adapt a similar approach to your own area of focus/curriculum theme.
All the resources below share the common aim of enabling children to explore materials, simple tools and their ideas, with plenty of freedom to play and invent.
Give children plenty of time and space to explore, take creative risks, discover and share, without working towards a predefined outcome. Encourage and celebrate individuality.
Have sketchbooks open on tables and encourage children to make notes (whatever form they take), and record and reflect.
Project 1
Creativity Medals
Jan Miller is an Art and Design Technology teacher and magazine editor with 25 years’ experience. Invite children to create imaginative and unique “Creativity Medals” using recycled materials.
Or…
Project 2
Making a Roller Coaster
KS1 children use their imaginations and sense of fun to collaborate to create a “Model Roller Coaster” with moving parts.
Or…
Projects 3 & 4
Boats That Float & Sea Creatures
Both these projects were illustrated with older children, but they follow the same playful making approach. Adapt by keeping tools simpler (ie scissors, but no pliers or glue guns).
Time to see the work which has been made, talk about intention and outcome.
Invite children to display the work in a clear space, and walk around the work as if they are in a gallery. Give the work the respect it deserves. Remind the children of their hardwork.
That drawing is a physical and emotional activity. That when we draw, we can move our whole body.
That we can control the lines we make by being aware of how we hold a drawing tool, how much pressure we apply, and how fast or slow we move.
That we can draw from observation or imagination.
That we can use colour to help our drawings engage others.
In this pathway children are enabled to build an understanding about the way they can make marks on a drawing surface. They explore how the way they hold a drawing tool, and move their bodies, will affect the drawings they make.
Children will begin to explore mark-making and experiment with how they can use the marks they make in their drawings.
They are introduced to the fact that they can make drawings as a result of observation, without a seen subject matter. (i.e. from action or imagination) and that they can make drawings as a result of observation. Through their drawings children are able to talk about what they can see and how it makes them feel.
The focus of the exploration is around spirals – an ancient symbol which we all recognise, and which lends itself to conversations around growth, movement and structure.
Children are introduced to sketchbooks as a place of personal exploration, and enabled to make a sketchbook or personalise a bought sketchbook.
Themes: Pattern, Structure, Movement, Growth, The Human Body, Sound
Medium: Graphite stick or soft B pencil, Handwriting Pen, Pastels & Chalk, Paper, (Sketchbook Making Task: Paper, string, elastic bands, glue)
Artists: Molly Haslund
If you use this resource in your setting, please tag us on social media: #InspiredBy @accessart (facebook, twitter) @accessart.org.uk (instagram) and share the url. Thank you!
“To paint a line for a minute and walk with it was something I had never done before, and it made me think a lot about how good simple things can be.” Chris Ofili
Science: Uses language to support understanding of concepts of growth, human body and natural forms.
Maths: Explores pattern, symmetry.
PSHE: Peer discussion, collaboration
I Can…
I can draw from my finger tips, my wrist, my elbow, my shoulder, my body.
I can make a drawing using a continuous line for a minute or two.
I have made a sketchbook (or perhaps decorated the cover of a bought sketchbook) and I feel like it belongs to me.
I can draw from observation for a few minutes at a time.
I can make different marks with different drawing tools. I have seen the different marks I can make with a soft pencil, a graphite stick and a handwriting pen.
I have explored how water affects the graphite and pen, and explored how I can use a brush to make new marks.
I can make choices about which colours I’d like to use in my drawing.
I have seen the work of an artist and listened to how the artist made the work. I have been able to share how I feel about the work.
I can talk about what I like in my drawings, and what I’d like to try again.
I can take photos of my artwork.
Time
This pathway takes 6 weeks, with an hour per week. Shorten or lengthen the suggested pathway according to time and experience. Follow the stages in green for a shorter pathway or less complex journey.
Materials
A2 newsprint, A2 cartridge or black paper, sugar paper (torn into squares), soft pencils, graphite sticks, chalk, handwriting pens, or graphite, sticks, coloured card, cardboard, recycled/scrap paper, elastic bands.
This pathway aims to introduce children to the idea that making a drawing is a physical activity which uses the whole body and connects head, hand and heart.
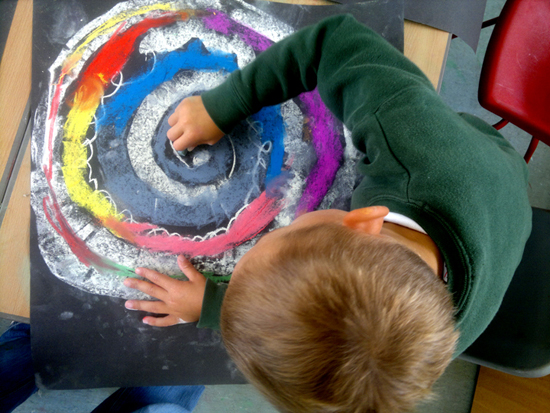
Week 1: Make drawings using your body
Making Spiral Drawings
Invite children to use their whole body to create large scale “Spiral Drawings“.
Use soft B pencils or graphite sticks. Work on large A2 sheets of paper (newsprint is fine).
Invite students to experiment with different materials – graphite sticks, soft B pencils, handwriting pens, chalks.
Create large scale drawings.
Make spiral drawings to music.
Stand up and work in the playground using chalk.
Juxtapose emotions eg. ‘Create a quiet spiral… then create a LOUD spiral.’ Invite children to tune into how they are feeling and create a spiral that reflects their mood.
Look & Talk
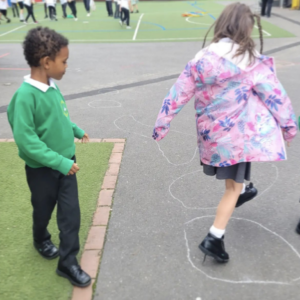
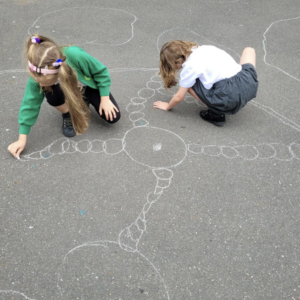
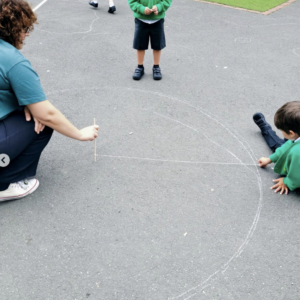
Molly Haslund: Outdoor Drawings
Molly Haslund Circles, 2015 New York, Peekskill Project #6, Hudson Valley MOCA
Explore our free to access “Talking Points: Molly Haslund” to discover an artist who makes drawings outside using her body as a drawing tool. Pause the videos and invite children to create drawings using the “Show Me What You See” method.
Fast engineering challenge: Respond to Molly Haslund’s work by asking children to make a tool that creates a circle when it has a drawing material attached. Use sticks, card, cardboard, tape, twine, straws etc.
Juxtapose children’s exploration by looking at the work of women who make kolam in front of their homes every morning in the “Talking Points: The Ancient Art of Kolam” resource.
Week 2: Develop your drawings
Make Snail Drawings
Create a “Snail Drawing” on a large square of white cartridge paper or black sugar paper, using chalk and oil pastels.
This exercise explores different qualities of line, colour blending, mark making and makes a wonderful mounting piece.
Week 3: Introduce sketchbooks and either make your own sketchbook or personalise a bought sketchbook
Make an Elastic Band Sketchbook
It’s important that children feel a sense of ownership with their sketchbooks. Invite children to create their own elastic band sketchbooks using recycled paper and card. These sketchbooks will create an ideal platform for exploration and creative risk taking. Ask children to decorate the cover using collage.
Or personalise a bought sketchbook to nurture ownership
In the next session children will start working in their sketchbooks.
Week 4 & 5: Two drawing exercises
Two Exercises to Encourage Close Looking & Experimental Mark-Making
Working in a sketchbook, invite children to try the following two drawing exercises below.
Continue with the spiral exploration by applying drawing skills to making observational drawings of shells.
Where possible work from real shells, making sure each child can clearly see what they are drawing. If you do not have real shells then you can work from “Drawing Source Materials: Shells“.
Do the exercises alongside the children (to model your own open exploration), or before the lesson so that you understand how it feels.
By the end of this session children will have completed a number of line drawings in their sketchbooks.
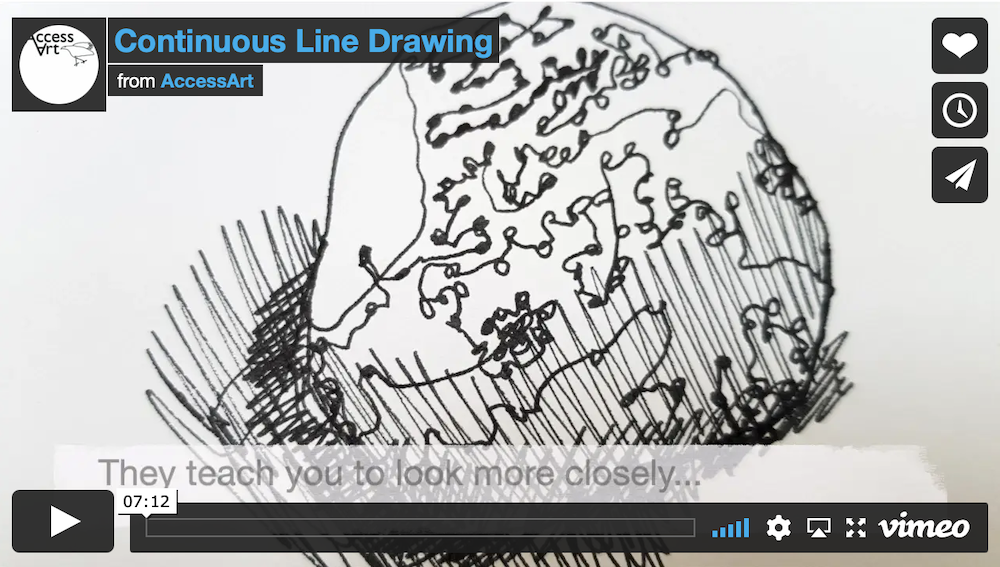
Exercise One
Observational Drawing: Continuous Line
Start the session by creating a calm meditative environment. Use this exercise to create “Observational Drawings using Continuous Line“. Encourage careful observation and intentional mark making.
Depending on how much time you would like to allocate to the warm up, you may want to ask children to experiment with scale, different materials, dominant and non dominant hand.
Rather than try the whole resource which was originally written for older children, focus upon enabling the children to see what happens when they add water to observational drawings made using a handwriting pen (check first that the pen you use is water-soluble) or water-soluble graphite. How are the marks changed by the water?
As the children may not have experience of the colour wheel yet, strip this activity back to focus on the line, texture, and light and dark areas.
Week 6: Celebrate
Share, reflect, discuss
Time to see the work which has been made, talk about intention and outcome.
Invite children to display the work in a clear space, and walk around the work as if they are in a gallery. Give the work the respect it deserves. Remind the children of their hardwork.
If you have class cameras or tablets, invite the children to document their work, working in pairs or teams.
You might like to get children to assemble the snail drawings made in Week 2 into a “class” Backwards Sketchbook.
A collection of imagery and sources which you can use to prompt drawing in schools and community groups.
Please note that this page contains links to external websites and has videos from external websites embedded. At the time of creating, AccessArt checked all links to ensure content is appropriate for teachers to access. However external websites and videos are updated and that is beyond our control.
Please let us know if you find a 404 link, or if you feel content is no longer appropriate.
We strongly recommend as part of good teaching practice that teachers watch all videos and visit all websites before sharing with a class. On occasion there may be elements of a video you would prefer not to show to your class and it is the teacher’s responsibility to ensure content is appropriate. Many thanks.
Shells
Use the films below to enable children to explore drawing shells. Try to create a sense of momentum – for example you might pause the video 4 times and ask the pupils to make a 1 minute, 2 minute, 3 minute and 4 minute drawing at each pause.
Encourage close and slow looking by talking as they draw – use your voice to attract their attention to qualities of the shells.
Try the same exercise using different materials, ie handwriting pen, ink and nib, pastel, watercolour…
Charles Dessalines
Anselmus Boëtius de Boodt
Common Triton Horns, Charonia tritonis (1596-1610) by Anselmus Boëtius de Boodt. Original from the Rijksmuseum.
George Shaw
Tritonian murex or Sea trumpet illustration from The Naturalist's Miscellany (1789-1813) by George Shaw (1751-1813)
A collection of sources and imagery to explore the ways in which artists are inspired by birds.
Please note that this page contains links to external websites and has videos from external websites embedded. At the time of creating, AccessArt checked all links to ensure content is appropriate for teachers to access. However external websites and videos are updated and that is beyond our control.
Please let us know if you find a 404 link, or if you feel content is no longer appropriate.
We strongly recommend as part of good teaching practice that teachers watch all videos and visit all websites before sharing with a class. On occasion there may be elements of a video you would prefer not to show to your class and it is the teacher’s responsibility to ensure content is appropriate. Many thanks.
*If you are having issues viewing videos it may be due to your schools firewall or your cookie selection. Please check with your IT department.*
This resource is free to access and is not a part of AccessArt membership.
Artists often draw parallels with other lives/beings to help us learn about ourselves. The resources below explore how artists take inspiration from birds, not so much visually but by drawing parallels between behaviour of birds and ourselves.
Conference for the Birds by Marcus Coates
Conference for the Birds celebrates the lives of the birds Thomas Bewick depicted in his wood engravings. His book ‘A History of British Birds’ first published in 1797 was a comprehensive guide to both the appearance and behaviour of birds.
The birds, played by wildlife experts, discuss topics from migration to predation, with each species speaking about the challenges they face day to day. By exploring the lives of the birds that Bewick studied and depicted, this artwork attempts to reveal how we, when speaking from the position of another animal like a bird, rely on subjective experience to relate across to this alien perspective. – Kate Macgary
Marcus Coates, Conference of the Birds, 2019, (excerpt) Film by Kate MacGarry
Questions to Ask Children
What kinds of challenges might birds face?
How do you think it would feel to be sharing a space with the installation?
How does it make you feel? What does it make you think?
How do you think the artist made the heads?
Migrations: Open Hearts Open Borders
The Migrations project started when word was sent out to illustrators asking them to create an image for the front of a postcard (plus appropriate text on the reverse) on the theme of ‘migration’. The project’s aim was to ‘express support for and solidarity with the hundreds of thousands of human migrants who face immense difficulties and dangers in their struggle to find a better and safer place to live.’ When asking for postcards, the organisers stated ‘Do not be concerned about possible damage to the card that you will mail to us. The stamp, the journey of the mail and all it entails will reflect the fragility and the precarious nature of migration.’ – AOI
Questions to Ask Children
Why do you think that birds were used as a symbol in this project?
What do you like about this project?
Why do you think that they asked lots of illustrators across the world to join in with this project?
How does it make you feel? What does it make you think?
That artists can use art as a way to express their opinions, using their skills to speak for sectors of society.
That artists acting as activists often use print because it allows them to duplicate and distribute their message.
That a carefully chosen image can be a powerful way to communicate as it is direct and crosses boundaries of language.
That through art as activism we can come together.
In this pathway children are introduced to the idea that they can use art as a way of sharing their passions and interests with their peers and community. We start by introducing pupils to artists who are activists, and then we go on to help pupils identify and voice the things they care about as individuals.
There is then a choice of projects: the class can either make posters or zines, using using collage, print and drawing.
Medium: Paper, Pen, Paint
Artists: Luba Lukova, Faith Ringgold, Shepard Fairey
If you use this resource in your setting, please tag us on social media: #InspiredBy @accessart (facebook, twitter) @accessart.org.uk (instagram) and share the url. Thank you!
PSHE: Responsibility to the planet, Collaboration, Peer Discussion, Different Religions, Ethnic Identity.
I Can…
I have seen how artists use their skills to make art which speaks about things which matter, often on behalf of whole communities.
I have explored how I can find out what I care about, and find ways I might share my ideas with us.
I have seen how my classmates may have different things they care about, or share things we care about, but they are all valid.
I can create visuals and text which communicate my message.
I can use line, shape and colour to make my artwork.
I can use typography to make my messages stand out.
I can combine different techniques such as print, collage and drawing.
I can reflect and articulate about my own artwork and artwork made by my classmates.
This pathway takes 6 weeks, with an hour per week. Shorten or lengthen the suggested pathway according to time and experience. Follow the stages in green for a shorter pathway or less complex journey.
Materials
Soft B pencils, handwriting pens, sharpies.
Option 1: Make a Poster – Wall paper samples, white acrylic paint, PVA glue. (For the screen printing) – Masking tape, silk screen mesh, printing ink, printing medium, newsprint, cartridge paper or other printable surface, pen/pencil, craft knives (optional), masking tape, cardboard for palette and squeegee, bucket, A4 Acetate sheets and pva glue (optional).
Option 2: The Art of Zines – Large sheet of cartridge paper, collage papers, newspaper, PVA glue.
This pathway introduces pupils to the idea that artists can use their skills, vision and creativity to speak on behalf of communities, changing the world for the better.
Week 1: Introduction
The Relationship Between Print & Activism
We begin by introducing pupils to the idea that art can be used to express the opinions of artists, who in turn speak for sectors of society. Artists can be activists, and many artists choose print as a way to make their art, as it allows them to reproduce their artwork so that it can reach many people.
Choose one or more of the artists below to introduce to your class, depending on the project option you choose.
Introduce an Artist Activist
Luba Lukova
Use free to access “Talking Points: Luba Lukova“ to explore a designer who uses posters as a way to address injustice in the world. Use the questions at the bottom of the resource to help guide a discussion about the artists approach.
Introduce an Artist Activist
Faith Ringgold
Use free to access “Talking Points: Faith Ringgold” resource to explore an artist who makes painted quilts to communicate personal narratives, history and politics. Use the questions at the bottom of the resource to help guide a discussion about the artists approach.
Introduce an Artist Activist
Kate DeCiccio
Use the free to access “Talking Points: Kate DeCiccio” to explore how posters can be used to communicate important messages within different communities.
Find Your Voice…
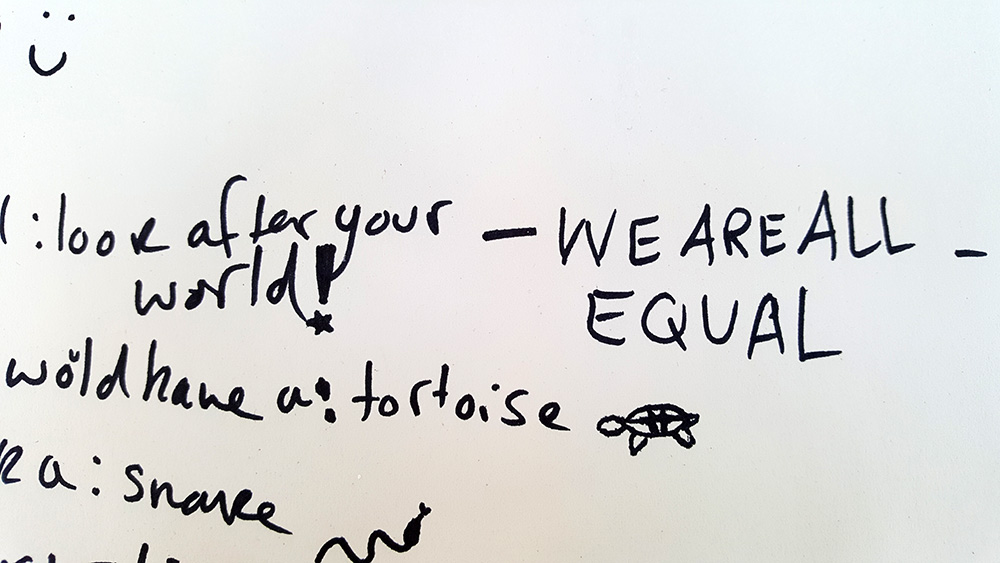
What Do YOU Care About?
What do you care about? What is your message to the world? Sometimes it can be hard to find the right words, or be brave enough to say them outloud.
The “Find Your Message” resource will help pupils to find their passion and their message, and enable them to communicate it in their own way.
Work in sketchbooks or on large sheets of paper. Work alone or in small groups of people you trust.
This activity will encourage children to start exploring who they really are, before they take their next steps to secondary school.
Week 2,3,4 & 5
Find your focus
Decide whether you would like to explore pupil voice by making posters or making zines, and follow the pathways below.
Option 1
Make a Poster
This pathway shares how you can make a poster about something you care about.
Look and Talk
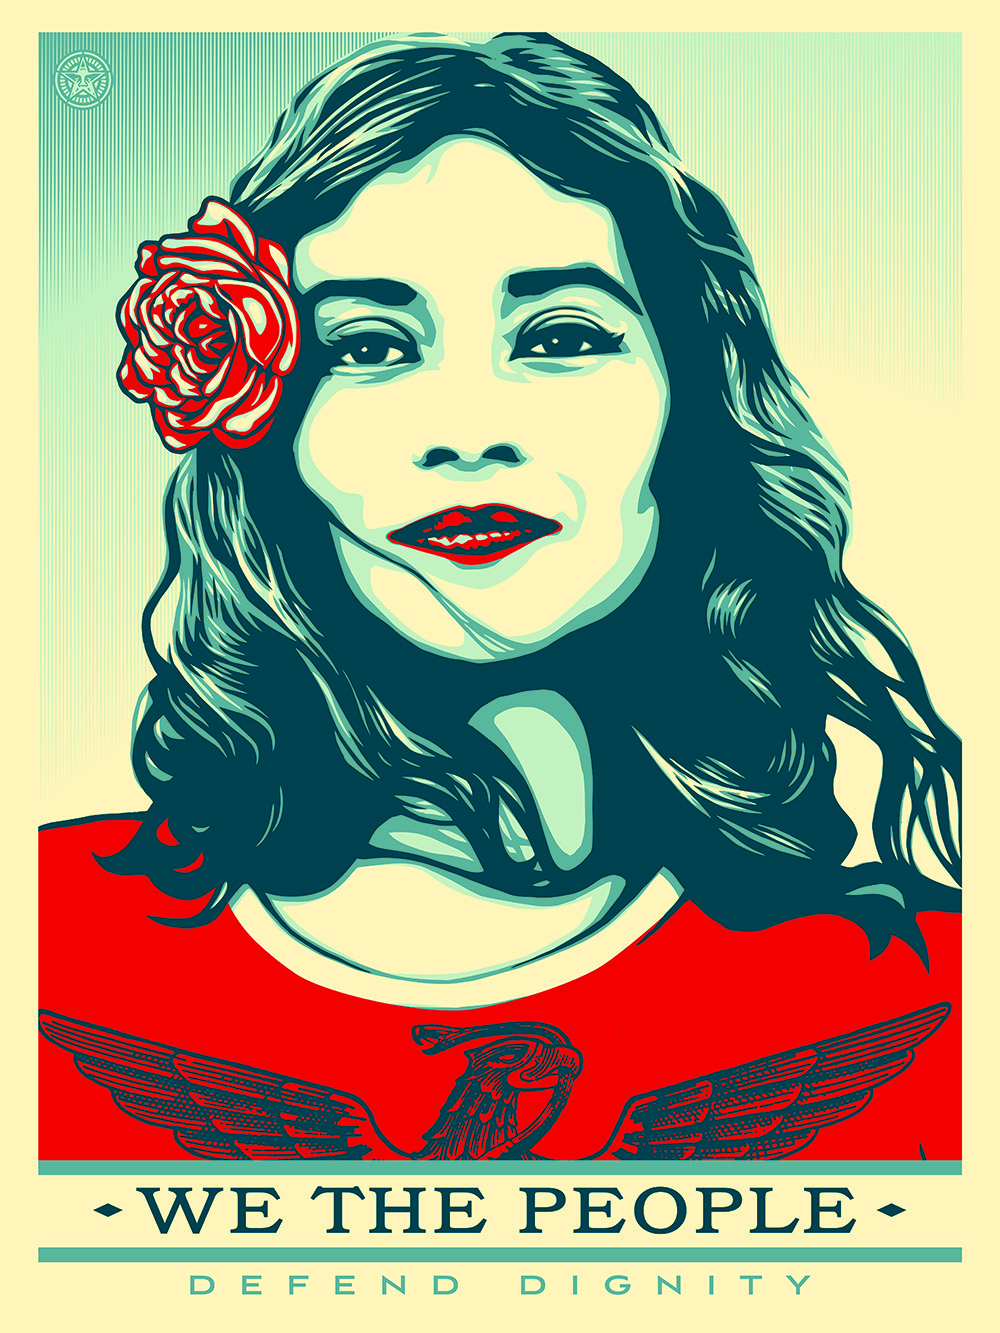
Shepard Fairey
Introduce discussions about street art and activism in the classroom using free to access “Talking Points: Shepard Fairey“.
Make
Create a Poster Inspired by Shepard Fairey
Use the “Creating a poster inspired by Shepard Fairey” resource. Children will begin by collaging their own canvas and go on to create their poster design, through stencil, collage or screen print.
Screen Print Hack
If you decide that you’d like to revisit screen print with the children or they haven’t had the opportunity to screen print before, here is a video for our “Screen Print Hack” to support this facilitation.
Children can also use collage and stencilling as a way to create their posters.
Or…
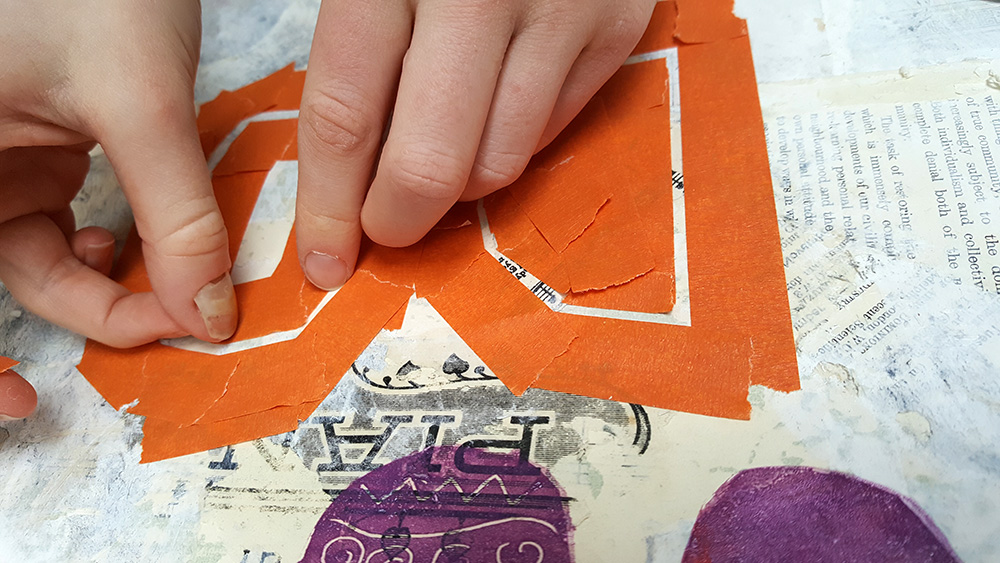
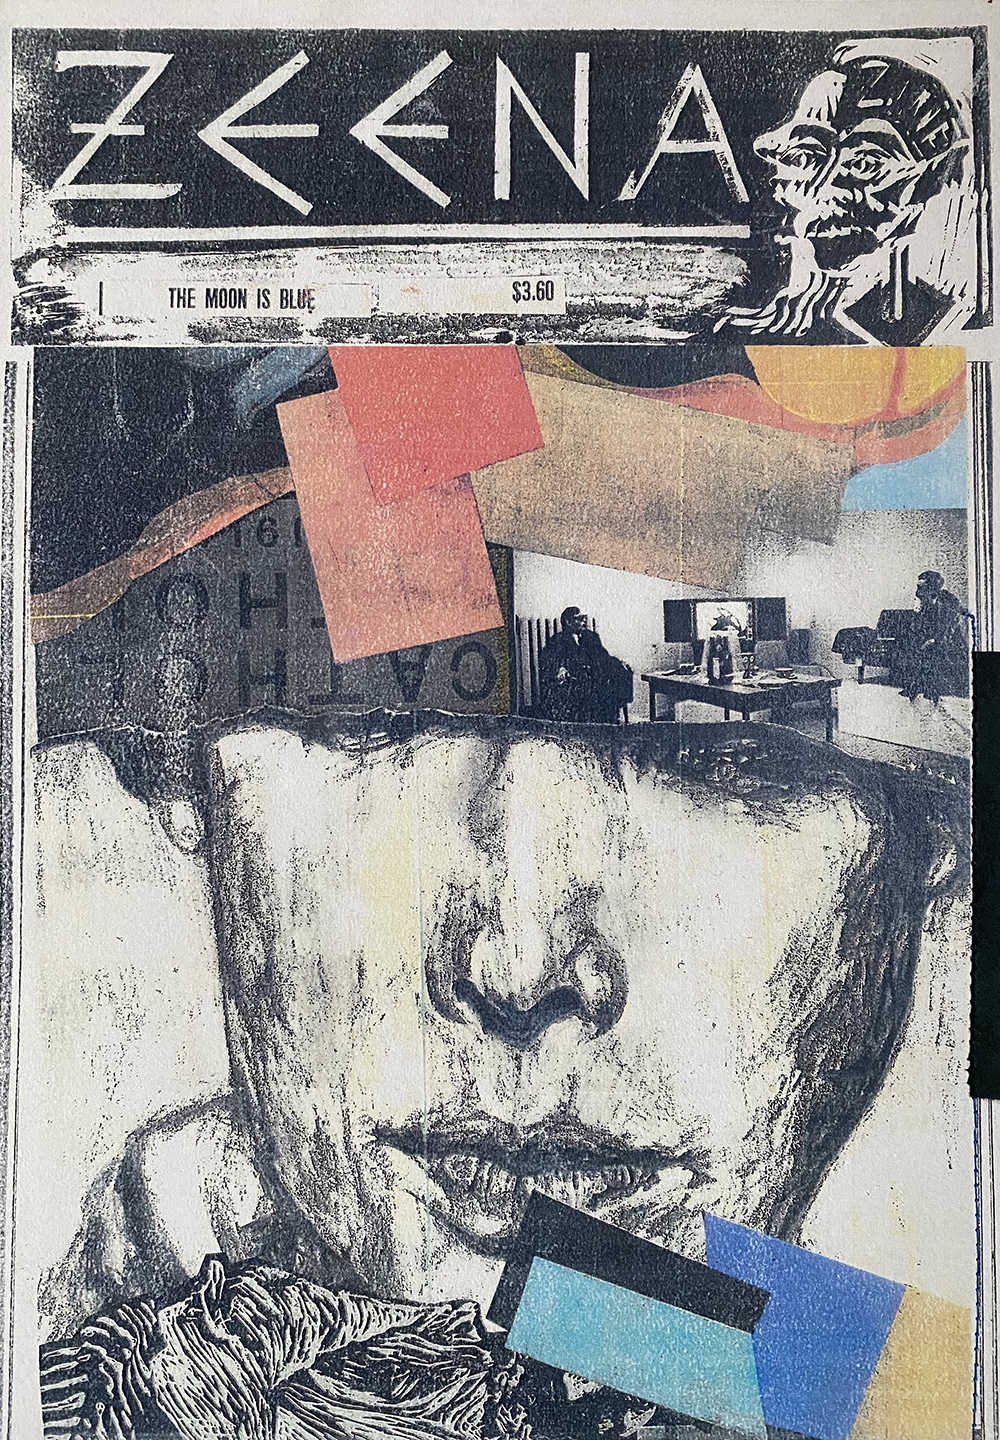
Option 2:
Make a Zine
Use the following resources to inspire pupils to make a zine.
Supply children with a variety of magazine imagery which can be used to communicate their message.
Invite children to modify their chosen imagery, by cutting, folding, sticking and juxtaposing whilst thinking about the composition of their zine pages. Images can be photocopied in black and white and drawn/painted over.
Encourage experimentation and exploration of how best to communicate their message through text and word.
Week 6
Share, reflect, discuss
Time to see the work which has been made, talk about intention and outcome.
Invite children to display the work in a clear space, and walk around the work as if they are in a gallery. Give the work the respect it deserves. Remind the children of their hardwork.
How can sharing your own experiences help you connect with people?
Pyer Moss is a fashion brand started by Kerby Jean-Raymond. The brand celebrates stories of culture and shared experiences, using clothing to show creativity, strength, and style, while also sharing messages about Black American history and community.
Take a look at the below images as well as videos and use the questions to form a discussion around Pyer Moss.
Please Note:
This page includes links and videos from external sites, verified at publication but subject to change.
Teachers should review all content for classroom suitability.
Report any issues, and check school firewall settings if videos don’t play.
Pyer Moss
Pyer Moss (pronounced ‘Pierre’) founder Kerby Jean-Raymond grew up in Brooklyn, the son of Haitian immigrants, and has been engaging with the fashion industry since his teenage years, interning at 14, starting a label at 15. Now in his 30s, Jean-Raymond has been at the helm of Pyer Moss since 2013, naming it for his mother. After a long-standing collaborative relationship with Reebok, Jean-Raymond was announced as the vice president of creative direction for the sportswear behemoth in late September 2020.
Please be aware that the Pyer Moss website contains some inappropriate language for Primary ages so ensure that you check pages and content before showing the class.
Questions to Ask Children
What do you like/dislike about the garments in Pyer Moss’ collection?
Where might you wear these clothes?
How do these clothes differ from the other garments you’ve explored throughout this half term?
How can memories of a place influence the clothes we design?
Alice Fox’s graduate fashion collection draws inspiration not only from observation, but also from specific memories of certain places. The fabrics, shapes, and colours she uses are informed by her own memories as well as those of her family, drawn from old photographs.
Watch the video and use the questions below to begin a discussion around Alice Fox’s collection.
Please Note:
This page includes links and videos from external sites, verified at publication but subject to change.
Teachers should review all content for classroom suitability.
Report any issues, and check school firewall settings if videos don’t play.
Alice Fox
Alice Fox is a Fashion Graduate from Norwich University of the Arts.
Her final year collection is inspired by 1960 seaside resorts. Alice’s garments are influenced by old family photos, deckchairs and fairground rides. These items informed the shapes and fabrics used within the collection.
Questions to Ask Children
How does this collection make you feel?
How would you describe the colour palette?
What do you like/dislike about the garments?
Which materials do you think Alice used to make her collection? How/why do you think she made these choices?
Rahul Mishra is a fashion designer based in Delhi. His collections are heavily influenced by traditional Indian craftsmanship, demonstrated by saree-like draped silhouettes and hand-embroidered details that bring history and tradition into modern spaces.
Watch the below video and answer the following questions to begin a discussion around Mishra’s work.
Please Note:
This page includes links and videos from external sites, verified at publication but subject to change.
Teachers should review all content for classroom suitability.
Report any issues, and check school firewall settings if videos don’t play.
Rahul Mishra
Rahul Mishra runs a sustainable couture brand that works with handmade techniques to empower the craftsmen in New Delhi.
Rahul Mishra is the first Indian designer to showcase at the Paris Haute Couture Week.


 It’s important that children feel a sense of ownership with their sketchbooks. Invite children to
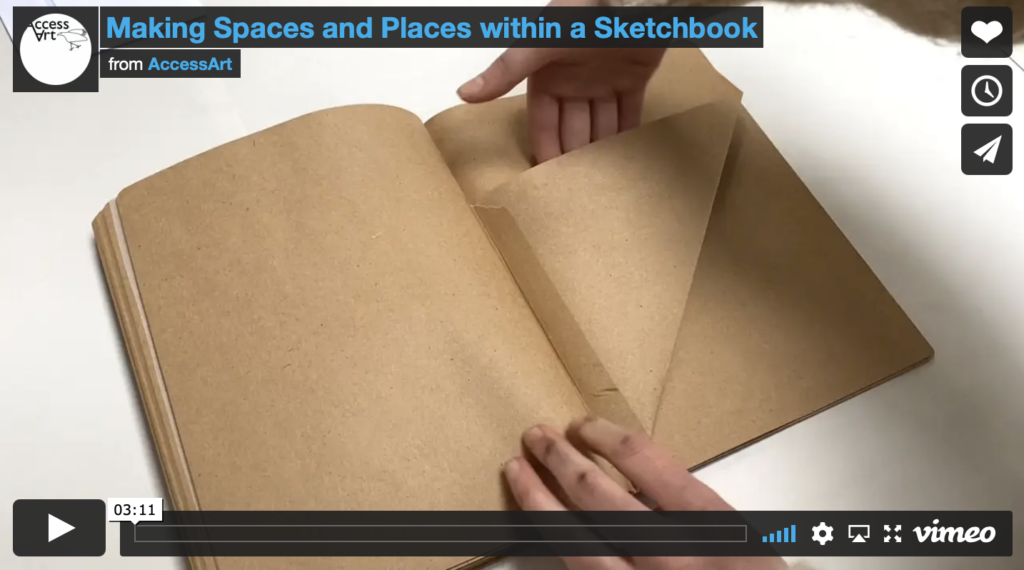 “
“ Start the session by creating a calm meditative environment. Use this exercise to create “
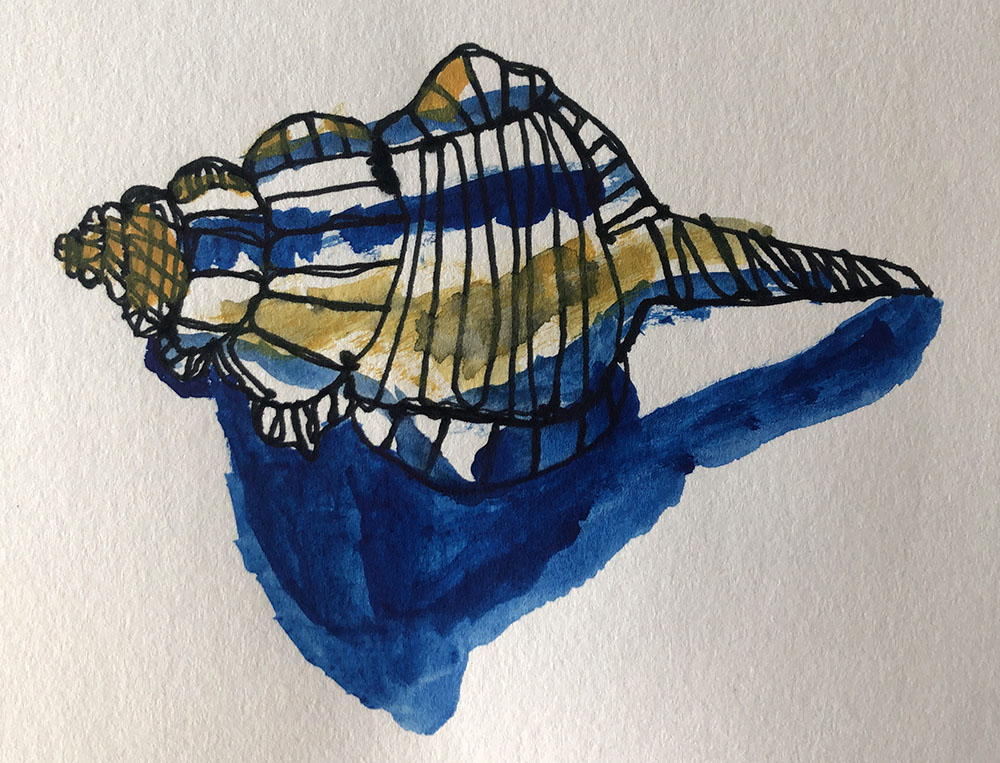 Adapt this resource and experiment with “
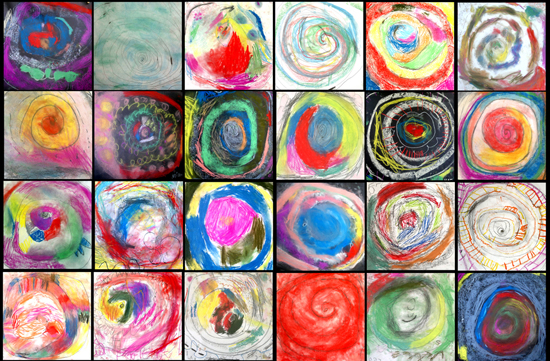


 See how older pupils made zines about things they cared about in the