Pathway for Years 3 & 4
Disciplines: Drawing, Collage, Design
Key Concepts:
-
That the act of making drawings can be mindful.
-
That we can use line, shape and colour to create patterns.
-
That we can use folding, cutting and collage to help us create pattern.
-
That we can create repeated patterns to apply to a range of products or outcomes.
In this pathway, children have the opportunity to explore pattern and develop a range of technical skills and knowledge through drawing and collage.
The pathway also introduces them to the idea that working with pattern can be a mindful activity, and that as humans we respond to patterns made by other people.
This pathway will take approximately half a term, based upon a weekly art lesson.
Medium:
Paper, Pens, Paint
Artists:
Rachel Parker, Shaheen Ahmed, Andy Gilmore, Louise Despont
If you use this resource in your setting, please tag us on social media: #InspiredBy @accessart (facebook, twitter) @accessart.org.uk (instagram) and share the url. Thank you!


Teaching Notes
Find the MTP for this pathway here.
Curriculum Links
History: Focus on patterns from your chosen ancient civilisation.
Maths: Measuring, symmetry, tessellation/repeated patterns, orientation.
Science: Look at patterns in the structure of fruits or plants, reflections and shadows.
Music: Use music and sound when doing mindful drawing as part of this pathway.
I Can…
-
I can relax into making a sensory drawing using a pencil, making marks on the page without having a predefined outcome.
-
I have explored the work of an artist who creates artwork inspired by pattern. I have thought about where we use pattern in our life to make our worlds brighter.
-
I can work in my sketchbooks to explore how I can make drawings inspired by “rules.” I can generate lots of different types of patterns.
-
I can make a tessellated design and think about colour and shape, exploring positive and negative shapes.
or
-
I can explore the work of a surface pattern designer and make my own repeating pattern, exploring colour, shape and composition.
or
-
I can fold paper and use pattern to make an object which other people can respond to.
-
I can present and share my work. I can reflect and share my thoughts with others. I can listen to the reflections of my classmates and feedback on their work.
-
I can take photographs of my work.
Time
This pathway takes 6 weeks, with an hour per week. Shorten or lengthen the suggested pathway according to time and experience. Follow the stages in green for a shorter pathway or less complex journey.
Materials
Soft B pencils, handwriting pen, A2 cartridge paper, rulers, tape, string, coloured paper & card.
Option 1: Making Tessellated Designs – Thin cardboard or stiff paper, pencils, handwriting pens, felt tip pens, scissors, masking tape.
Option 2: Creating Repeated Patterns – Collage papers, A3 cartridge paper, ruler, masking tape, PVA glue, scissors, scanner for digital rendering (optional).
Option 3: Puzzle Purse – 21X21cm squares of card, soft pencils, handwriting pens, felt tip pens, ruler.
Pathway: Exploring Pattern
A PDF of this pathway can be found here.
-
Aims of the Pathway
This pathway aims to enable a mindful approach to working with pattern. Pupils explore how artists and designers use pattern in their own work, and then go on to explore ways in which they can create pattern in a playful way.
- Week 1: Slow Down & Tune In
Making a Sensory Drawing

The aim of the first session is to enable children to quieten and slow down into the process.
Use the “Making a Sensory Drawing” resource as a warm-up, enabling children to make sensory patterns without a theme or subject focus. The emphasis should be on the process not outcome.
The repetitive nature of the exercise will allow the children to not worry about outcome, but will encourage them to make decisions as they go along. Use needles and sharp pencils with a variation of width to create a rhythmic piece.
Work on thicker paper (cartridge or sugar paper is ideal). Work on sheets small enough to be stuck into sketchbooks at a later point.
Spend half an hour on this.
- Look and Talk…
Shaheen Ahmed

Explore the free to access “Talking Points: Shaheen Ahmed” resource to discover an artist who explores patterns, signs and motifs that hold significance to her identity. Use the questions at the bottom of the resource to help guide your class conversation.
- Week 2: Inventing & Exploring
Rules and Resolutions

Use the “Rules and Resolutions” resource to enable children to explore the idea that they can devise their own process criteria to help them make drawings.
Work in sketchbooks and encourage children to collaborate and discuss aims and outcomes.
- Week 3, 4 & 5: Find your focus
Explore Tessellations, Surface Pattern or Puzzle Purses
For the next three weeks work on one of the projects below. Intersperse the projects by looking at the work of the artists below to help inspire your journey.
- Option One
Making a Tessellated Design

Explore working in colour and making patterns which fit together over and over again by using the “Making Tessellated Designs” resource.
This activity links really well with maths. Begin by asking them to invent a shape. Push them further by asking them to look at an object and try to create a shape inspired by it.
Use the project to explore colour. What happens when they make a tessellated design using complimentary colours? How many colours do they need? How does the design change if they use cold colours, or warm colours?
Use sketchbooks to test colours and refine tessellation design, and then make final outcomes on larger sheets of cartridge or sugar paper.
- Explore an Artist
Explore Andy Gilmore

Use the free to access “Talking Points: Andy Gilmore” resource to explore the work of an artist inspired by repeated shape and pattern. See where Andy finds inspiration. Remember, pupils are not aiming to reproduce Andy’s work – just introduce the artist to the children and build their creative thinking, visual literacy and oracy skills through conversation.
-
Or…
- Option Two
Explore Surface Design with Rachel Parker

Explore the work of surface pattern designer Rachel Parker.
-
Make A Repeat Pattern

Use the “Creating Repeated Patterns” resource to enable pupils to think about colours and shapes, and the relationship between these components to create an overall balanced pattern. Using collage allows them to make these creative decisions as they work.
Get children to think about where they find patterns, what are they used for? Make it known that children can grow up to make patterns for a living if they enjoy the process.
Have their sketchbook open and ask them to make notes about their decision making, with swatches and thoughts as they go along.
For the second part of this session children will get the opportunity to scan their pattern into the computer and create a repeat pattern using a Word Document or an equivalent editing software.
-
Or…
- Option 3
Making a Puzzle Purse

Use the “Making a Puzzle Purse Part One” resource to show children how to make an origami puzzle purse.
- Explore an Artist
Louise Despont

Explore the work of an artist who makes meditative drawings through pattern with the free to access “Talking Points: Louise Despont“. Use the conversation to highlight to children how the act and outcome of drawing can help with feeling calm and in the moment.
-
Making a Puzzle Purse Part Two

Adapt the “Making a Puzzle Purse Part Two” resource, focusing on pattern rather than narrative. Explore colour, line, and shape to create patterns within the puzzle purse. Use the folded geometric structure to help inspire pattern making.
- Week 6: Reflect & Discuss
Present, Talk, Share and Celebrate

End the pathway by taking time to appreciate the developmental stages and the final outcomes in a clear space.
Invite children to display the work in a way that best suits the project, have open sketchbooks. Use the “Crit in the Classroom” resource to help you.
Have children use tablets or cameras to take photographs of the work.
Encourage children to reflect upon all stages of the journey, and reference the artists studied.
See This Pathway Used in Schools…


If You Use AccessArt Resources…
You might like to…
Join our Facebook Group

Join the AccessArt Network group on Facebook and ask questions of others using our resources
Share and Tag

Share photos of work made by tagging us on social media
You May Also Like…
Making Ruler Drawings

Use a straight edge to explore how you can find freedom by applying simple rules to your drawing
Explore Paper weaving

Explore different methods for paper weaving
Making Stronger Drawings

If children in your class struggle with making confident drawings try this warm-up/intervention exercise
Pattern and Collage


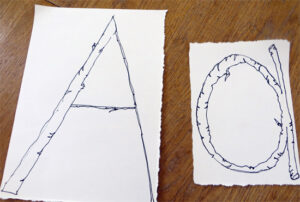


 2016 construction with found twigs 27 x 27 x 3\" by Chris Kenny")


 Introduce pupils to the technique of mono printing with ink. Watch this video on


 Date: probably 1613 Medium: Oil on wood Dimensions: 33 1/2 x 24 5/8 in. (85.1 x 62.5 cm) Classification: Paintings Credit Line: Purchase, 1871")

 Date: 1683 Medium: Oil on canvas Dimensions: 74 7/8 x 53 in. (190.2 x 134.6 cm) Classification: Paintings Credit Line: Gift of Samuel H. Kress, 1927 Accession Number: 27.250.1")
 Date: 1628 Medium: Oil on wood Dimensions: 9 1/2 x 14 1/8 in. (24.1 x 35.9 cm) Classification: Paintings Credit Line: Rogers Fund, 1949 Accession Number: 49.107")